
利用 Hugo 與 Vercel 建立個人網頁
如果想建立自己的個人網站來整理筆記或分享技術文章,靜態網站生成器會是一個不錯的選擇。這篇文章將介紹如何使用 Hugo 建立靜態網站,並透過 Vercel 進行部署,從環境安裝到 SEO 設定一步一步完成整個網站架設流程。
文章中所有以 <> 框起的指令需被替換,若無特別說明則可以自行命名
Hugo
Hugo 是基於 Go 語言開發的靜態網站生成器,號稱是世界上最快的網站建構工具之一。除了生成網頁的速度極快,Hugo 也有許多主題可供選擇,並支援實時渲染、多語系切換的功能,可以優化文章的寫作與網站架設的體驗。下方為比較 Hugo 和 Hexo 兩種靜態網站生成器的表格:
| 功能 | Hugo | Hexo |
|---|---|---|
| 程式語言 | Go | Node.js |
| 速度 | 非常快 | 中等 |
| 主題 / 插件 | 多 | 非常多 |
| 內容格式 | Markdown、HTML 等 | Markdown、HTML 等 |
| 學習難度 | 中等 | 適合初學者 |
| 依賴性 | 無 | 需要 Node.js |
| 搜尋引擎優化 | 內建支援 | 需要透過插件 |
| 多語言支援 | 有 | 有 |
安裝 Hugo
由於 Hugo 並未提供 GUI,因此需要由終端機安裝,以下是 Hugo 官方提供在不同系統下的 安裝方法:
Windows
1
choco install hugo-extended
macOS
1
brew install hugo
Linux
1
sudo snap install hugo
在安裝完成後使用以下指令測試 Hugo 是否安裝成功:
1 | hugo version |
安裝 Git
至 Git 官網下載安裝。
初始化環境
選擇網頁存放的資料夾,並輸入以下指令新增網頁:
1 | hugo new site <site_name> |
完成後會在 <site_name> 資料夾中生成以下的檔案:
1 | ├── archetypes |
為了方便推送到 GitHub,我們先進入剛剛生成的資料夾初始化整個 Git 儲存庫:
1 | cd <site_name> |
選擇主題
在 Hugo Themes 中有提供許多類型的主題,可以依個人喜好挑選,這裡我選擇 Stack 主題作為範例。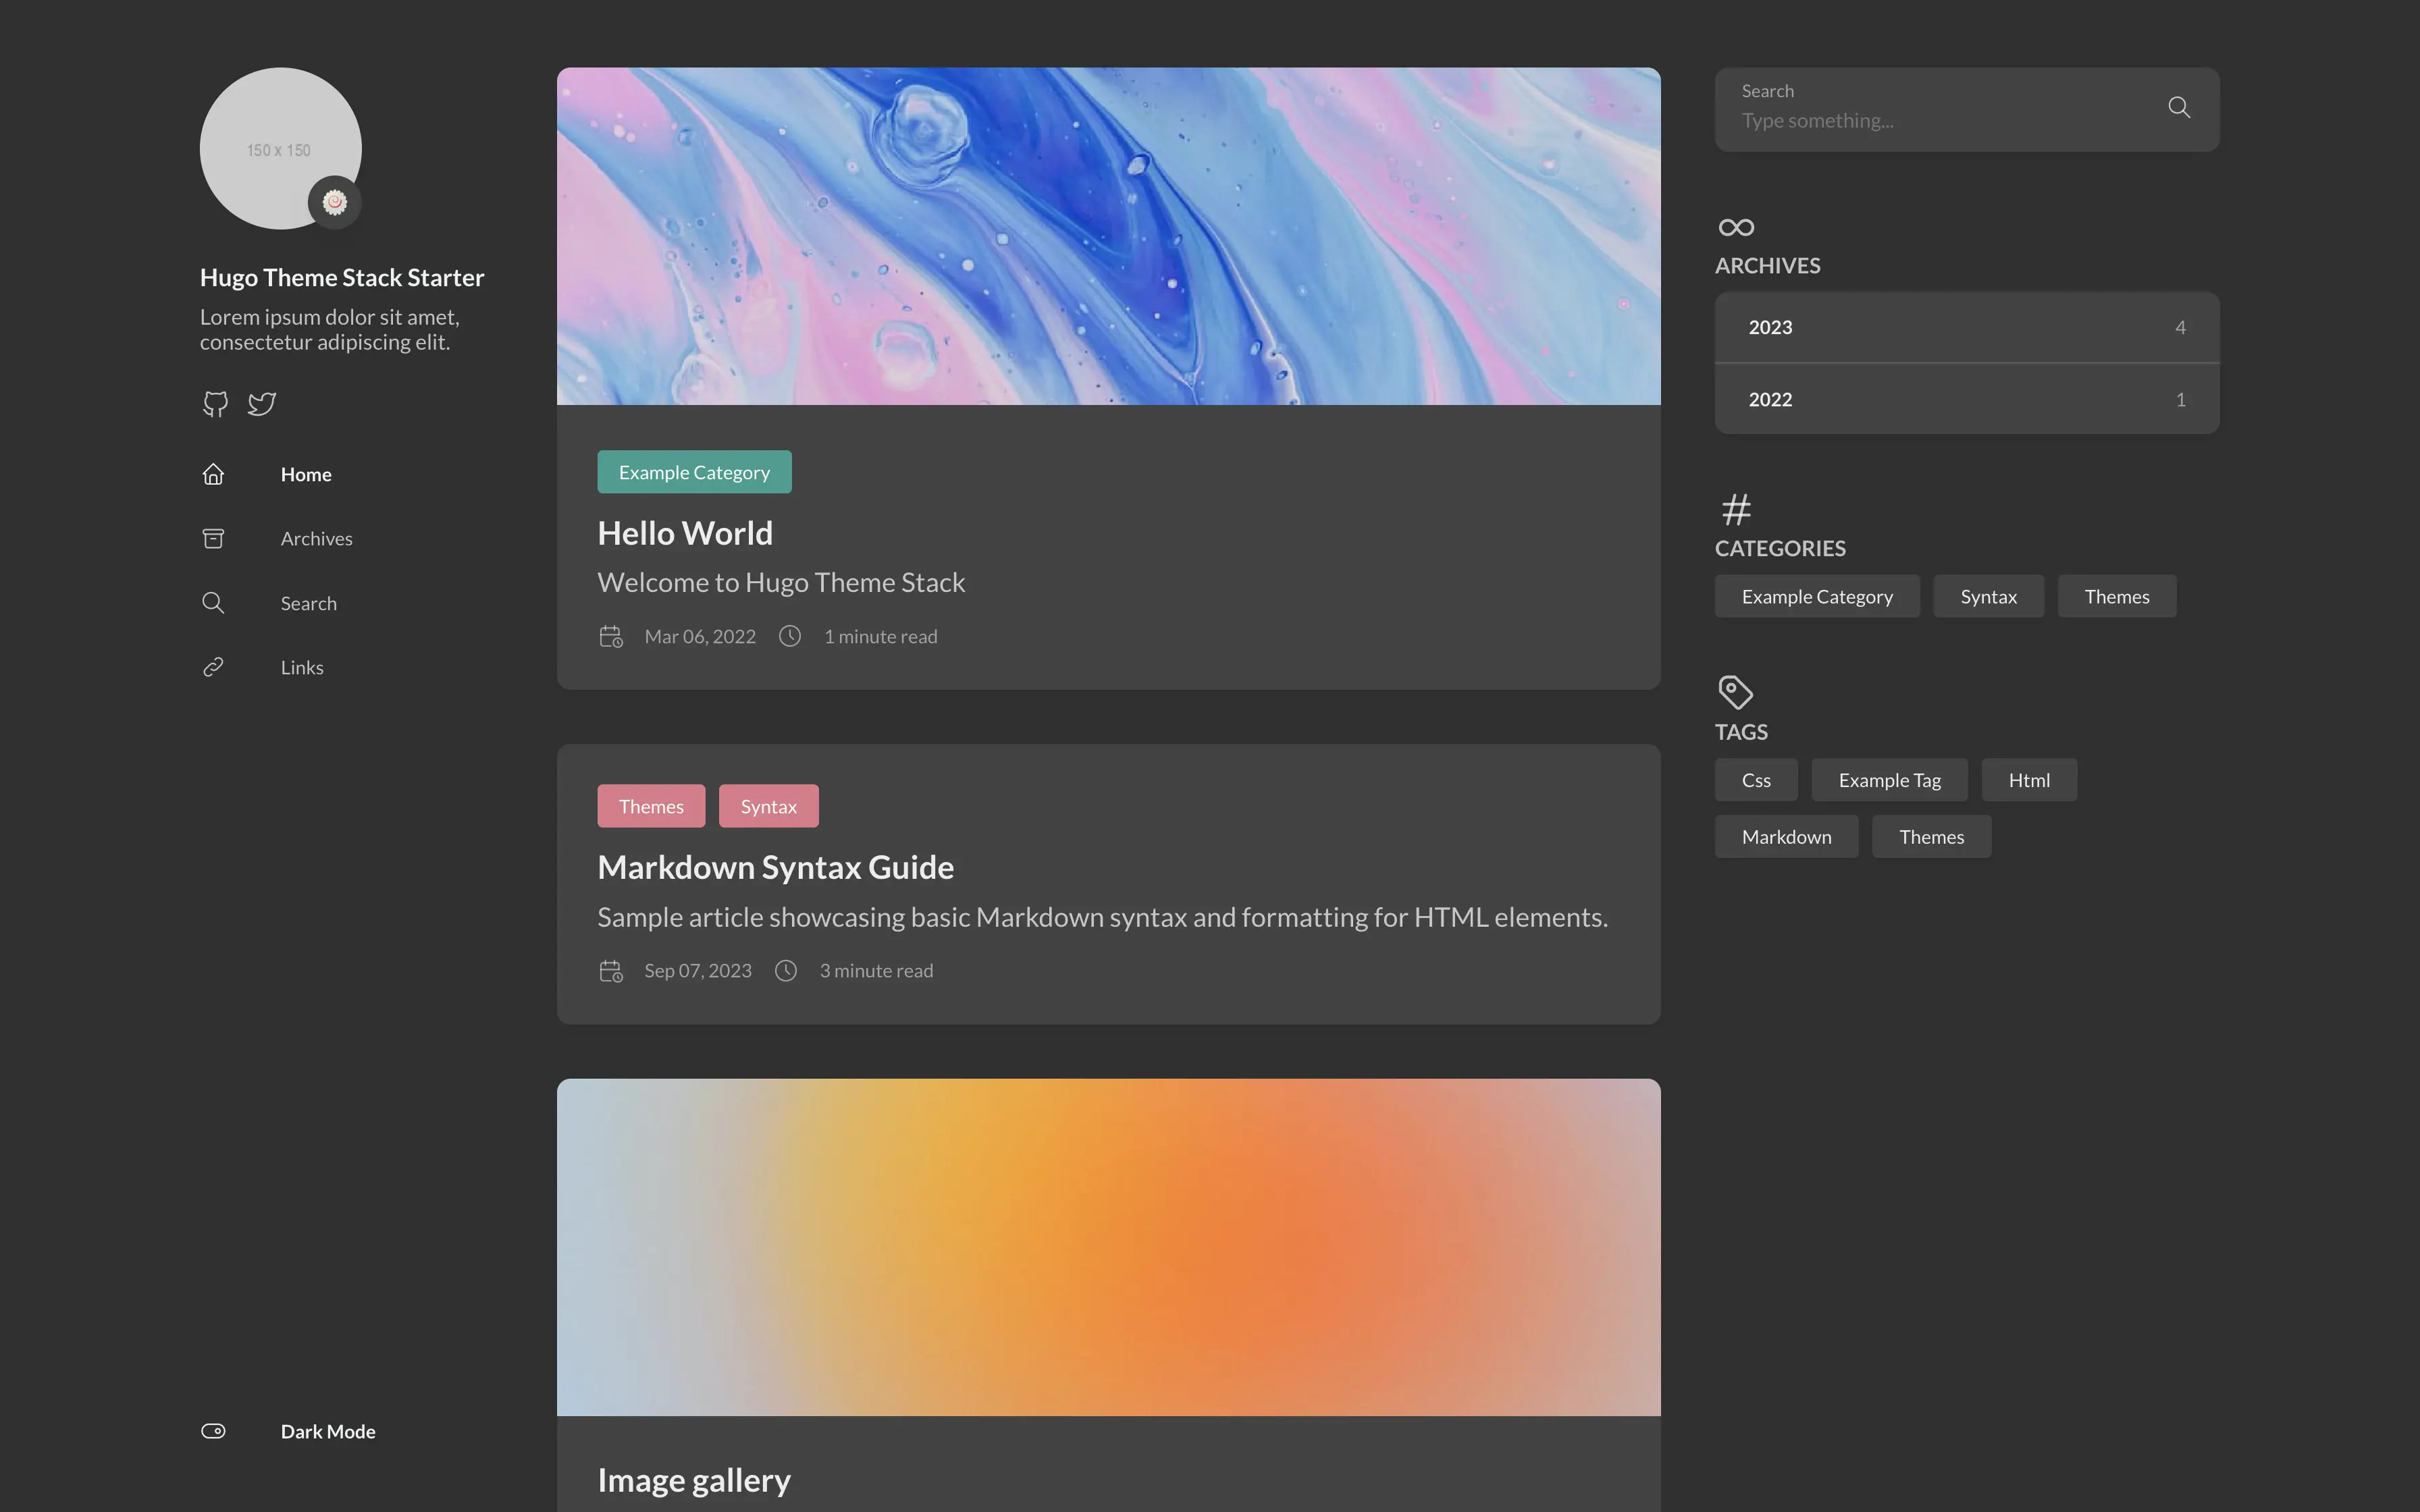
- 在網站的根目錄中打開終端機,利用
git submodule將主題下載至themes資料夾中:1
git submodule add https://github.com/CaiJimmy/hugo-theme-stack/ themes/hugo-theme-stack
- 刪除
hugo.toml檔案並將themes/hugo-theme-stack中的config.yaml複製到根目錄中,在此檔案的最上方加入以下內容:1
2
3
4
5
6baseurl: https://example.com
languageCode: zh-tw
theme: hugo-theme-stack
pagination:
pagerSize: 5
title: <blog_title> - 其他設定可以參考 Stack 官方提供的 Config 依個人喜好修改:
網站 icon 設定
將favicon.ico置於static的資料夾中,並在config.yaml修改以下內容:1
2params:
favicon: favicon.ico側邊欄設定
- 將自己的大頭貼
avatar.webp置於assets/img資料夾中(若無則自行新增),並在config.yaml修改以下內容:1
2
3
4
5
6
7
8
9params:
sidebar:
compact: false
emoji:
subtitle: <subtitle>
avatar:
enabled: true
local: true
src: img/avatar.webp - 在副標題下方可以加上連結提供導向至自己的 GitHub 等網站,在
config.yaml最下方新增以下內容:1
2
3
4
5
6
7menu:
social:
- identifier: github
name: GitHub
url: <github_link>
params:
icon: brand-github - 若要新增導覽列則可參考
themes/hugo-theme-stack/exampleSite中的檔案內容與架構,修改後content資料夾中的檔案架構將如下所示:1
2
3
4
5
6
7
8
9
10
11
12├── _index.md
├── categories
├── page
│ ├── about
│ │ └── index.md
│ ├── archives
│ │ └── index.md
│ ├── links
│ │ └── index.md
│ └── search
│ └── index.md
└── post
- 將自己的大頭貼
文章設定
修改以下config.yaml的內容讓文章可以支援 LaTeX,並加上目錄、閱讀時長、預設 CC 授權等內容:1
2
3
4
5
6
7
8params:
article:
math: true
toc: true
readingTime: true
license:
enabled: true
default: CC BY-NC-SA 4.0留言設定
至 Disqus 建立新帳戶,並創建新的 site,從設定中查詢 shortname。
修改以下
config.yaml的內容以增加留言功能(將<shortname>替換為 Disqus 設定中的 shortname):1
2
3
4
5
6
7
8
9
10
11
12disqusShortname: <shortname>
params:
comments:
enabled: true
provider: disqus
disqusjs:
shortname: <shortname>
apiUrl:
apiKey:
admin:
adminLabel:
widget 設定
修改以下config.yaml的內容使主頁及文章中顯示搜尋、目錄等小工具:1
2
3
4
5
6
7
8
9
10
11
12
13params:
widgets:
homepage:
- type: search
- type: categories
params:
limit: 10
- type: tag-cloud
params:
limit: 10
page:
- type: search
- type: toczh-tw 用詞設定
將themes/hugo-theme-stack/i18n中的zh-tw.yaml複製到i18n資料夾中,並依需求更改:1
2
3
4toggleMenu:
other: 切換選單
darkMode:
other: 深色模式
撰寫文章
Hugo 需要使用 Markdown 語法來撰寫文章,這裡採用的方法是為每篇文章都建立一個資料夾,以方便整理資源。
在
content/post的資料夾中新增一個以新文章名稱命名的資料夾(盡量使用英文,字與字間不要有空格)。在資料夾中新增
index.md的檔案,content/post資料夾中的檔案架構如下所示:1
2
3
4├── myPost
│ └── index.md
└── myPost2
└── index.md利用 Visual Studio Code 等文字編輯器編輯
index.md,以下為基本的檔案內容(除文章屬性架構外皆可進行修改):1
2
3
4
5
6
7
8
9
10
11
12
13
14---
title: myPost
slug: my-post
date: 2024-05-20
description: My first post
categories:
- Blog
tags:
- First
---
## Hugo Blog
content
預覽 Hugo 網頁
透過內建的網頁即時預覽功能,可以讓我們了解網頁目前的內容。
- 在終端機中輸入以下指令:
1
hugo server -D
- 若網頁沒有錯誤,終端機會顯示以下內容:
1
2
3
4Serving pages from disk
Running in Fast Render Mode. For full rebuilds on change: hugo server --disableFastRender
Web Server is available at http://localhost:1313/ (bind address 127.0.0.1)
Press Ctrl+C to stop - 在瀏覽器中連上
http://localhost:1313/即可預覽目前的網頁。
推送至 GitHub
為了接下來的網頁部署,需要將剛剛所生成的網頁推送到 GitHub 上,具體步驟如下:
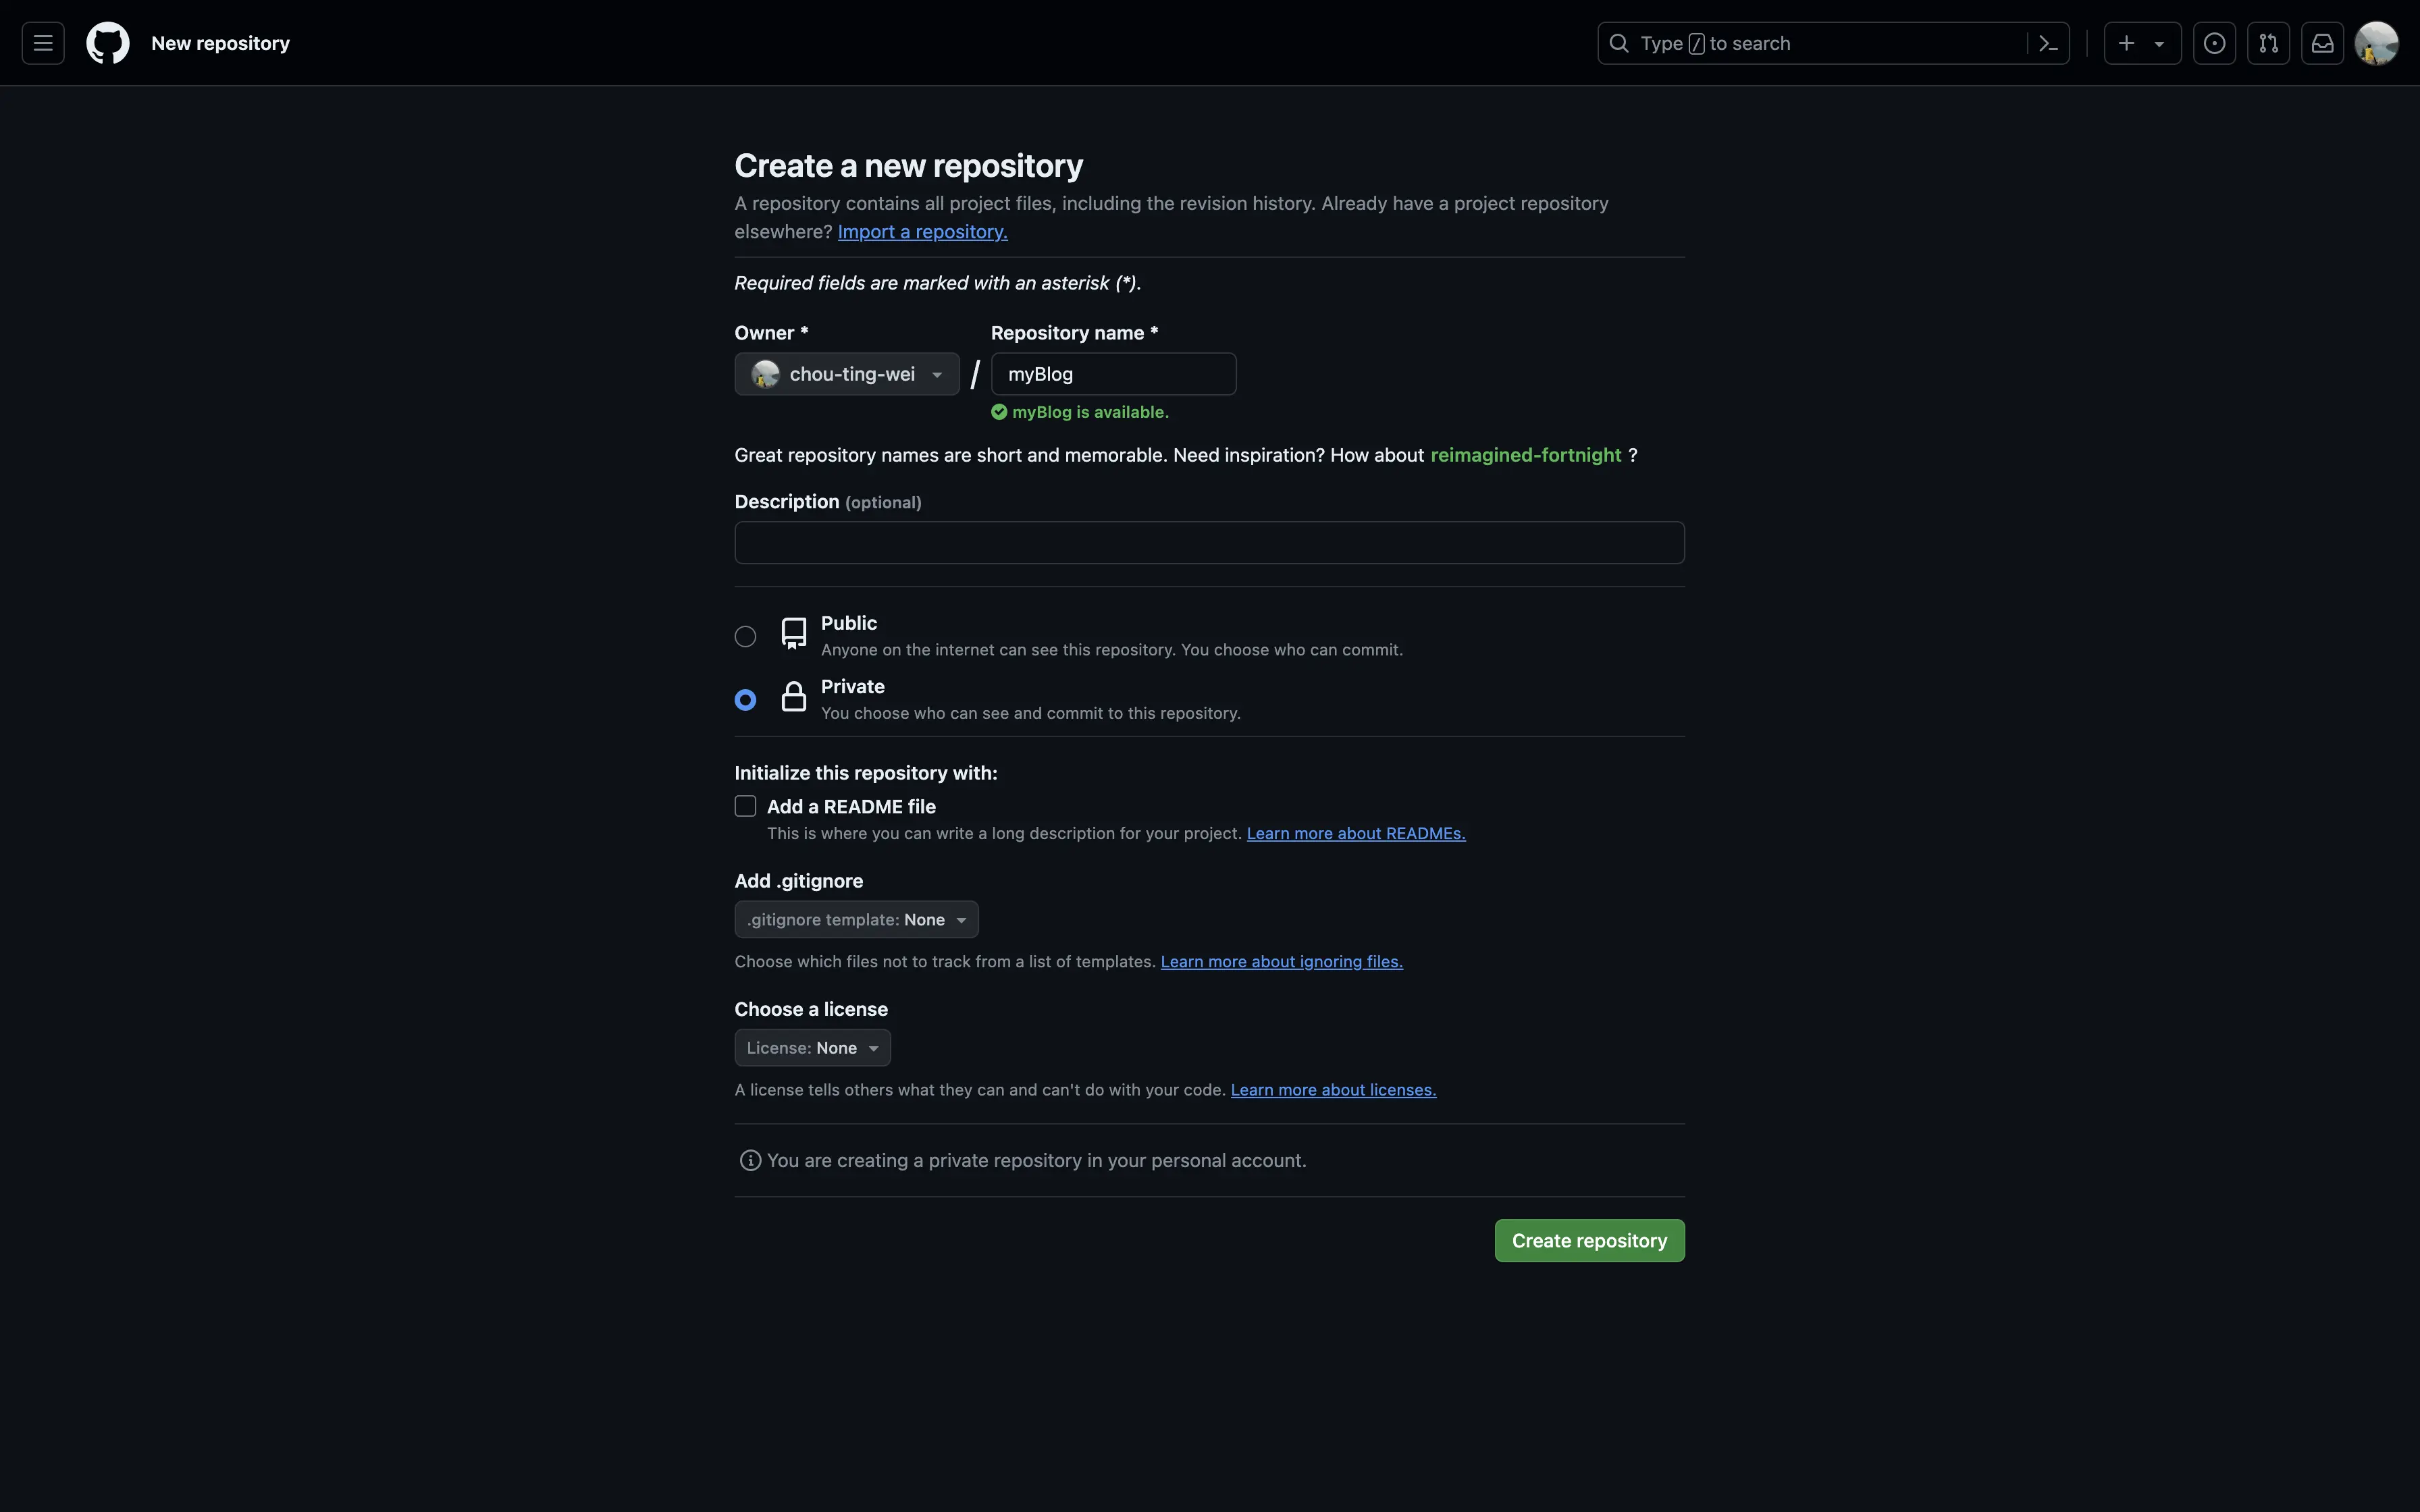
- 在 GitHub 上新開一個儲存庫,並將權限設為私人(Private),其餘設定皆保持原狀。
- 在根目錄中建立
.gitignore檔案,檔案內容如下:1
2
3
4public
resources
assets/jsconfig.json
.hugo_build.lock - 複製頁面上儲存庫的網址
https://github.com/xxx/xxx.git,並在根目錄中執行以下指令(<repo_link>需替換成儲存庫的網址),將全部檔案推送到 GitHub 儲存庫中:1
2
3
4
5git add .
git commit -m "first commit"
git branch -M main
git remote add origin <repo_link>
git push -u origin main
Vercel
Vercel 是一個提供網頁的託管服務的平台,類似於 GitHub Pages 但更為強大、快速。另外 Vercel 也可以在有新的 Git 推送時自動化部署新的網頁,並每月提供 100GB 的免費流量,對小型網站架設是一大福音。下方表格為幾個常見網頁託管平台的比較:
| 功能 | Vercel | Netlify | GitHub Pages |
|---|---|---|---|
| 最適用於 | Next.js 應用 | 靜態網站 | 靜態網站 |
| 部署來源 | GitHub、GitLab、Bitbucket | GitHub、GitLab、Bitbucket | 僅限 GitHub |
| 建構速度 | 極快 | 快 | 較慢 |
| 頻寬限制 | 每月 100GB(免費方案) | 每月 100GB(免費方案) | 無限制 |
| 可靠性保證 | 99.99% | 99.99% | 無 |
| 分析工具 | 內建 | 內建 | 無 |
部署網站
- 至 Vercel 官網以 GitHub 登入。
- 選擇
Add New >> Project,並於左側列表選擇剛剛設定好的 Git Repository。 - 將
Framework Preset設為Hugo,並點擊展開Environment Variables加入HUGO_VERSION與本地端使用的版本(可使用hugo version指令查詢):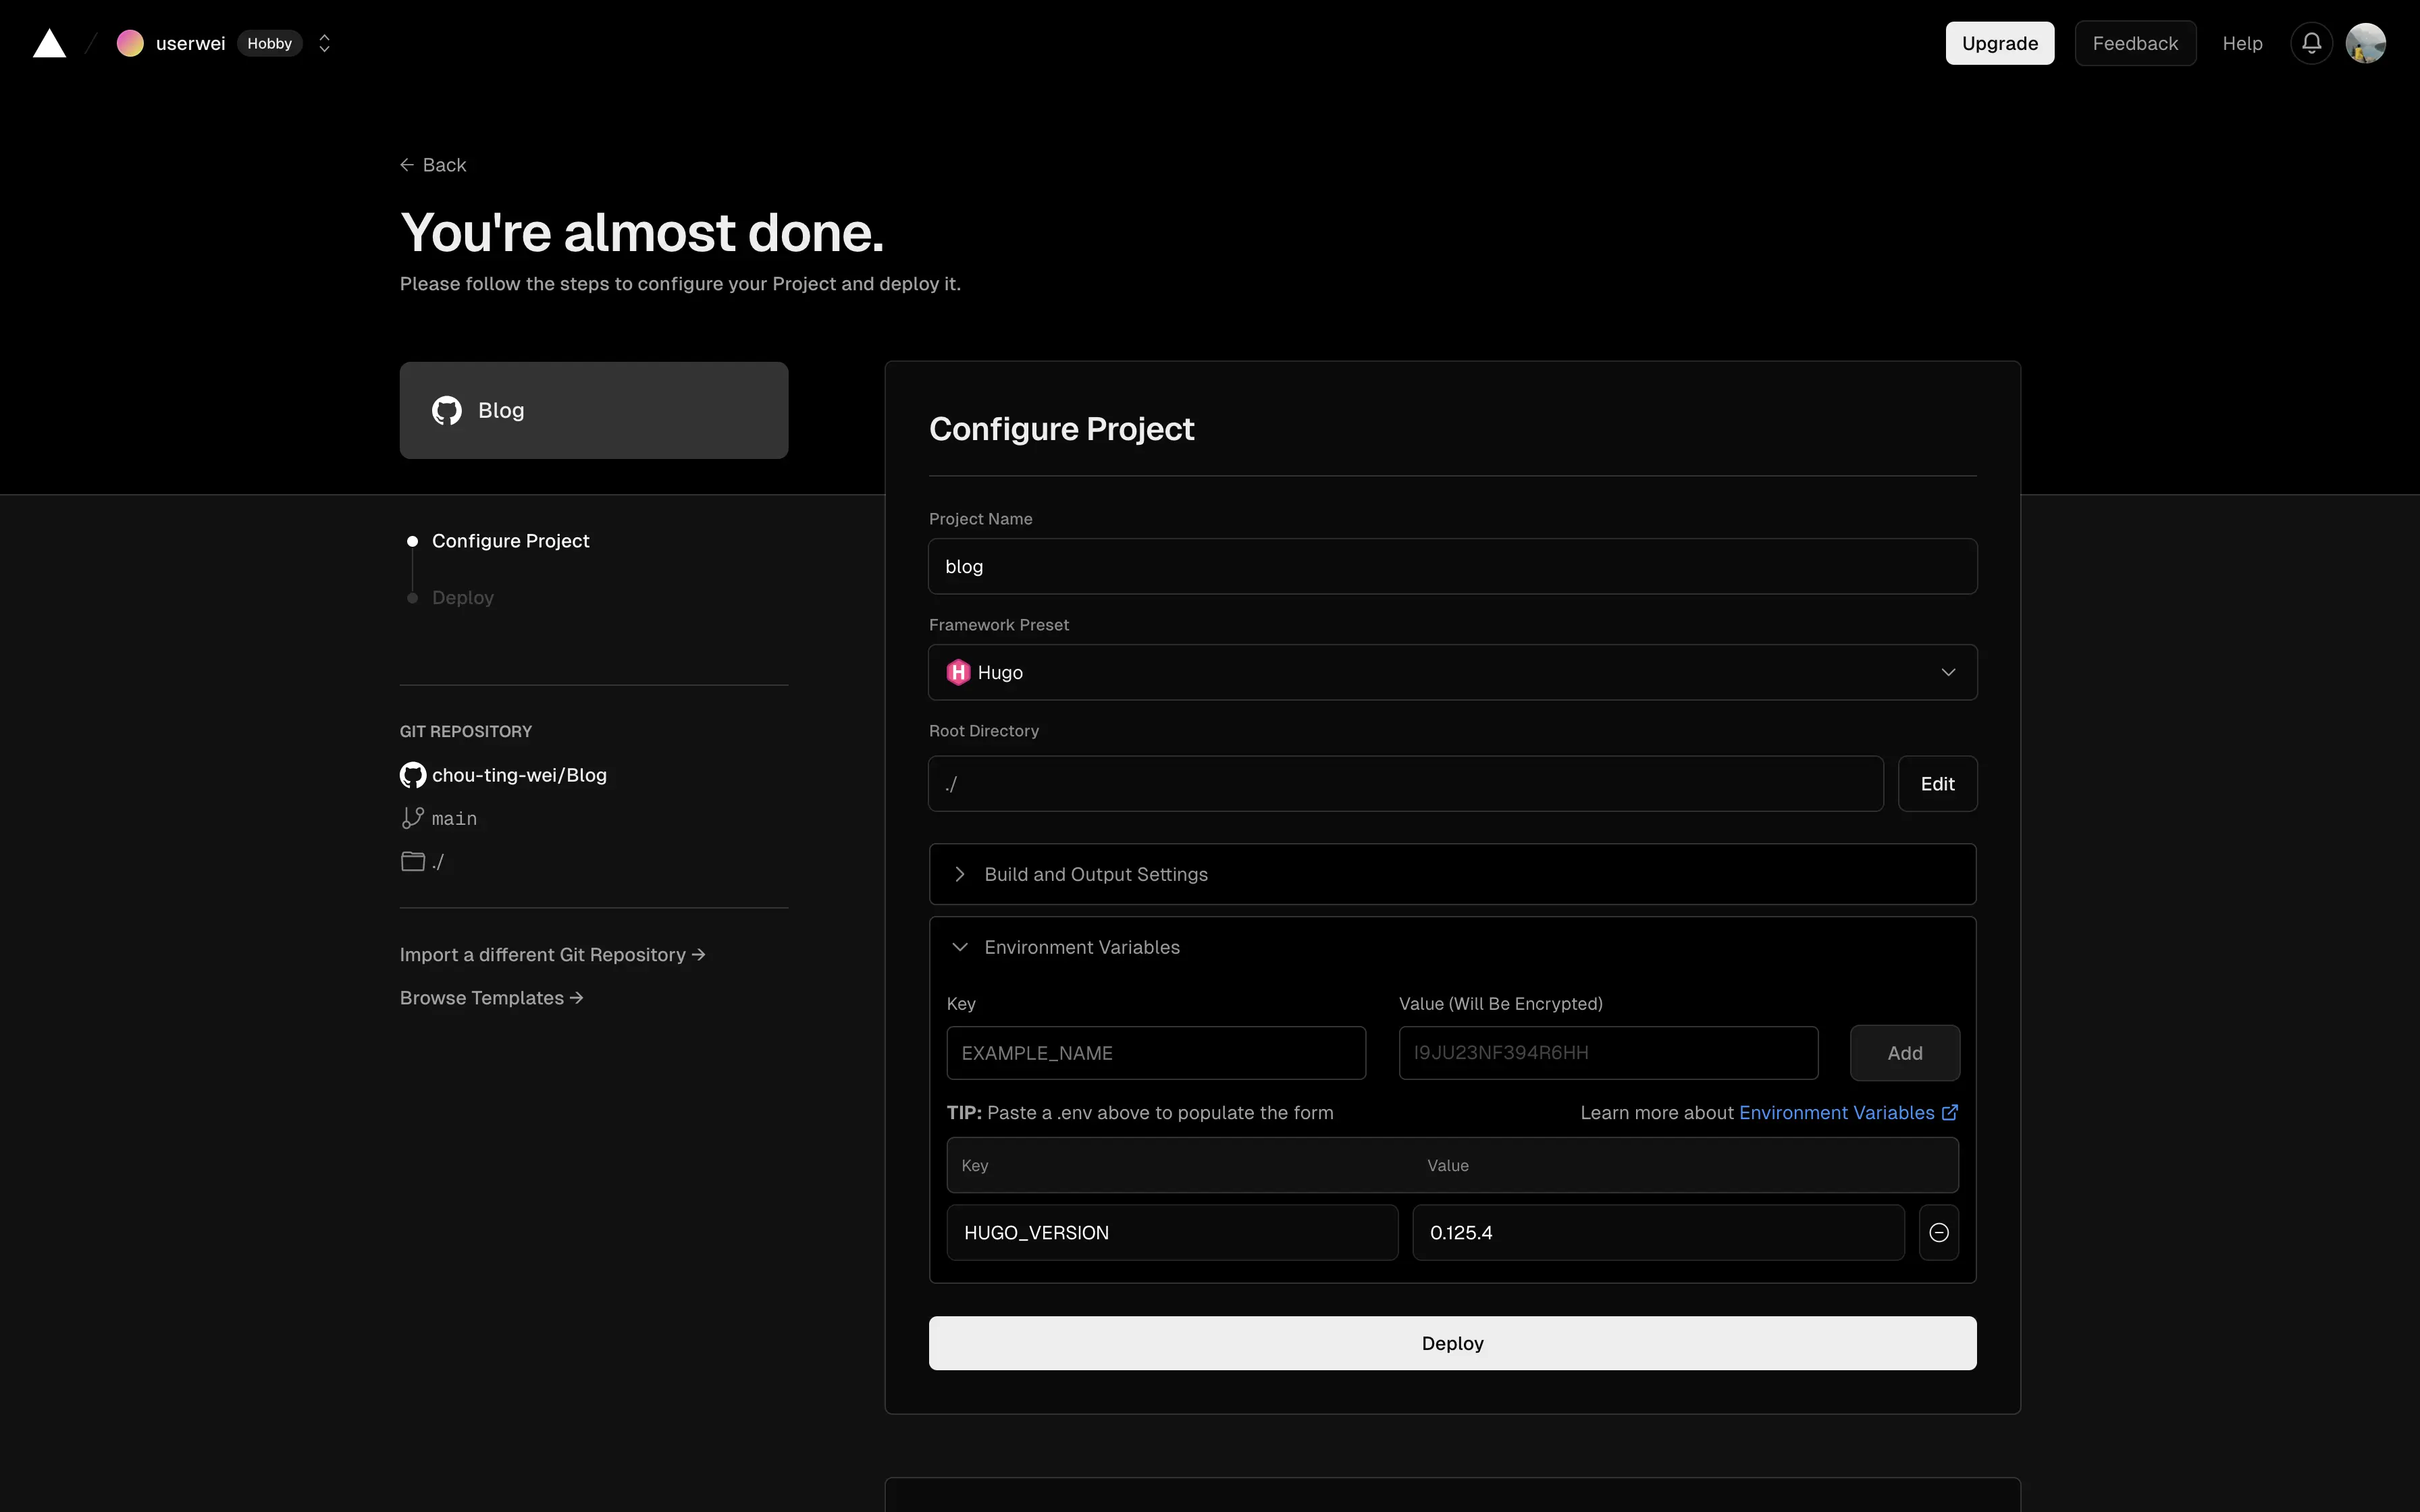
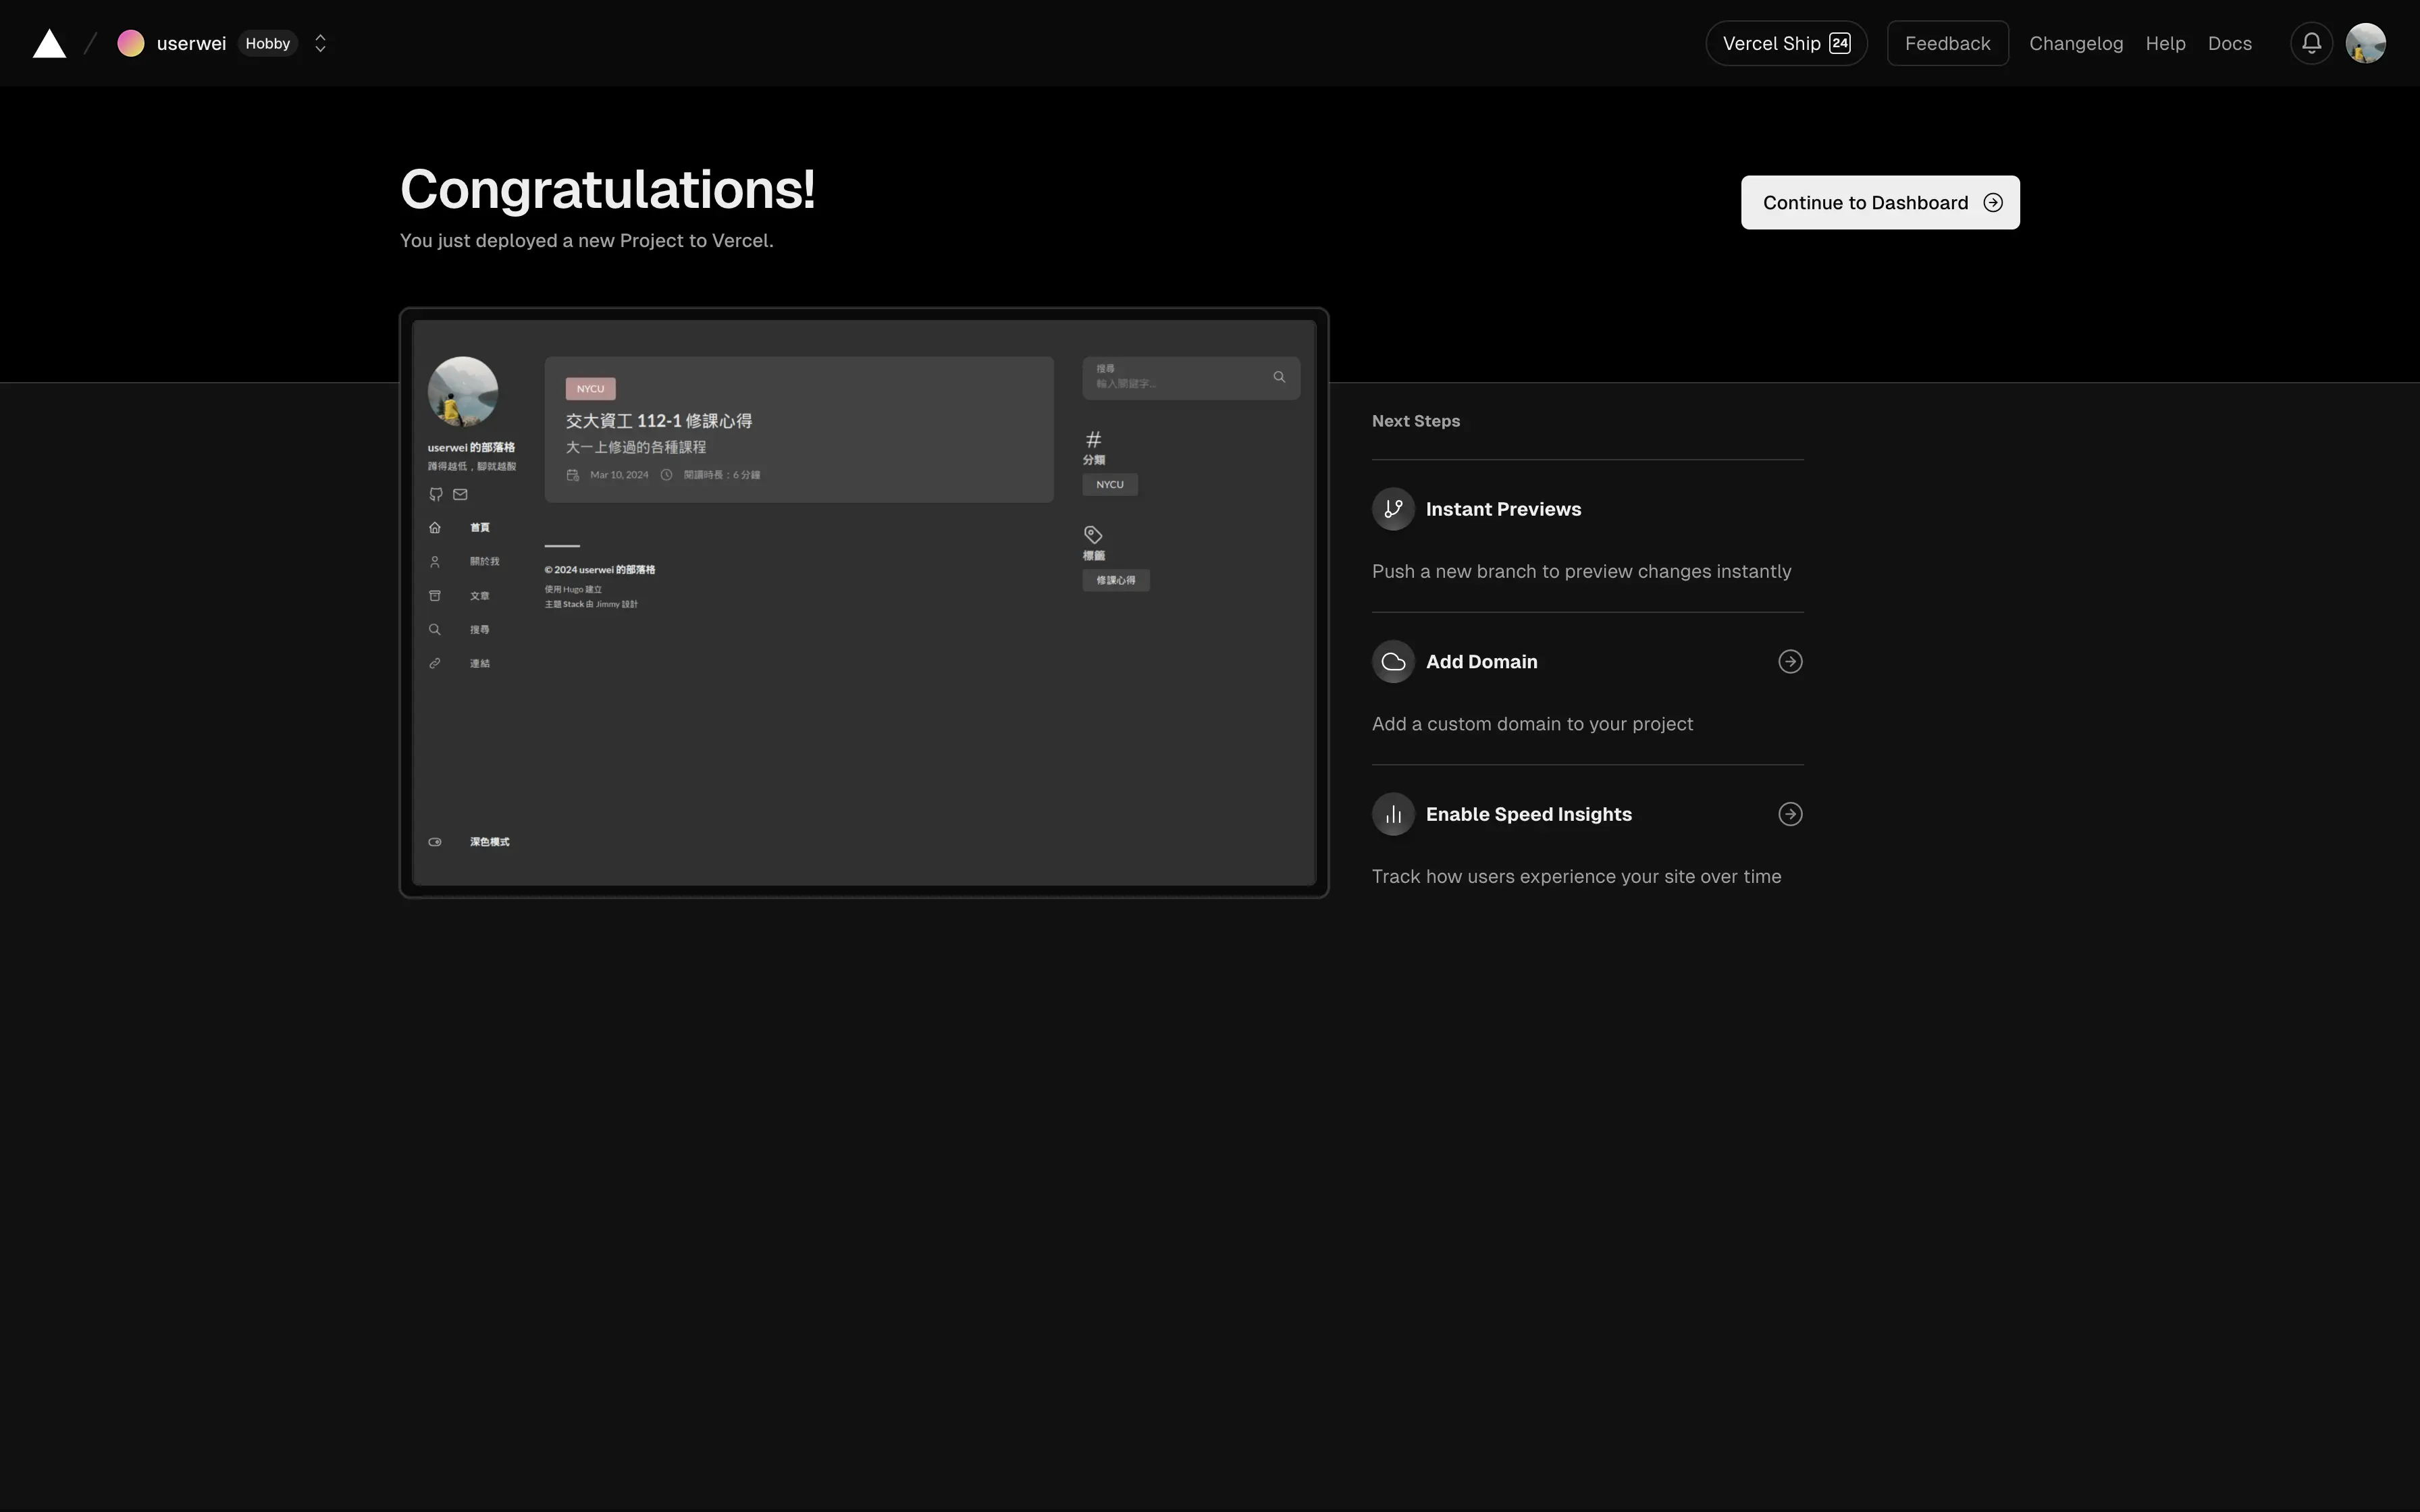
- 若看到以下畫面即完成網頁的部署。
連結域名
在後台中可以看到 Vercel 為剛剛部署的網頁提供了一個 xxx.vercel.app 網址,如果想更改為其他的自訂網址,則需要自行取得並連結域名。
- 從 Cloudflare、Namecheap、GoDaddy 等網域註冊商取得一個域名。
- 將
config.yaml中的baseurl更改為取得的域名https://www.xxx.com:1
baseurl: <domain_name>
- 進入後台
Settings >> Domains加入取得的域名,選擇推薦的加入方式。加入後會顯示以下畫面: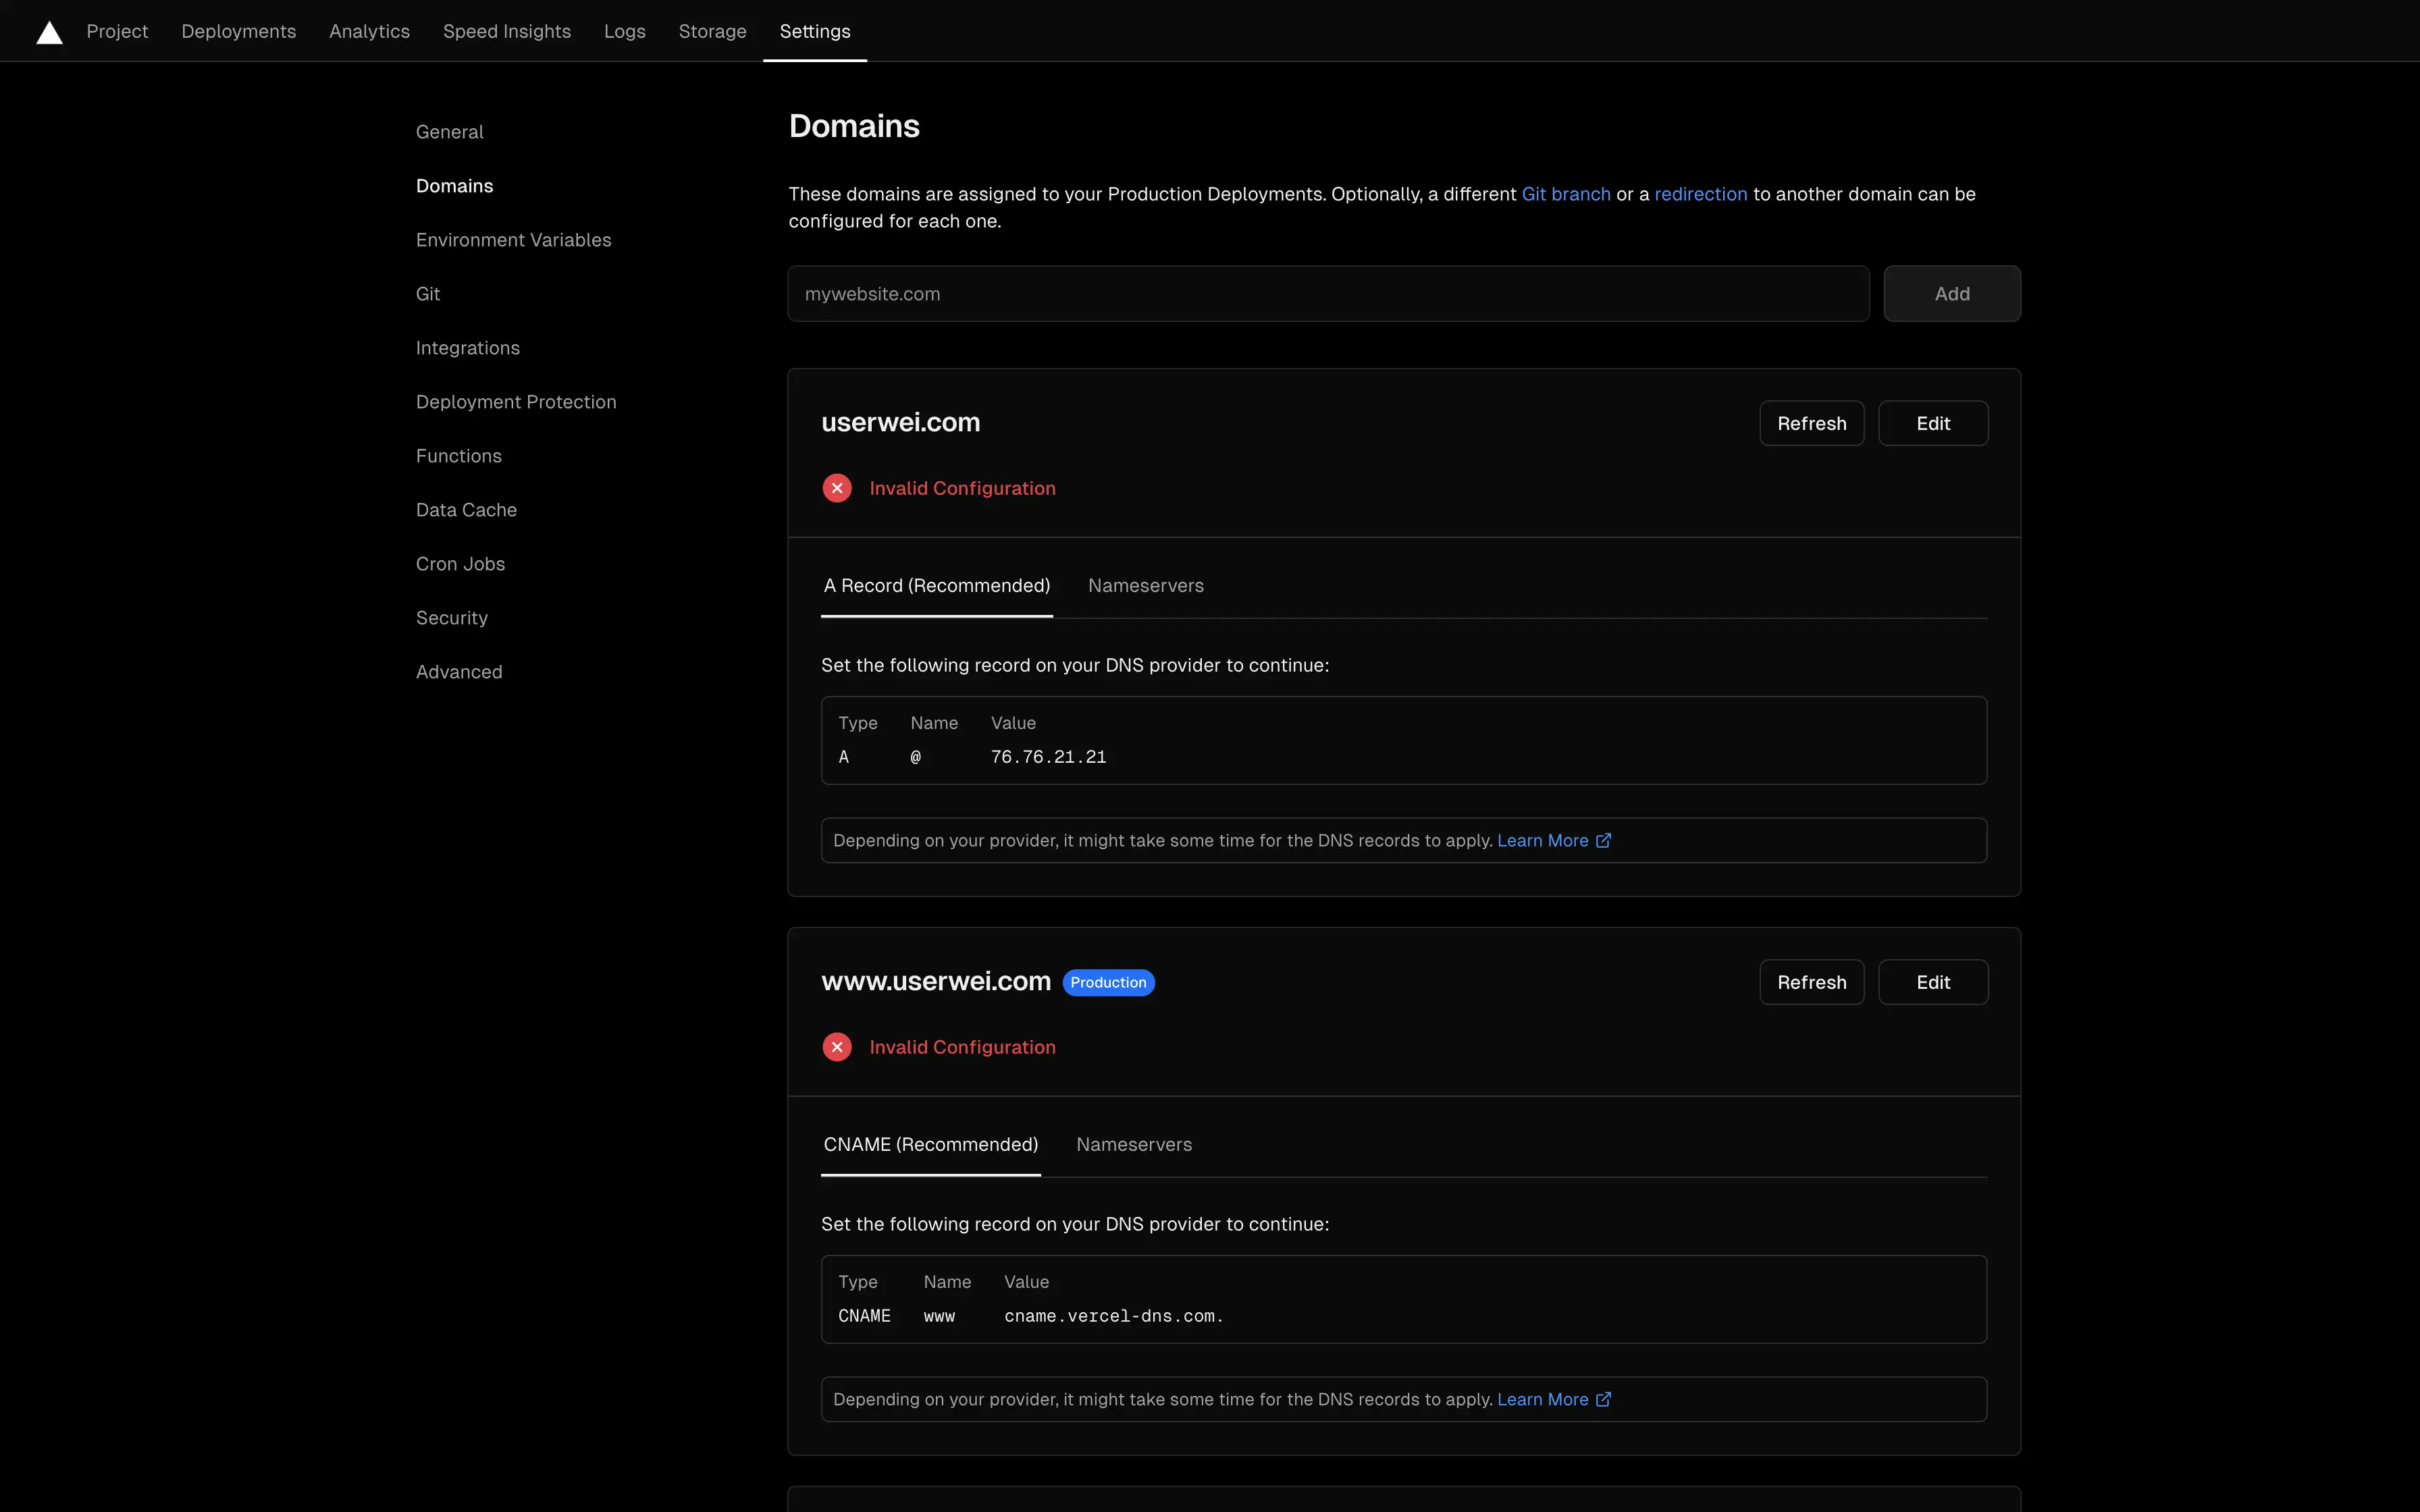
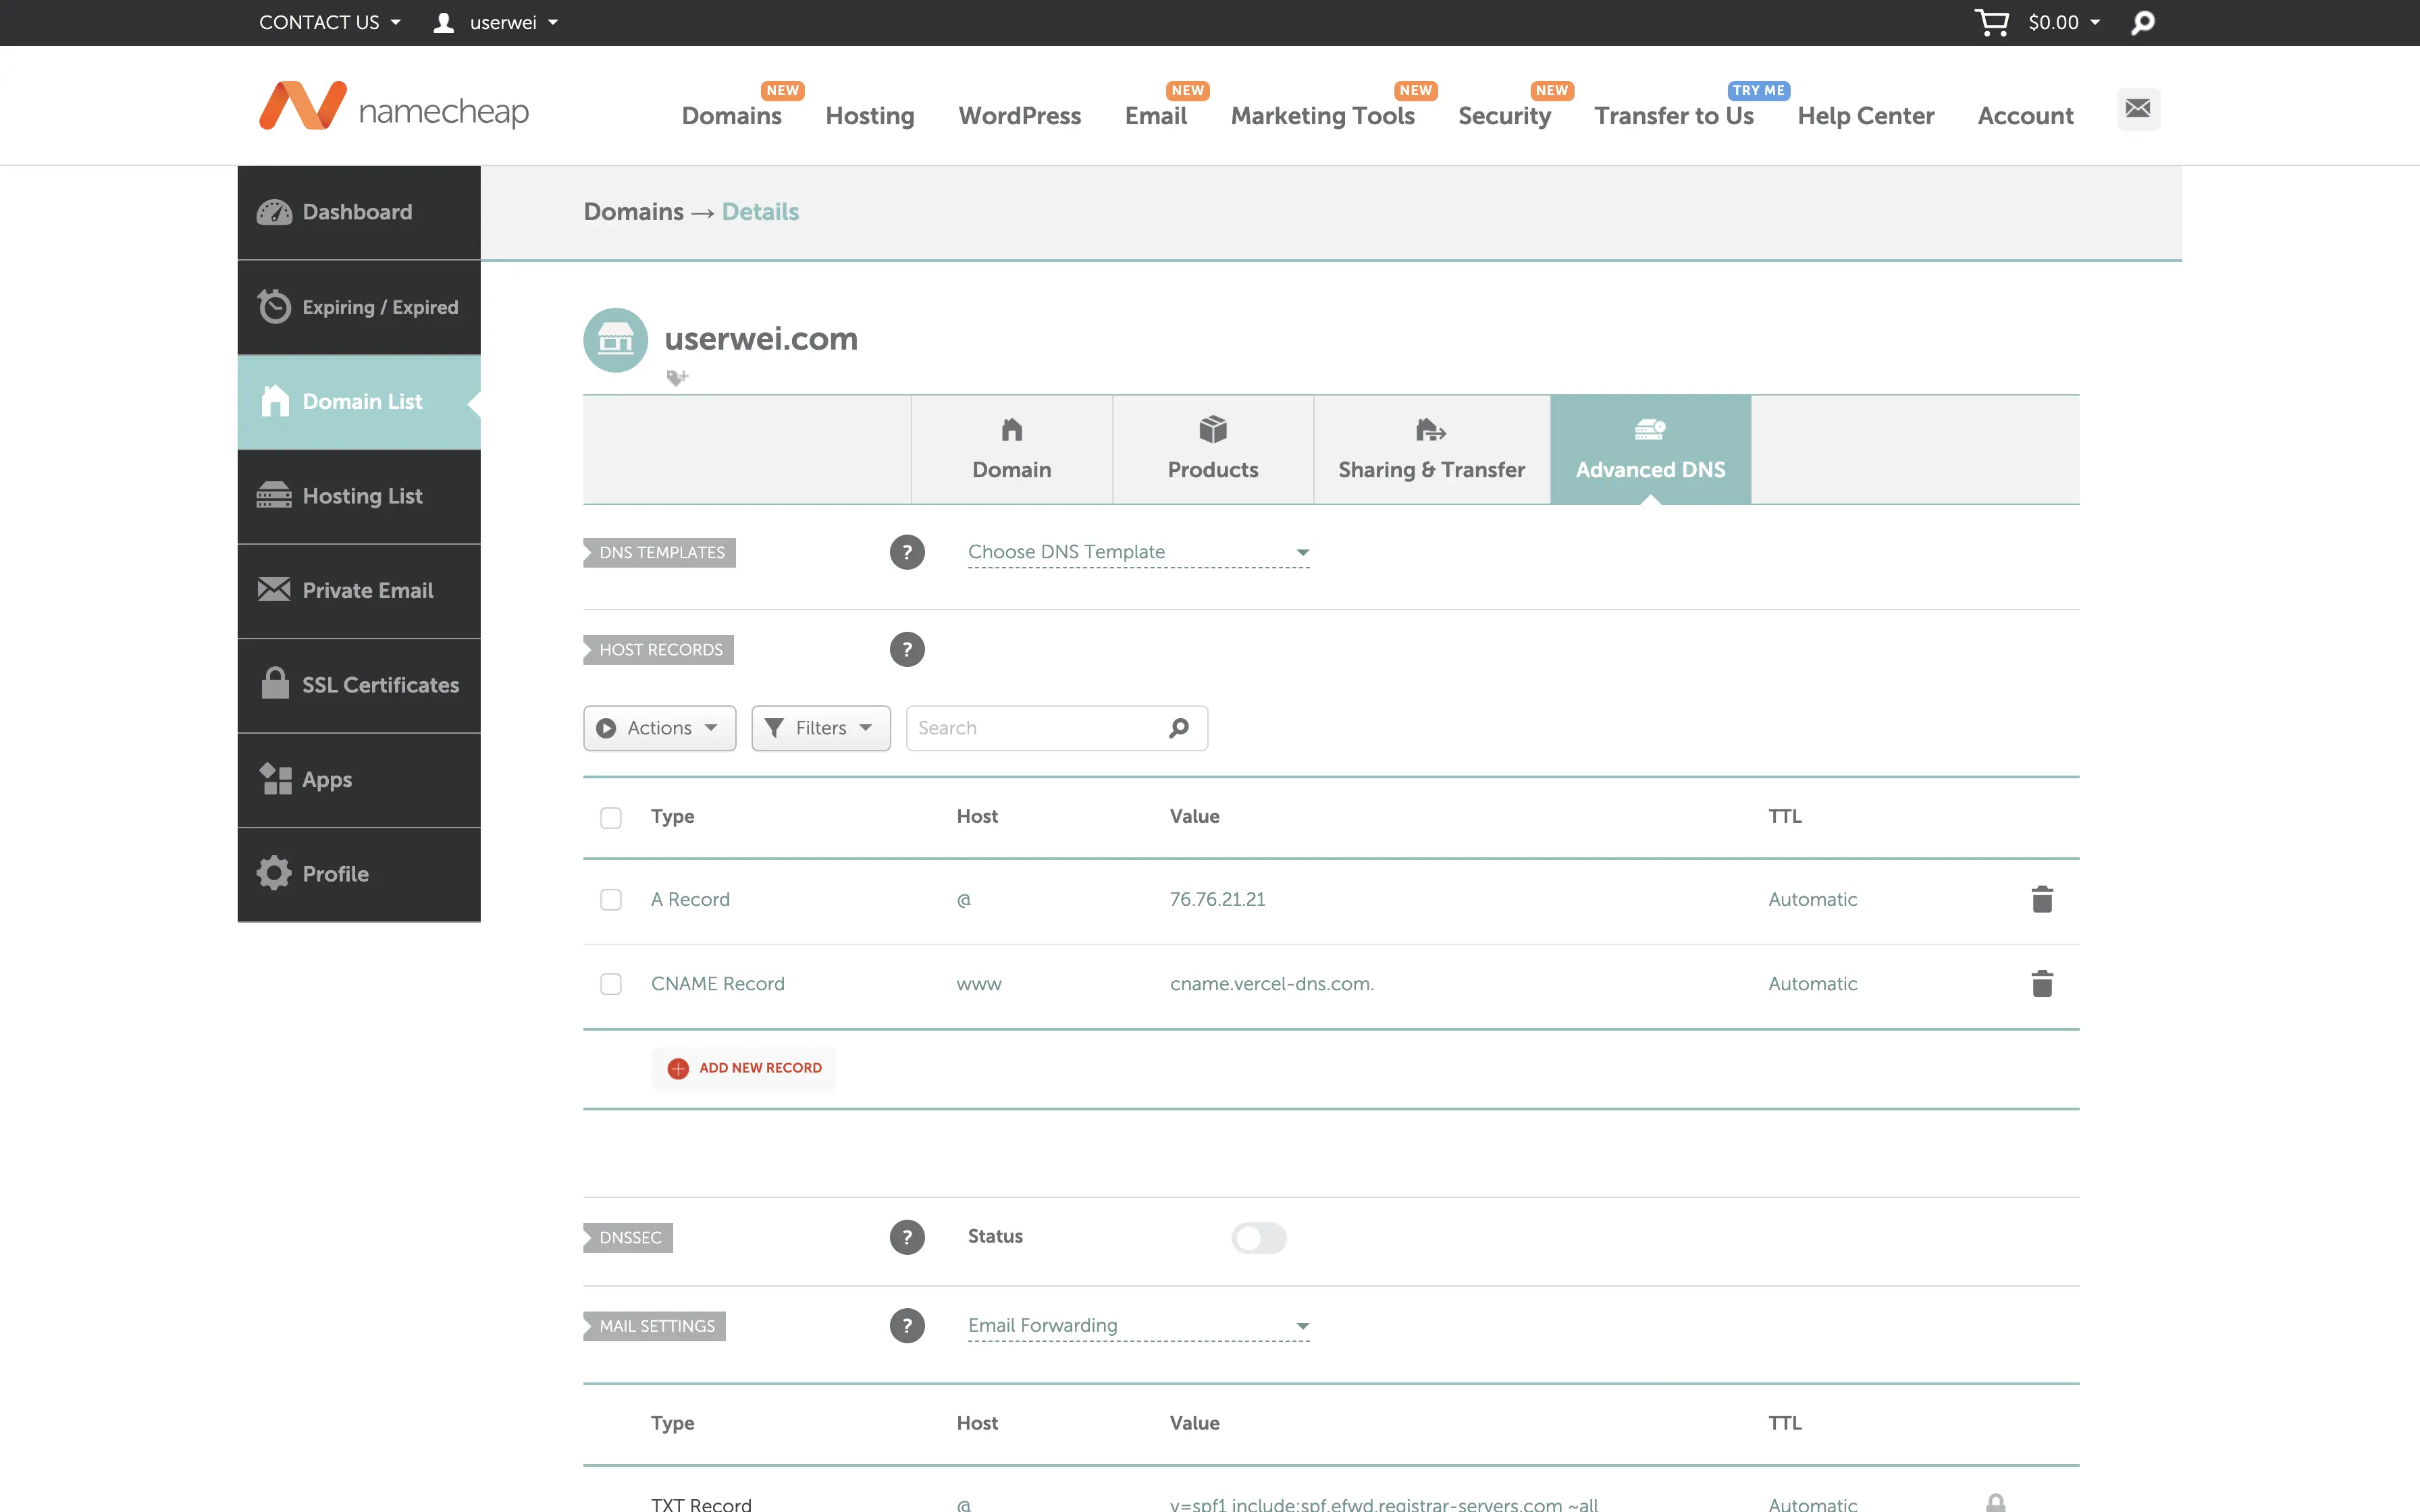
- 依照指示至網域註冊商設定 DNS:
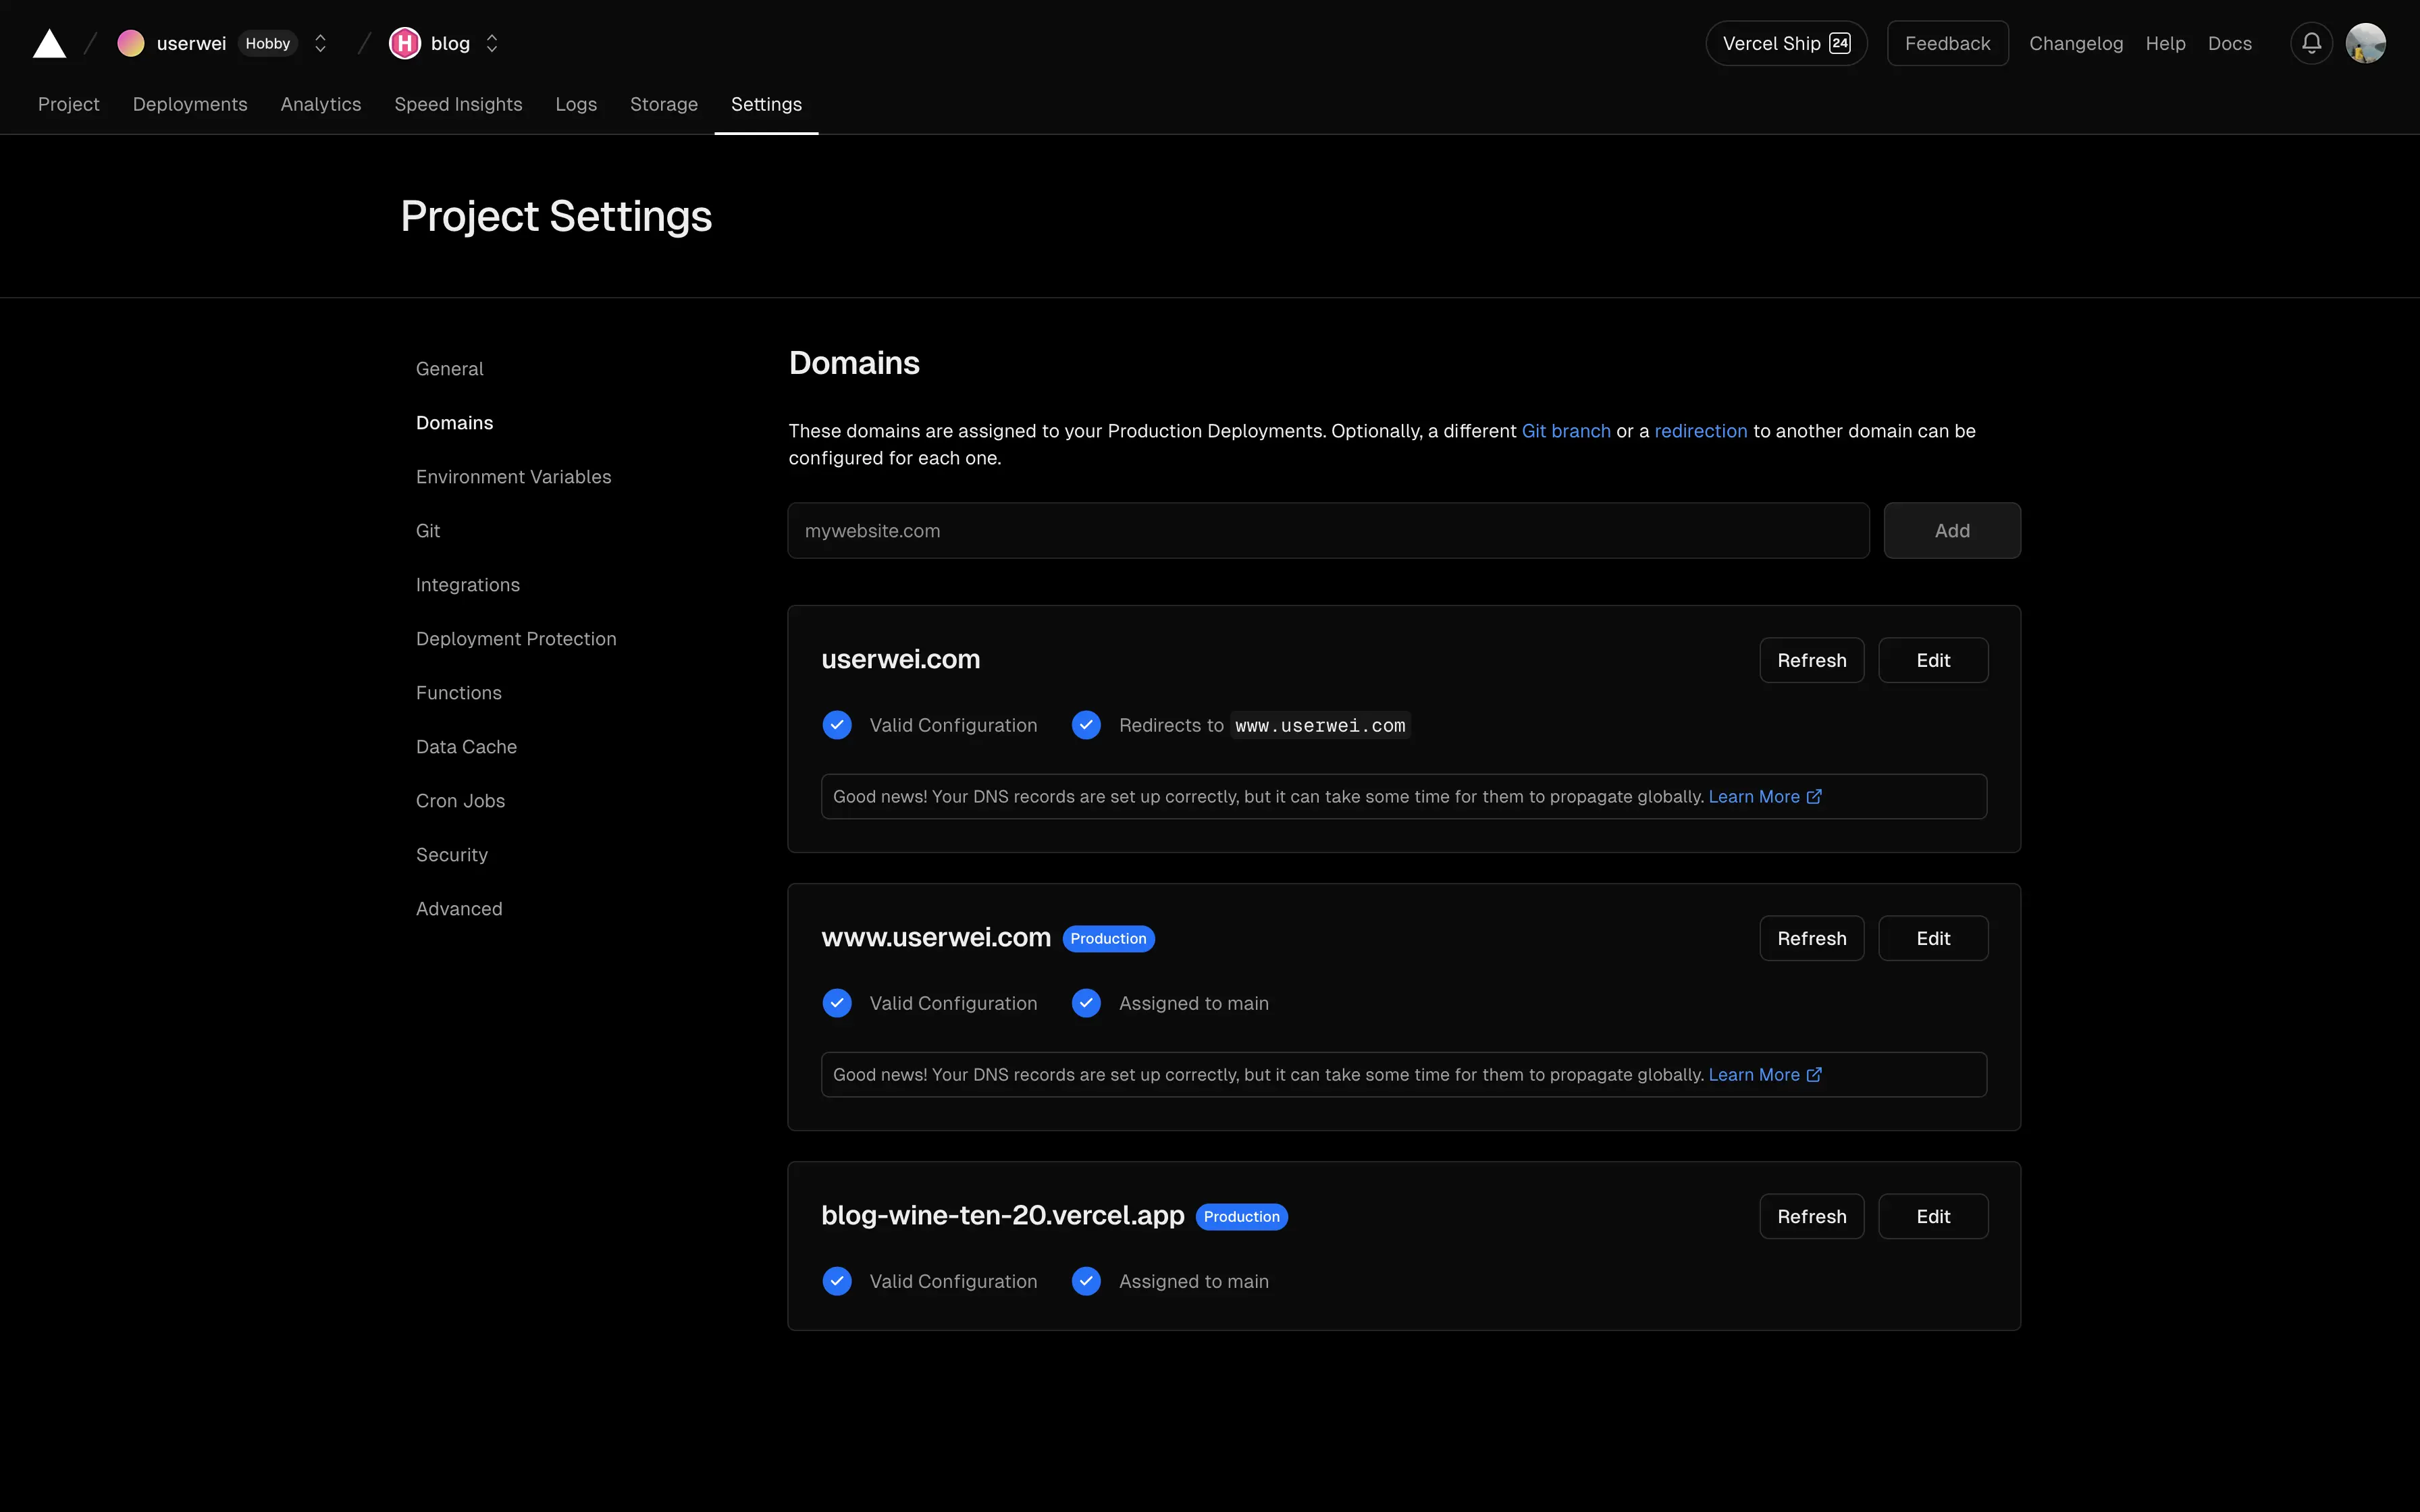
- 回到後台重整後,看到域名的設定都配置成功即完成設置:
網頁分析設定
在 Vercel 後台的導覽列上可以找到 Analytics 與 Speed Insights 的選項,可以用來了解目前網頁的成效。
- 在後台分別同意使用這兩種網頁分析,完成會顯示幾段程式碼需要加入自己的網頁中。
- 於
layouts資料夾中新增_default資料夾。 - 從
themes/hugo-theme-stack/layouts/_default中複製baseof.html至剛剛新增的layouts/_default資料夾,檔案架構如下所示:1
2
3└── layouts
└── _default
└── baseof.html - 在
baseof.html的<body>區塊中新增以下程式碼:1
2
3
4
5
6
7
8
9
10
11
12
13
14
15
16<script>
window.si =
window.si ||
function () {
(window.siq = window.siq || []).push(arguments);
};
</script>
<script defer src="/_vercel/speed-insights/script.js"></script>
<script>
window.va =
window.va ||
function () {
(window.vaq = window.vaq || []).push(arguments);
};
</script>
<script defer src="/_vercel/insights/script.js"></script>⚠️注意: 請不要替換此部分的
<>。 - 將更新後的網站 push 至 GitHub,重整 Vercel 後台即可查看網頁分析。
Google Search Console
Google Search Console 是由 Google 開發的 SEO 工具,可以提供網站所有者了解索引狀況、搜尋流量等資訊,進而優化網頁的搜索排名。
新增網頁資源
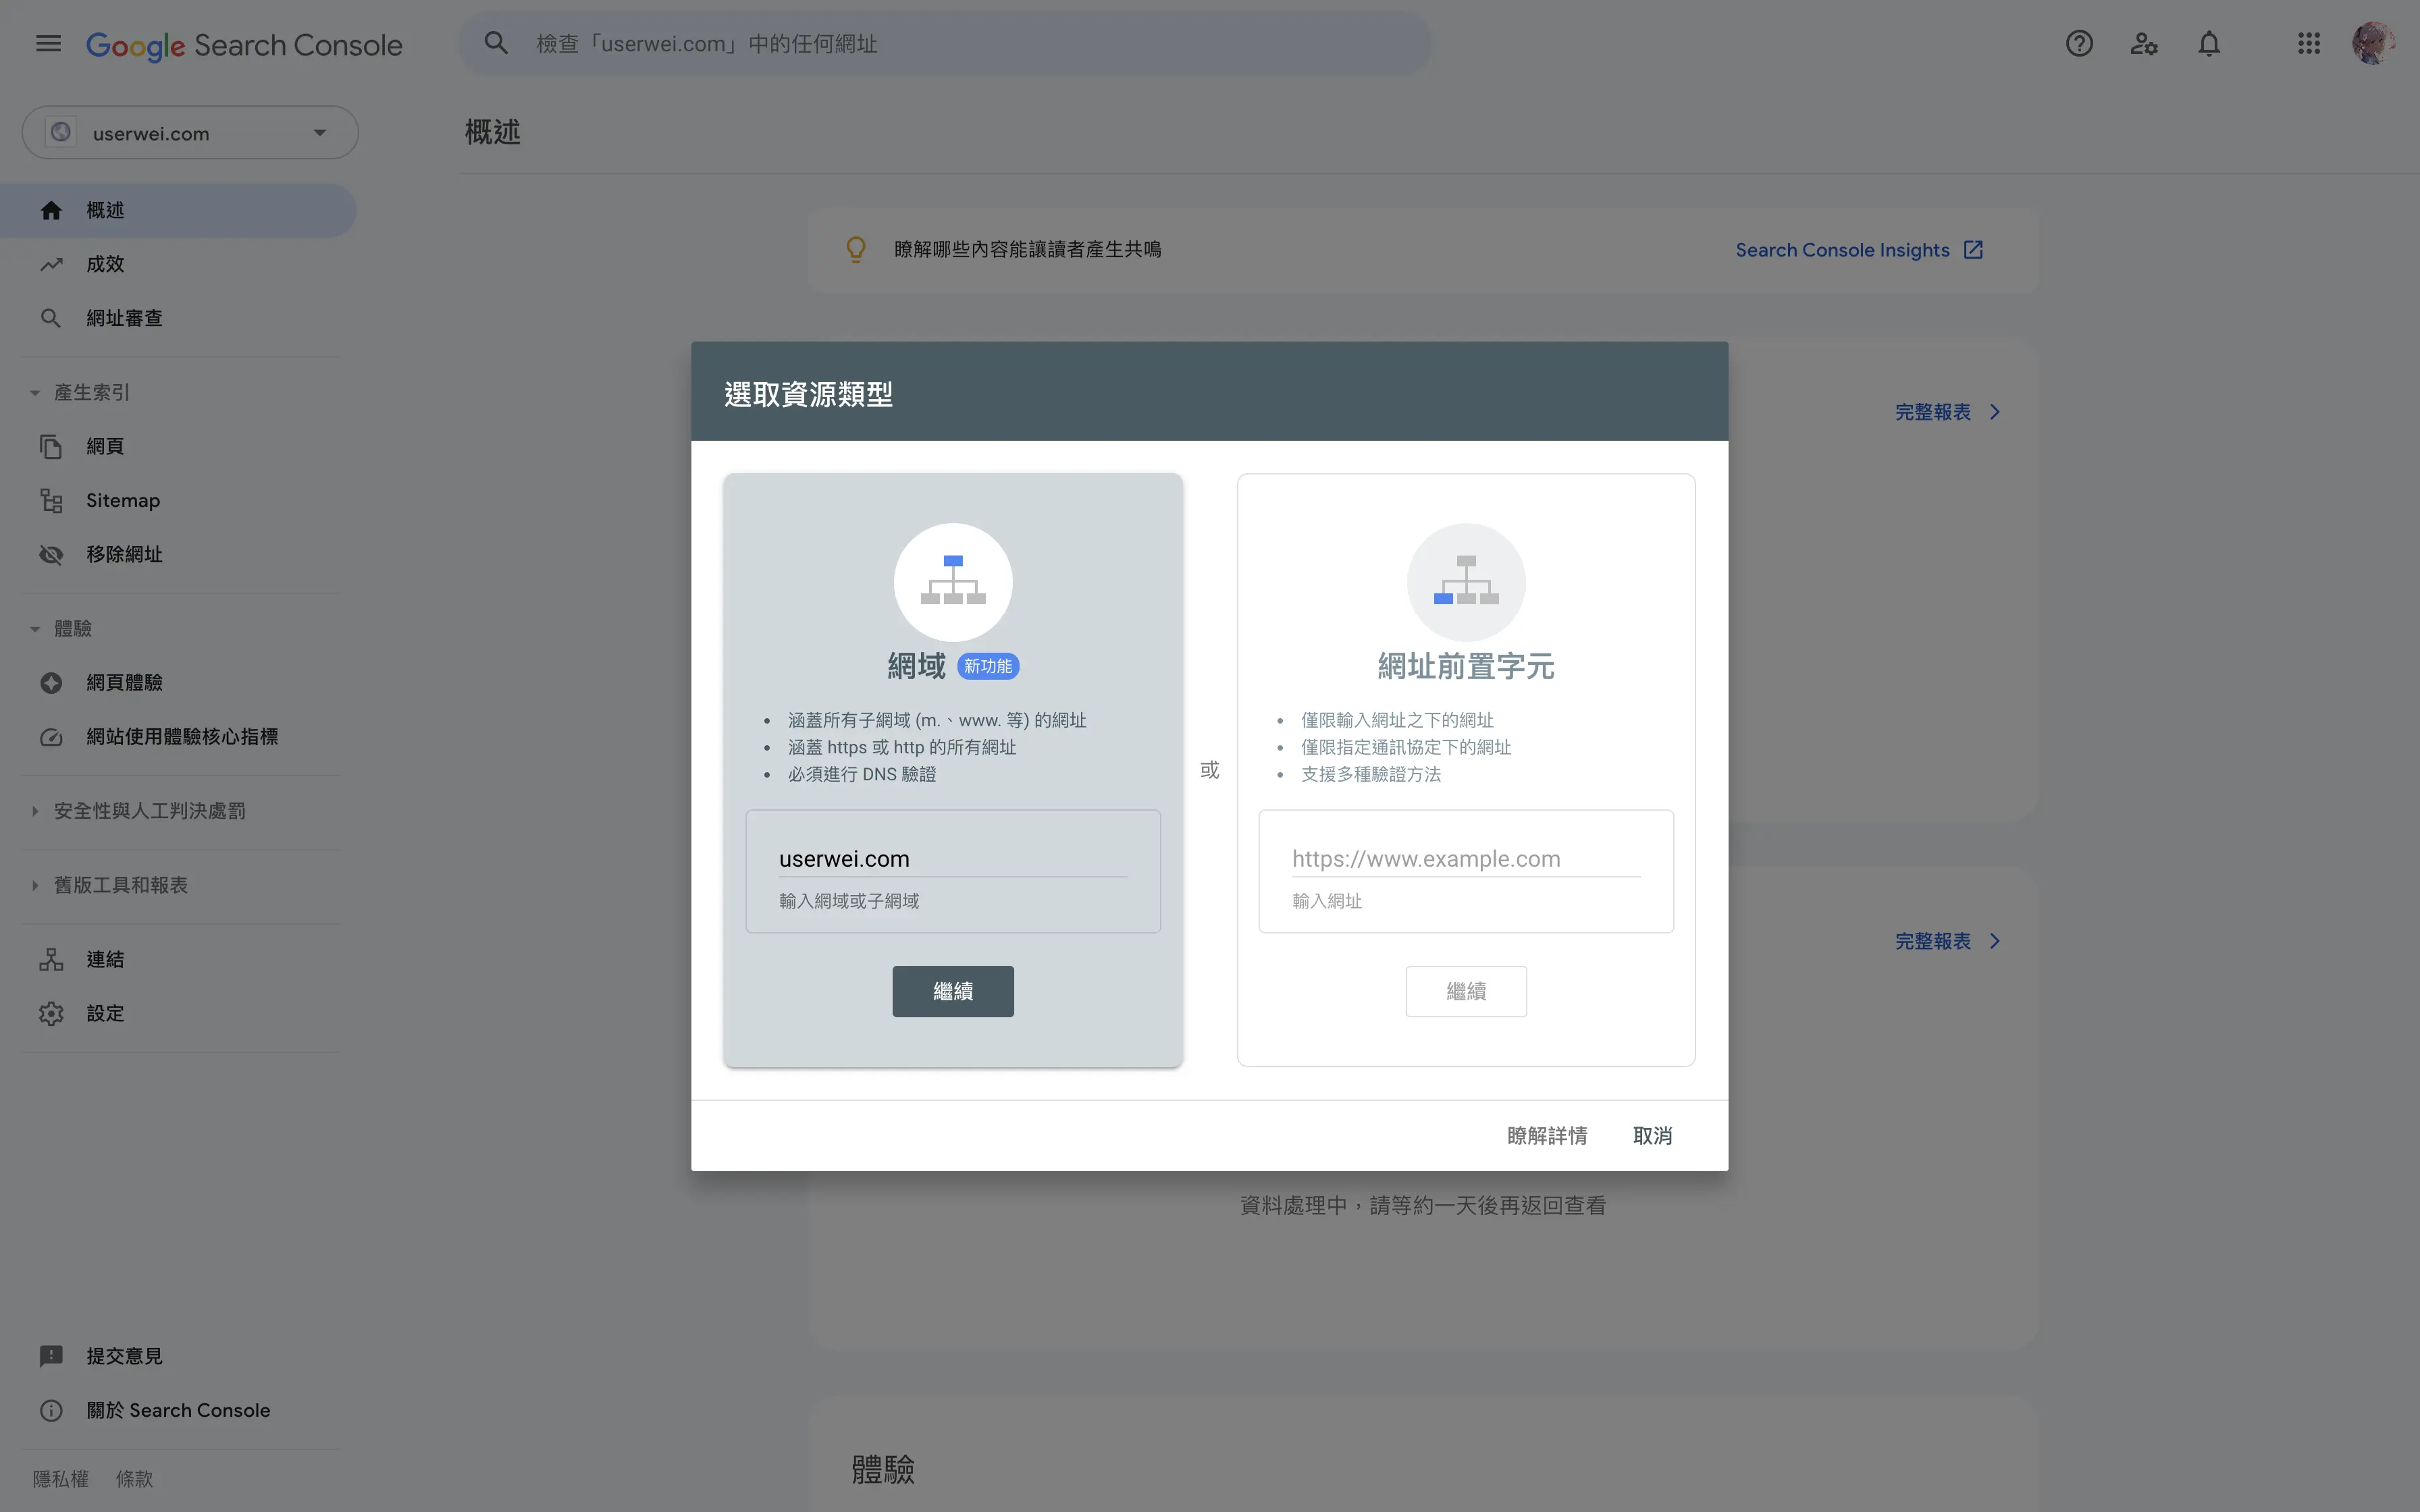
- 登入 Google Search Console 後選擇新增資源,輸入自己取得的域名:
- 在網域註冊商的 DNS 中加上 Google 提供的驗證代碼
google-site-verification=xxx: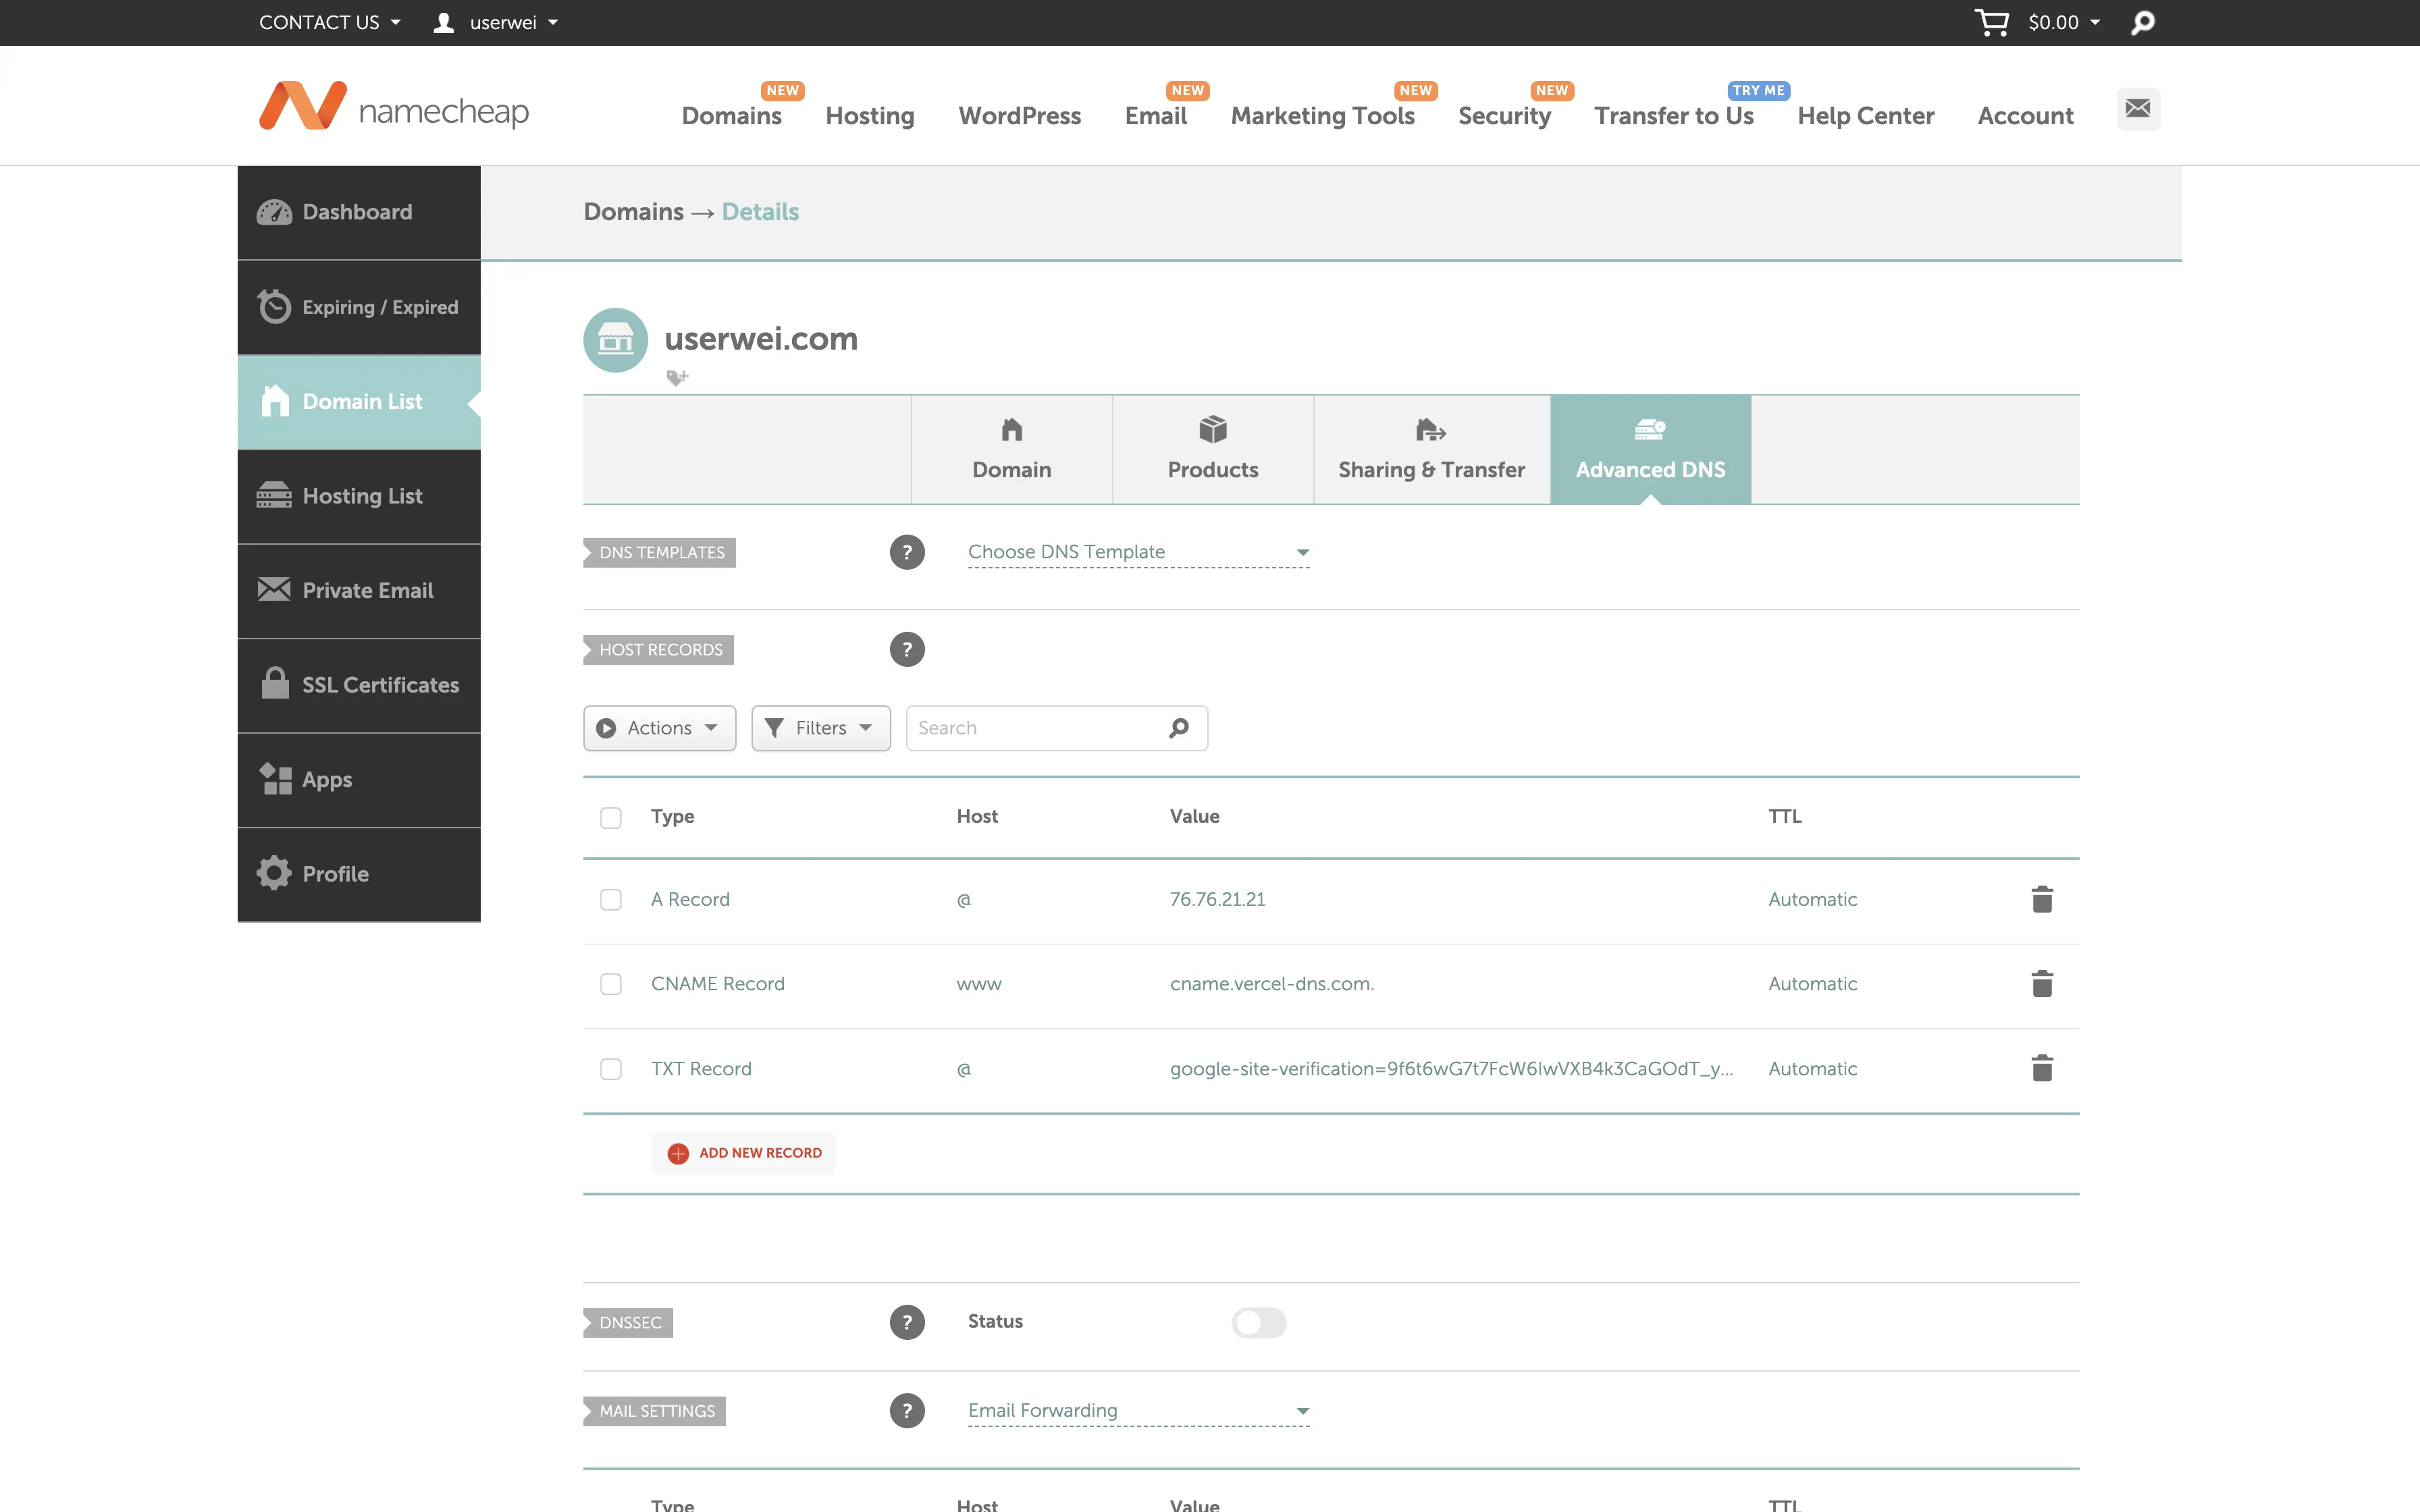
- 等待所有權驗證成功後即可使用。
Sitemap 設定
Sitemap 是一種網頁導覽的檔案,它記載所有網頁的連結與架構,讓搜尋引擎能快速理解網站內容架構,其中用途最廣泛的為 XML Sitemap。
- 在
config.yaml中新增以下設定使網頁自動產生sitemap.xml:1
2
3
4
5sitemap:
changeFreq: ""
disable: false
filename: sitemap.xml
priority: -1 - 將更新後的網站 push 至 GitHub,等待 Vercel 重新建置網頁。
- 在 Google Search Console 的後台側邊欄選取
Sitemap並新增https://www.xxx.com/sitemap.xml。 - 提交後狀態顯示成功即完成設定。
Robots.txt 設定
Robots.txt 是提供給機器人的一組指令,主要是管理網路爬蟲的活動,能夠告訴搜尋引擎檢索器可以存取網站上的哪些網址。
在
static資料夾中新增robots.txt,內容如下:1
2
3
4User-agent: *
Disallow:
Sitemap: https://example.com/sitemap.xmlDisallow 的部分可依個人需求自行增加,這邊簡單舉幾個例子:
1
2
3Disallow: /page/
Disallow: /page/search/
Disallow: /categories/等待 Google Search Console 自行檢索,可在
設定 >> robots.txt中查看,若顯示已擷取即完成設定。