
Nginx 架設與反向代理教學
在部署 Web 服務時,Nginx 幾乎是最常見的選擇之一。它不只能拿來提供靜態檔案,也很適合放在前端與後端之間作為反向代理。這篇文章會先介紹反向代理的概念與 Nginx 的基本設定,最後再透過 React + FastAPI 的範例,實際示範如何完成靜態頁面服務與 API 轉發。
反向代理 (Reverse Proxy) 介紹
反向代理是一種伺服器端的中介,它坐落在客戶端與後端伺服器之間,接受客戶端請求,再將請求轉發給內部的真實伺服器群組;最後將真實伺服器的回應回傳給客戶端。
運作流程
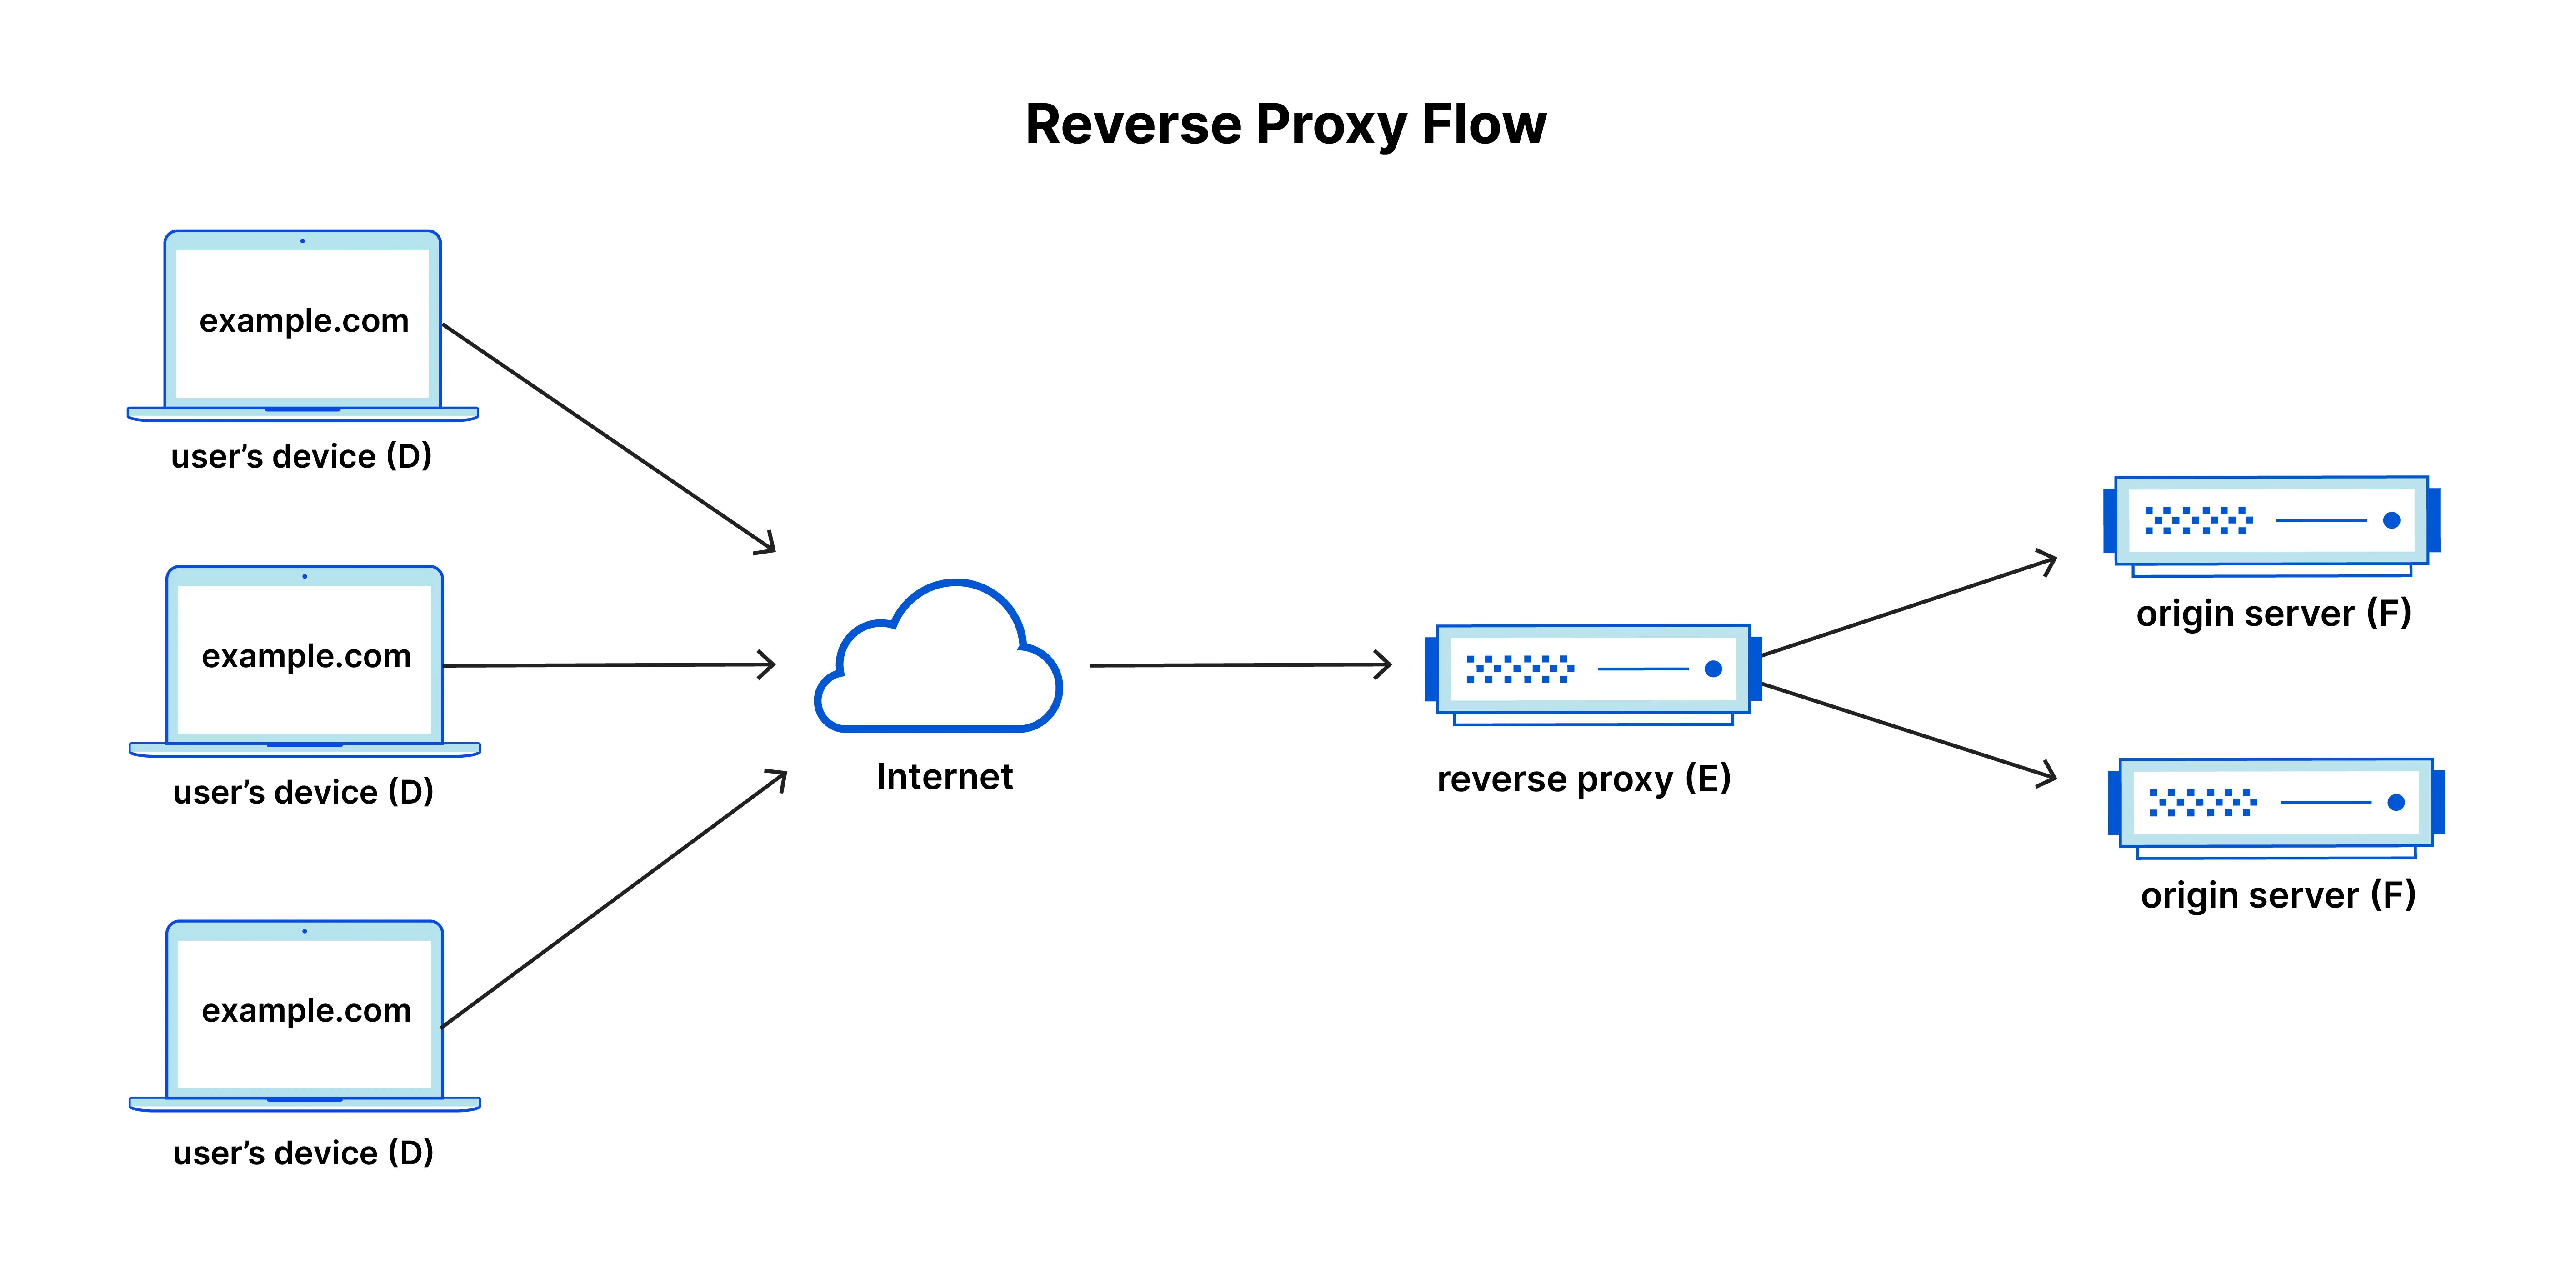
- 客戶端(瀏覽器)發出 HTTP 請求到反向代理
- 反向代理根據規則(例如 URL 路徑、負載平衡策略)選擇一台或多台後端伺服器
- 反向代理將請求轉發至後端伺服器,接收回應後再統一回傳給客戶端
主要功能與好處
- 安全性隔離:隱藏內網伺服器真實 IP、避免直接攻擊
- 負載平衡:依輪詢(round robin)、IP hash、least connections 等策略分散流量
- SSL 終端:在反向代理端集中管理 HTTPS 憑證
- 快取加速:靜態資源或 API 回應可緩存於代理層,減少後端負擔
- 壓縮與優化:可在傳送給客戶端前,進行 Gzip 壓縮、圖片優化等
反向代理與正向代理的比較
| 特性 | 反向代理 (Reverse Proxy) | 正向代理 (Forward Proxy) |
|---|---|---|
| 位置 | 位於伺服器端,介於客戶端與後端伺服器之間 | 位於客戶端,介於客戶端與目標伺服器之間 |
| 用途 | 隱藏後端伺服器,提供負載平衡、安全性等功能 | 隱藏客戶端,繞過防火牆或訪問受限資源 |
| 請求方向 | 客戶端 → 反向代理 → 後端伺服器 | 客戶端 → 正向代理 → 目標伺服器 |
| IP 暴露 | 客戶端只能看到代理伺服器的 IP | 目標伺服器只能看到代理伺服器的 IP |
| 應用場景 | 負載平衡、快取、SSL 終端、API 網關等 | 繞過地區限制、匿名瀏覽、訪問受限網站等 |
反向代理的優勢
- 安全性:隱藏後端伺服器的真實 IP,防止直接攻擊。
- 負載平衡:分散流量到多台伺服器,提升系統穩定性。
- 集中管理:統一處理 SSL 憑證、快取、壓縮等功能。
正向代理的優勢
- 匿名性:隱藏客戶端的真實 IP,保護隱私。
- 繞過限制:訪問被防火牆或地區限制的資源。
- 內容過濾:可用於企業內部,限制員工訪問特定網站。
什麼是 Nginx
- 高效能的 HTTP/反向代理與負載平衡伺服器
- 採用非同步事件驅動與 Master/Worker 架構
應用場景
- 靜態檔案伺服
- 反向代理(Proxy → FastAPI、Node.js…)
- 負載平衡(簡易輪詢、IP hash)
- SSL 終端(HTTPS 憑證管理)
指令介紹
| 指令 | 用途 |
|---|---|
nginx -v |
顯示 Nginx 版本 |
nginx -t |
測試設定檔語法正確性 |
sudo systemctl start nginx |
啟動 Nginx 服務 |
sudo systemctl stop nginx |
停止 Nginx 服務 |
sudo systemctl reload nginx |
重新載入設定 |
nginx -s reload |
直接向 master process 發送重載信號 |
檔案結構與設定檔介紹
1 | /etc/nginx/ |
nginx.conf
1 | user www-data; |
- main 區塊:工作程序數量、檔案限制
- events 區塊:連線相關設定(worker_connections)
- http 區塊:MIME、Gzip、全域快取、引入
conf.d/*.conf
Server & Location
1 | ## |
- server 區塊
listen:指定監聽的埠號與協定。server_name:根據 HTTP Request 中的 Host Header 決定匹配的 server。
- location 區塊
- 支援不同的路徑匹配方式(前綴匹配、正則表達式匹配)。
root與alias:設定靜態檔案目錄,使用方式略有差異。- 常用指令包括
proxy_pass、try_files,用來做反向代理或檔案處理。
常見設定範例與說明
以下是一些常見的 Nginx 設定範例,並附上詳細說明:
設定 HTTP Header
1
2
3
4
5
6
7
8
9location /api/ {
proxy_pass http://127.0.0.1:8000;
# 設定 HTTP Header,保留客戶端資訊
proxy_set_header Host $host;
proxy_set_header X-Real-IP $remote_addr;
proxy_set_header X-Forwarded-For $proxy_add_x_forwarded_for;
proxy_set_header X-Forwarded-Proto $scheme;
}proxy_set_header Host $host:將客戶端的 Host Header 傳遞給後端,確保後端能正確識別請求的 Host。proxy_set_header X-Real-IP $remote_addr:將客戶端的真實 IP 傳遞給後端,方便後端記錄來源 IP。proxy_set_header X-Forwarded-For $proxy_add_x_forwarded_for:記錄所有經過的代理伺服器 IP,形成完整的請求路徑。proxy_set_header X-Forwarded-Proto $scheme:傳遞請求的協定(HTTP 或 HTTPS),後端可根據此資訊進行處理。
設定監聽的 Port
1
2
3
4
5
6
7
8
9
10
11server {
listen 8080;
listen [::]:8080;
server_name example.com;
location / {
root /usr/share/nginx/html;
index index.html;
}
}listen 8080:設定伺服器監聽的埠號為 8080,適合用於非預設 HTTP 埠號的服務。listen [::]:8080:支援 IPv6 的監聽設定。- 應用場景:當伺服器需要提供多個服務時,可以使用不同的埠號來區分,例如:
- 80:靜態網站
- 8080:測試環境
- 8443:HTTPS 測試環境
設定靜態檔案服務
1 | location /static/ { |
root /var/www/myapp:指定靜態檔案的根目錄。autoindex on:開啟目錄瀏覽功能,當目錄中沒有index.html時,會顯示目錄列表。- 應用場景:適合用於提供靜態資源(如圖片、CSS、JS)的服務。
設定 Gzip 壓縮
1
2
3
4
5http {
gzip on;
gzip_types text/plain text/css application/json application/javascript text/xml application/xml+rss text/javascript;
gzip_min_length 1024;
}gzip on:啟用 Gzip 壓縮,減少傳輸的資料量。gzip_types:指定需要壓縮的檔案類型。gzip_min_length 1024:設定最小壓縮大小,避免小檔案壓縮後反而增加負擔。- 應用場景:適合用於提升網站性能,特別是對於靜態資源的傳輸。
設定錯誤頁面
1
2
3
4error_page 404 /custom_404.html;
location = /custom_404.html {
root /usr/share/nginx/html;
}error_page 404 /custom_404.html:當發生 404 錯誤時,返回自訂的錯誤頁面。- 應用場景:提升用戶體驗,提供友好的錯誤提示。
設定負載平衡
1
2
3
4
5
6
7
8
9
10upstream backend {
server backend1.example.com;
server backend2.example.com;
}
server {
location / {
proxy_pass http://backend;
}
}upstream:定義後端伺服器群組。proxy_pass http://backend:將請求分發到後端伺服器群組。- 應用場景:適合用於高流量網站,分散請求到多台伺服器。
設定 WebSocket 支援
1
2
3
4
5
6
7
8
9
10
11
12location /ws/ {
proxy_pass http://127.0.0.1:9000;
# 保留 WebSocket 必要的 Header
proxy_http_version 1.1;
proxy_set_header Upgrade $http_upgrade;
proxy_set_header Connection "upgrade";
# 設定超時時間
proxy_read_timeout 60s;
proxy_send_timeout 60s;
}proxy_http_version 1.1:WebSocket 需要使用 HTTP/1.1 協定。proxy_set_header Upgrade $http_upgrade:將 Upgrade Header 傳遞給後端,告知伺服器升級為 WebSocket 連線。proxy_set_header Connection "upgrade":指定連線類型為升級。proxy_read_timeout和proxy_send_timeout:設定讀取與傳送的超時時間,避免長時間未回應導致連線中斷。- 應用場景:適合用於即時應用,例如聊天室、即時通知等。
注意事項
- 確保後端服務支援 WebSocket 並正確處理升級請求。
- 若使用 HTTPS,需確保 WebSocket 連線使用
wss://協定。
綜合實作
本次實作將模擬一個完整的前後端專案架構,並在 GitHub Codespaces 上部署:
靜態檔案服務:使用 Nginx 提供 React App 的 HTML、CSS、JS。
API 反向代理:將
/api開頭的 HTTP 請求轉發到後端 FastAPI。
功能項目
靜態檔案服務
- Nginx 直接提供
frontend/dist目錄下的靜態檔案。
- Nginx 直接提供
API 反向代理
GET /api/health:回傳後端健康狀態。GET /api/greet?name=…:示範帶參數的 GET 請求。POST /api/post:示範接收 JSON 的 POST 請求。
環境準備
開啟 Codespace
- 點擊此 GitHub Repo 連結。
- 在 GitHub Repo 頁面點擊
「Code」→「Codespaces」→「Create codespace on main」。 - 等待 Codespace 環境建立完成。
建置前端並啟動後端服務
打開 Codespace 的 Terminal,依序執行以下指令:
1
2
3
4
5
6cd frontend
npm install
npm run build
cd ..
nohup uvicorn backend.app.main:app --host 0.0.0.0 --port 8000 --reload > /dev/null 2>&1 &- 前端會被建置到
/workspaces/nginx-tutorial/frontend/dist。 - 後端使用
uvicorn啟動 FastAPI Server。
- 前端會被建置到
Nginx 設定
打開
nginx/default.conf,修改以下 TODO 處的設定1
2
3
4
5
6
7
8
9
10
11
12
13
14
15
16server {
listen 80 default_server;
listen [::]:80 default_server;
server_name _;
# TODO: 填寫靜態檔案服務設定
location / {
}
# TODO: 填寫 REST API 反向代理設定
location /api/ {
}
}- 修改重點
- location
/:設定root指向靜態檔案資料夾,並用try_files支援前端路由。 - location
/api/:透過proxy_pass將請求轉發至 FastAPI。
- location
- 修改重點
重載 Nginx 設定
完成設定後,執行以下指令:
1
2
3
4sudo ln -sf /workspaces/nginx-tutorial/nginx/default.conf /etc/nginx/sites-enabled/default
sudo nginx -t
sudo service nginx start
# sudo service nginx restart
驗證流程
在 VS Code 的「Ports」分頁找到 80 Port 對應的 Forwarded Address。
開啟網址(通常是
https://<codespace-name>-80.app.github.dev/)。功能測試
- Health Check 應顯示 OK。
- 測試 GET
/api/greet。 - 測試 POST
/api/post。
本部落格所有文章除特別聲明外,均採用CC BY-NC-SA 4.0 授權協議。轉載請註明來源 userwei's Blog!