Nginx 架設與反向代理教學

梅竹黑客松 13th Techshare

  • 有其他問題歡迎在文章下方留言或 來信 詢問

反向代理 (Reverse Proxy) 介紹

反向代理是一種伺服器端的中介,它坐落在客戶端與後端伺服器之間,接受客戶端請求,再將請求轉發給內部的真實伺服器群組;最後將真實伺服器的回應回傳給客戶端。

運作流程

proxy

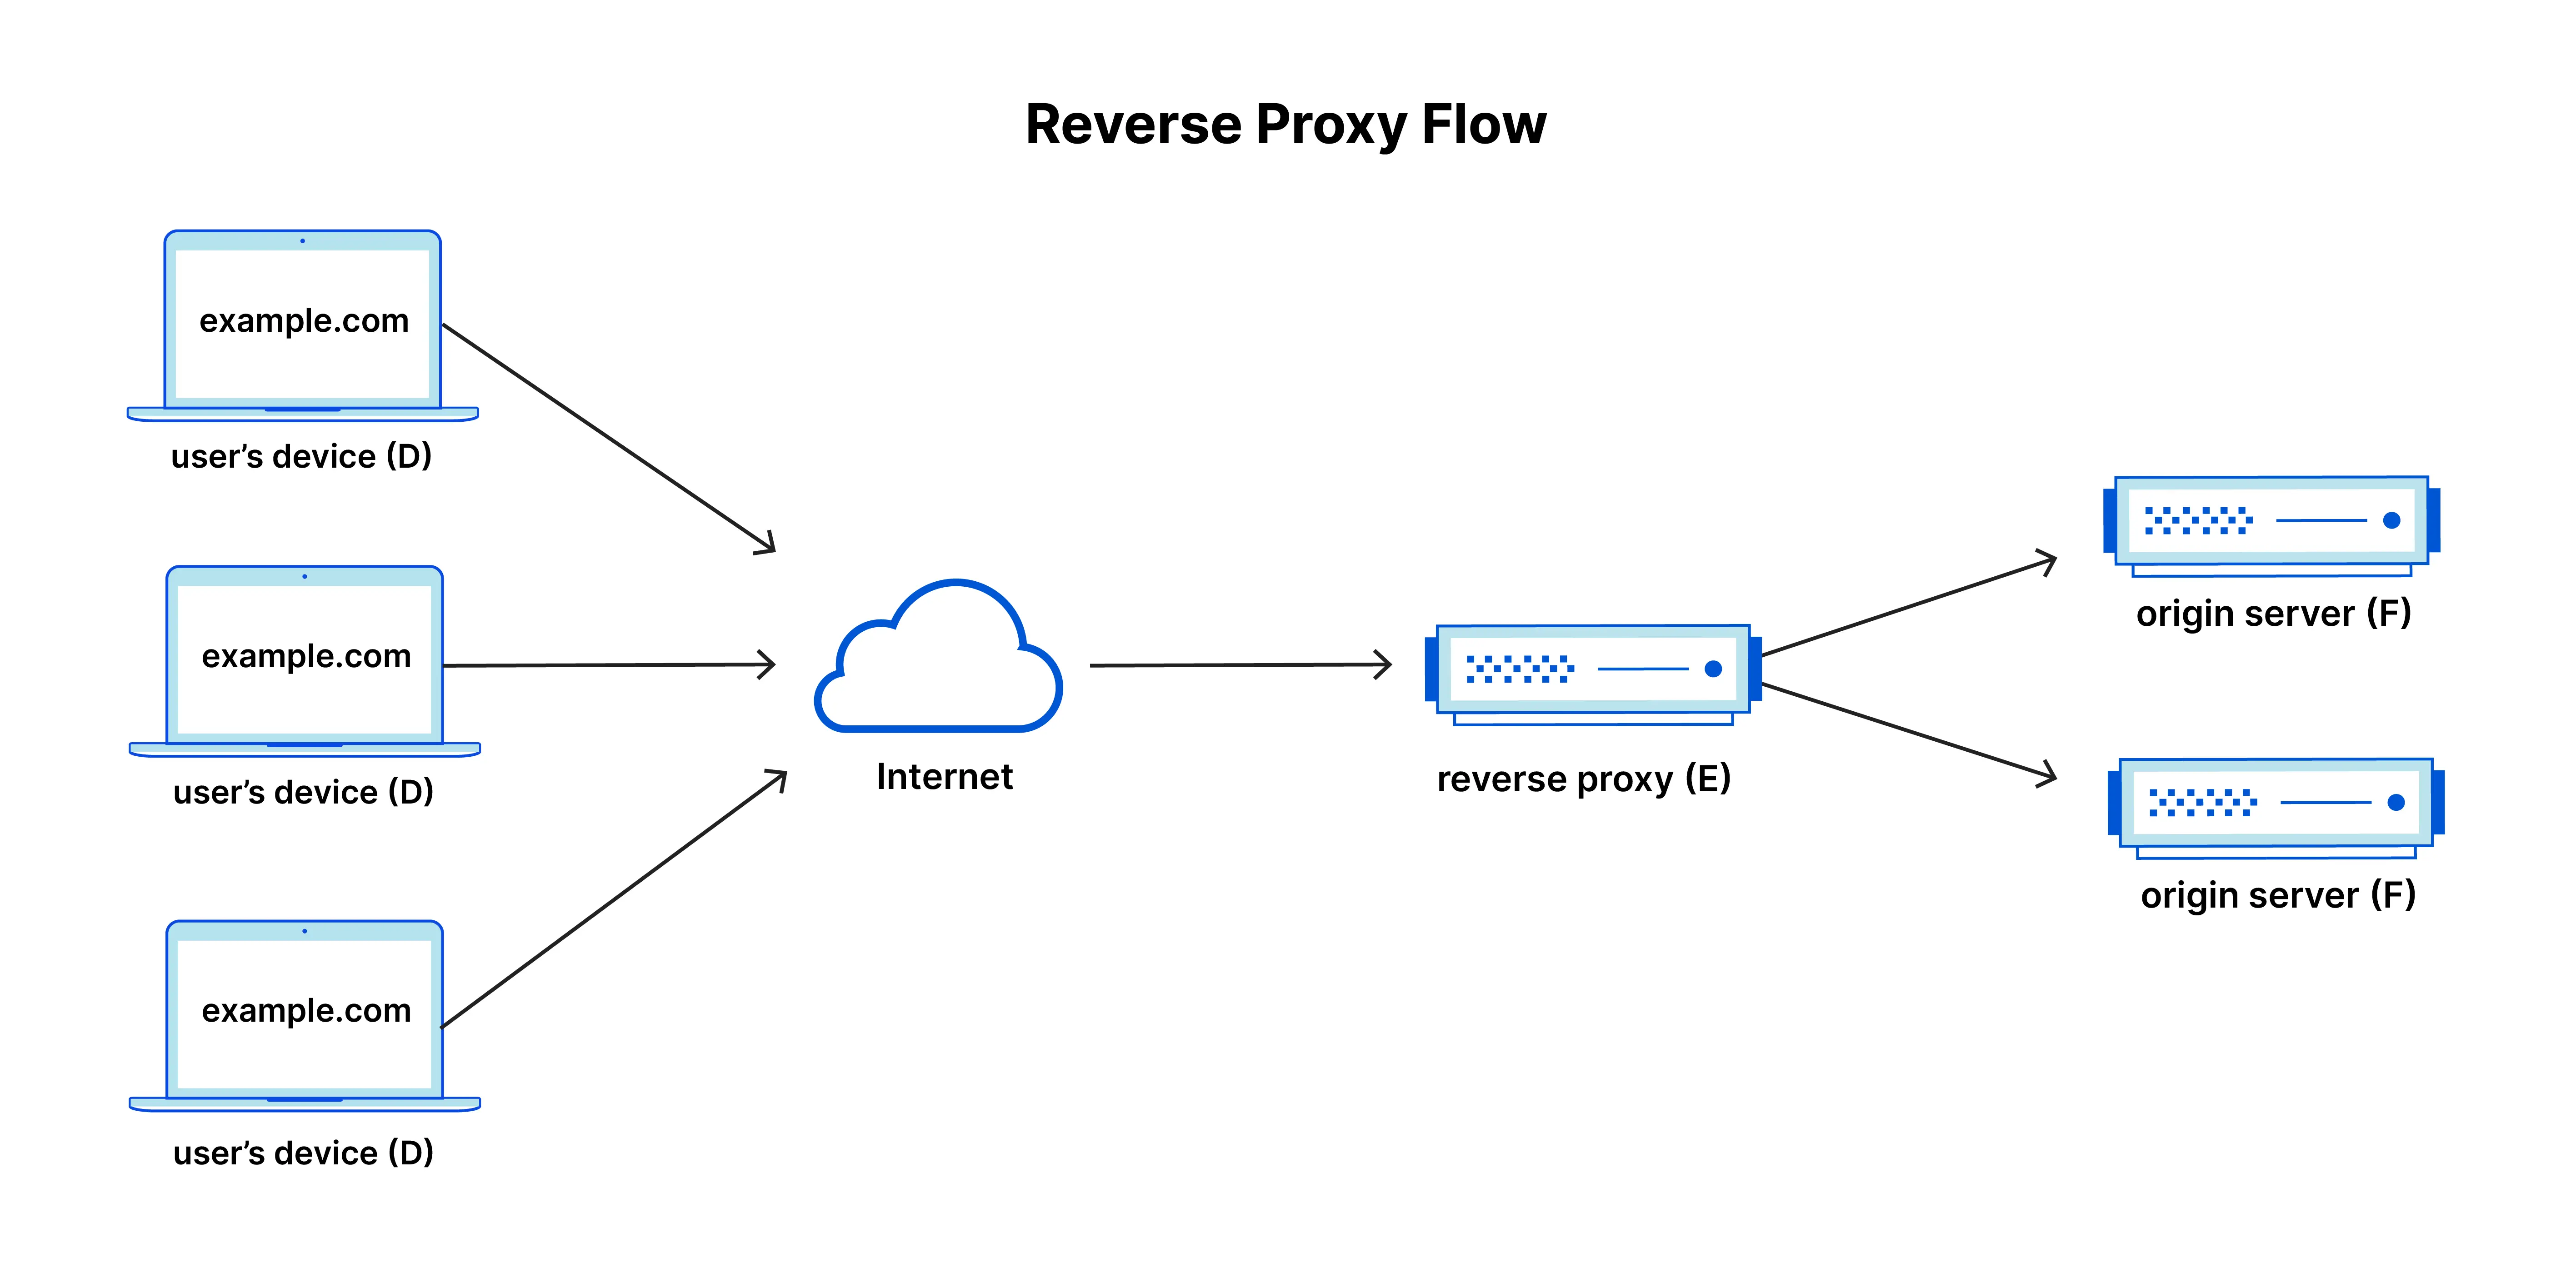
  1. 客戶端(瀏覽器)發出 HTTP 請求到反向代理
  2. 反向代理根據規則(例如 URL 路徑、負載平衡策略)選擇一台或多台後端伺服器
  3. 反向代理將請求轉發至後端伺服器,接收回應後再統一回傳給客戶端

主要功能與好處

  1. 安全性隔離:隱藏內網伺服器真實 IP、避免直接攻擊
  2. 負載平衡:依輪詢(round robin)、IP hash、least connections 等策略分散流量
  3. SSL 終端:在反向代理端集中管理 HTTPS 憑證
  4. 快取加速:靜態資源或 API 回應可緩存於代理層,減少後端負擔
  5. 壓縮與優化:可在傳送給客戶端前,進行 Gzip 壓縮、圖片優化等

反向代理與正向代理的比較

特性 反向代理 (Reverse Proxy) 正向代理 (Forward Proxy)
位置 位於伺服器端,介於客戶端與後端伺服器之間 位於客戶端,介於客戶端與目標伺服器之間
用途 隱藏後端伺服器,提供負載平衡、安全性等功能 隱藏客戶端,繞過防火牆或訪問受限資源
請求方向 客戶端 → 反向代理 → 後端伺服器 客戶端 → 正向代理 → 目標伺服器
IP 暴露 客戶端只能看到代理伺服器的 IP 目標伺服器只能看到代理伺服器的 IP
應用場景 負載平衡、快取、SSL 終端、API 網關等 繞過地區限制、匿名瀏覽、訪問受限網站等

反向代理的優勢

  1. 安全性:隱藏後端伺服器的真實 IP,防止直接攻擊。
  2. 負載平衡:分散流量到多台伺服器,提升系統穩定性。
  3. 集中管理:統一處理 SSL 憑證、快取、壓縮等功能。

正向代理的優勢

  1. 匿名性:隱藏客戶端的真實 IP,保護隱私。
  2. 繞過限制:訪問被防火牆或地區限制的資源。
  3. 內容過濾:可用於企業內部,限制員工訪問特定網站。

什麼是 Nginx

  • 高效能的 HTTP/反向代理與負載平衡伺服器
  • 採用非同步事件驅動與 Master/Worker 架構

應用場景

  • 靜態檔案伺服
  • 反向代理(Proxy → FastAPI、Node.js…)
  • 負載平衡(簡易輪詢、IP hash)
  • SSL 終端(HTTPS 憑證管理)

指令介紹

指令 用途
nginx -v 顯示 Nginx 版本
nginx -t 測試設定檔語法正確性
sudo systemctl start nginx 啟動 Nginx 服務
sudo systemctl stop nginx 停止 Nginx 服務
sudo systemctl reload nginx 重新載入設定
nginx -s reload 直接向 master process 發送重載信號

檔案結構與設定檔介紹

1
2
3
4
5
/etc/nginx/
├─ nginx.conf # 主設定檔:包含 Main、Events、HTTP 區塊
├─ conf.d/ # 可放額外 .conf 做模組化管理
├─ sites-available/ # 虛擬主機設定檔存放處
└─ sites-enabled/ # 已啟用的虛擬主機(符號連結)

nginx.conf

 1
 2
 3
 4
 5
 6
 7
 8
 9
10
11
12
13
14
15
16
17
18
19
20
21
22
23
24
25
26
27
28
29
30
31
32
33
34
35
36
37
38
39
40
41
42
43
44
45
46
47
48
49
50
51
52
53
54
55
56
57
58
59
60
61
62
63
64
65
66
67
68
69
70
71
72
73
74
75
76
77
78
79
80
81
82
83
84
85
user www-data;
worker_processes auto;
pid /run/nginx.pid;
include /etc/nginx/modules-enabled/*.conf;

events {
        worker_connections 768;
        # multi_accept on;
}

http {

        ##
        # Basic Settings
        ##

        sendfile on;
        tcp_nopush on;
        tcp_nodelay on;
        keepalive_timeout 65;
        types_hash_max_size 2048;
        # server_tokens off;

        # server_names_hash_bucket_size 64;
        # server_name_in_redirect off;

        include /etc/nginx/mime.types;
        default_type application/octet-stream;

        ##
        # SSL Settings
        ##

        ssl_protocols TLSv1 TLSv1.1 TLSv1.2 TLSv1.3; # Dropping SSLv3, ref: POODLE
        ssl_prefer_server_ciphers on;

        ##
        # Logging Settings
        ##

        access_log /var/log/nginx/access.log;
        error_log /var/log/nginx/error.log;

        ##
        # Gzip Settings
        ##

        gzip on;

        # gzip_vary on;
        # gzip_proxied any;
        # gzip_comp_level 6;
        # gzip_buffers 16 8k;
        # gzip_http_version 1.1;
        # gzip_types text/plain text/css application/json application/javascript text/xml application/xml application/xml+rss text/javascript;

        ##
        # Virtual Host Configs
        ##

        include /etc/nginx/conf.d/*.conf;
        include /etc/nginx/sites-enabled/*;
}


#mail {
#       # See sample authentication script at:
#       # http://wiki.nginx.org/ImapAuthenticateWithApachePhpScript
#
#       # auth_http localhost/auth.php;
#       # pop3_capabilities "TOP" "USER";
#       # imap_capabilities "IMAP4rev1" "UIDPLUS";
#
#       server {
#               listen     localhost:110;
#               protocol   pop3;
#               proxy      on;
#       }
#
#       server {
#               listen     localhost:143;
#               protocol   imap;
#               proxy      on;
#       }
#}
  • main 區塊:工作程序數量、檔案限制
  • events 區塊:連線相關設定(worker_connections)
  • http 區塊:MIME、Gzip、全域快取、引入 conf.d/*.conf

Server & Location

 1
 2
 3
 4
 5
 6
 7
 8
 9
10
11
12
13
14
15
16
17
18
19
20
21
22
23
24
25
26
27
28
29
30
31
32
33
34
35
36
37
38
39
40
41
42
43
44
45
46
47
48
49
50
51
52
53
54
55
56
57
58
59
60
61
62
63
64
65
66
67
68
69
70
71
72
73
74
75
76
77
78
79
80
81
##
# You should look at the following URL's in order to grasp a solid understanding
# of Nginx configuration files in order to fully unleash the power of Nginx.
# http://wiki.nginx.org/Pitfalls
# http://wiki.nginx.org/QuickStart
# http://wiki.nginx.org/Configuration
#
# Generally, you will want to move this file somewhere, and start with a clean
# file but keep this around for reference. Or just disable in sites-enabled.
#
# Please see /usr/share/doc/nginx-doc/examples/ for more detailed examples.
##

# Default server configuration
#
server {
        listen 80 default_server;
        listen [::]:80 default_server;

        # SSL configuration
        #
        # listen 443 ssl default_server;
        # listen [::]:443 ssl default_server;
        #
        # Self signed certs generated by the ssl-cert package
        # Don't use them in a production server!
        #
        # include snippets/snakeoil.conf;

        root /usr/share/nginx/html;

        # Add index.php to the list if you are using PHP
        index index.html index.htm index.nginx-debian.html;

        server_name _;

        location / {
                # First attempt to serve request as file, then
                # as directory, then fall back to displaying a 404.
                try_files $uri $uri/ =404;
        }


        # pass the PHP scripts to FastCGI server listening on 127.0.0.1:9000
        #
        #location ~ \.php$ {
        #       include snippets/fastcgi-php.conf;
        #
        #       # With php5-cgi alone:
        #       fastcgi_pass 127.0.0.1:9000;
        #       # With php5-fpm:
        #       fastcgi_pass unix:/var/run/php5-fpm.sock;
        #}

        # deny access to .htaccess files, if Apache's document root
        # concurs with nginx's one
        #
        #location ~ /\.ht {
        #       deny all;
        #}
}


# Virtual Host configuration for example.com
#
# You can move that to a different file under sites-available/ and symlink that
# to sites-enabled/ to enable it.
#
#server {
#       listen 80;
#       listen [::]:80;
#
#       server_name example.com;
#
#       root /var/www/example.com;
#       index index.html;
#
#       location / {
#               try_files $uri $uri/ =404;
#       }
#}
  • server 區塊
    • listen:指定監聽的埠號與協定。
    • server_name:根據 HTTP Request 中的 Host Header 決定匹配的 server。
  • location 區塊
    • 支援不同的路徑匹配方式(前綴匹配、正則表達式匹配)。
    • rootalias:設定靜態檔案目錄,使用方式略有差異。
    • 常用指令包括 proxy_passtry_files,用來做反向代理或檔案處理。

常見設定範例與說明

以下是一些常見的 Nginx 設定範例,並附上詳細說明:

  1. 設定 HTTP Header

    1
    2
    3
    4
    5
    6
    7
    8
    9
    
    location /api/ {
       proxy_pass http://127.0.0.1:8000;
    
       # 設定 HTTP Header,保留客戶端資訊
       proxy_set_header Host $host;
       proxy_set_header X-Real-IP $remote_addr;
       proxy_set_header X-Forwarded-For $proxy_add_x_forwarded_for;
       proxy_set_header X-Forwarded-Proto $scheme;
    }
    
    • proxy_set_header Host $host:將客戶端的 Host Header 傳遞給後端,確保後端能正確識別請求的 Host。
    • proxy_set_header X-Real-IP $remote_addr:將客戶端的真實 IP 傳遞給後端,方便後端記錄來源 IP。
    • proxy_set_header X-Forwarded-For $proxy_add_x_forwarded_for:記錄所有經過的代理伺服器 IP,形成完整的請求路徑。
    • proxy_set_header X-Forwarded-Proto $scheme:傳遞請求的協定(HTTP 或 HTTPS),後端可根據此資訊進行處理。
  2. 設定監聽的 Port

     1
     2
     3
     4
     5
     6
     7
     8
     9
    10
    11
    
    server {
       listen 8080;
       listen [::]:8080;
    
       server_name example.com;
    
       location / {
          root /usr/share/nginx/html;
          index index.html;
       }
    }
    
    • listen 8080:設定伺服器監聽的埠號為 8080,適合用於非預設 HTTP 埠號的服務。
    • listen [::]:8080:支援 IPv6 的監聽設定。
    • 應用場景:當伺服器需要提供多個服務時,可以使用不同的埠號來區分,例如:
      • 80:靜態網站
      • 8080:測試環境
      • 8443:HTTPS 測試環境
  3. 設定靜態檔案服務

1
2
3
4
location /static/ {
    root /var/www/myapp;
    autoindex on;
}
  • root /var/www/myapp:指定靜態檔案的根目錄。
  • autoindex on:開啟目錄瀏覽功能,當目錄中沒有 index.html 時,會顯示目錄列表。
  • 應用場景:適合用於提供靜態資源(如圖片、CSS、JS)的服務。
  1. 設定 Gzip 壓縮

    1
    2
    3
    4
    5
    
    http {
       gzip on;
       gzip_types text/plain text/css application/json application/javascript text/xml application/xml+rss text/javascript;
       gzip_min_length 1024;
    }
    
    • gzip on:啟用 Gzip 壓縮,減少傳輸的資料量。
    • gzip_types:指定需要壓縮的檔案類型。
    • gzip_min_length 1024:設定最小壓縮大小,避免小檔案壓縮後反而增加負擔。
    • 應用場景:適合用於提升網站性能,特別是對於靜態資源的傳輸。
  2. 設定錯誤頁面

    1
    2
    3
    4
    
    error_page 404 /custom_404.html;
    location = /custom_404.html {
       root /usr/share/nginx/html;
    }
    
    • error_page 404 /custom_404.html:當發生 404 錯誤時,返回自訂的錯誤頁面。
    • 應用場景:提升用戶體驗,提供友好的錯誤提示。
  3. 設定負載平衡

     1
     2
     3
     4
     5
     6
     7
     8
     9
    10
    
    upstream backend {
       server backend1.example.com;
       server backend2.example.com;
    }
    
    server {
       location / {
          proxy_pass http://backend;
       }
    }
    
    • upstream:定義後端伺服器群組。
    • proxy_pass http://backend:將請求分發到後端伺服器群組。
    • 應用場景:適合用於高流量網站,分散請求到多台伺服器。
  4. 設定 WebSocket 支援

     1
     2
     3
     4
     5
     6
     7
     8
     9
    10
    11
    12
    
    location /ws/ {
       proxy_pass http://127.0.0.1:9000;
    
       # 保留 WebSocket 必要的 Header
       proxy_http_version 1.1;
       proxy_set_header Upgrade $http_upgrade;
       proxy_set_header Connection "upgrade";
    
       # 設定超時時間
       proxy_read_timeout 60s;
       proxy_send_timeout 60s;
    }
    
    • proxy_http_version 1.1:WebSocket 需要使用 HTTP/1.1 協定。
    • proxy_set_header Upgrade $http_upgrade:將 Upgrade Header 傳遞給後端,告知伺服器升級為 WebSocket 連線。
    • proxy_set_header Connection "upgrade":指定連線類型為升級。
    • proxy_read_timeoutproxy_send_timeout:設定讀取與傳送的超時時間,避免長時間未回應導致連線中斷。
    • 應用場景:適合用於即時應用,例如聊天室、即時通知等。

    注意事項

    • 確保後端服務支援 WebSocket 並正確處理升級請求。
    • 若使用 HTTPS,需確保 WebSocket 連線使用 wss:// 協定。

綜合實作

本次實作將模擬一個完整的前後端專案架構,並在 GitHub Codespaces 上部署:

  1. 靜態檔案服務:使用 Nginx 提供 React App 的 HTML、CSS、JS。

  2. API 反向代理:將 /api 開頭的 HTTP 請求轉發到後端 FastAPI。

功能項目

  1. 靜態檔案服務

    • Nginx 直接提供 frontend/dist 目錄下的靜態檔案。
  2. API 反向代理

    • GET /api/health:回傳後端健康狀態。
    • GET /api/greet?name=…:示範帶參數的 GET 請求。
    • POST /api/post:示範接收 JSON 的 POST 請求。

環境準備

  1. 開啟 Codespace

    • 點擊此 GitHub Repo 連結。
    • 在 GitHub Repo 頁面點擊 「Code」→「Codespaces」→「Create codespace on main」
    • 等待 Codespace 環境建立完成。
  2. 建置前端並啟動後端服務

    打開 Codespace 的 Terminal,依序執行以下指令:

    1
    2
    3
    4
    5
    6
    
    cd frontend
    npm install
    npm run build
    cd ..
    
    nohup uvicorn backend.app.main:app --host 0.0.0.0 --port 8000 --reload > /dev/null 2>&1 &
    
    • 前端會被建置到 /workspaces/nginx-tutorial/frontend/dist
    • 後端使用 uvicorn 啟動 FastAPI Server。
  3. Nginx 設定

    打開 nginx/default.conf,修改以下 TODO 處的設定

     1
     2
     3
     4
     5
     6
     7
     8
     9
    10
    11
    12
    13
    14
    15
    16
    
    server {
        listen 80 default_server;
        listen [::]:80 default_server;
    
        server_name _;
    
        # TODO: 填寫靜態檔案服務設定
        location / {
    
        }
    
        # TODO: 填寫 REST API 反向代理設定
        location /api/ {
    
        }
    }
    
    • 修改重點
      • location /:設定 root 指向靜態檔案資料夾,並用 try_files 支援前端路由。
      • location /api/:透過 proxy_pass 將請求轉發至 FastAPI。
  4. 重載 Nginx 設定

    完成設定後,執行以下指令:

    1
    2
    3
    4
    
    sudo ln -sf /workspaces/nginx-tutorial/nginx/default.conf /etc/nginx/sites-enabled/default
    sudo nginx -t
    sudo service nginx start
    # sudo service nginx restart
    

驗證流程

  1. 在 VS Code 的「Ports」分頁找到 80 Port 對應的 Forwarded Address。

  2. 開啟網址(通常是 https://<codespace-name>-80.app.github.dev/)。

  3. 功能測試

    • Health Check 應顯示 OK。
    • 測試 GET /api/greet
    • 測試 POST /api/post
comments powered by Disqus
使用 Hugo 建立
主題 StackJimmy 設計