- All commands enclosed in
<>within the article need to be replaced. If not otherwise specified, you can name them as you see fit. - For any further questions, feel free to leave a comment below the article or email for inquiries
Hugo
Hugo is a static site generator developed in Go, touted as the world’s fastest site-building tool. Apart from its high speed, Hugo offers a variety of themes and supports real-time rendering and multilingual switching, enhancing both the writing and website setup experience. Below is a table comparing Hugo and Hexo, two popular static site generators:
| Feature | Hugo | Hexo |
|---|---|---|
| Language | Go | Node.js |
| Speed | Very fast | Moderate |
| Themes/Plugins | Large library | Extensive ecosystem |
| Content Formats | Markdown, HTML, etc. | Markdown, HTML, etc. |
| Learning Curve | Moderate | Beginner-friendly |
| Dependencies | None | Node.js |
| SEO | Built-in support | Plugins available |
| Multilingual Support | Yes | Yes |
Installing Hugo
Since Hugo does not have a GUI, it needs to be installed via the command line. Here are the installation methods provided by Hugo for different operating systems:
- Windows
1choco install hugo-extended - macOS
1brew install hugo - Linux
After installing, use the following command to test if Hugo was installed successfully:
1sudo snap install hugo
|
|
Install Git
Download and install from the Git official website.
Initialize Environment
Choose the folder where the webpage will be stored, and enter the following command to create a new webpage:
|
|
After completion, the following files will be generated in the <site_name> folder:
|
|
To easily push to GitHub, let’s first enter the folder that was just created and initialize the entire Git repository:
|
|
Choose a Theme
In Hugo Themes, there are many types of themes available for personal preference. Here, I choose the Stack theme as an example.
!stack
-
Open the terminal in the root directory of the site and use
git submoduleto download the theme to thethemesfolder:1git submodule add https://github.com/CaiJimmy/hugo-theme-stack/ themes/hugo-theme-stack -
Delete the
hugo.tomlfile and copy theconfig.yamlfromthemes/hugo-theme-stackto the root directory, adding the following content at the top of this file:1 2 3 4 5 6baseurl: https://example.com languageCode: en-us theme: hugo-theme-stack pagination: pagerSize: 5 title: <blog_title> -
Other settings can be modified according to personal preference by referring to the official Stack Config:
-
Website icon setting
Placefavicon.icoin thestaticfolder and modify the following inconfig.yaml:1 2params: favicon: favicon.ico -
Sidebar setting
- Place your avatar
avatar.webpin theassets/imgfolder (create if it doesn’t exist) and modify the following inconfig.yaml:1 2 3 4 5 6 7 8 9params: sidebar: compact: false emoji: subtitle: <subtitle> avatar: enabled: true local: true src: img/avatar.webp - You can add links under the subtitle to direct to your GitHub or other websites by adding the following at the bottom of
config.yaml:1 2 3 4 5 6 7menu: social: - identifier: github name: GitHub url: <github_link> params: icon: brand-github - To add navigation, refer to the file content and structure in
themes/hugo-theme-stack/exampleSite. After modification, the file structure in thecontentfolder will look like this:1 2 3 4 5 6 7 8 9 10 11 12├── _index.md ├── categories ├── page │ ├── about │ │ └── index.md │ ├── archives │ │ └── index.md │ ├── links │ │ └── index.md │ └── search │ └── index.md └── post
- Place your avatar
-
Article setting
Modify the following inconfig.yamlto support LaTeX in articles, and add table of contents, reading time, default CC license, etc.:1 2 3 4 5 6 7 8params: article: math: true toc: true readingTime: true license: enabled: true default: CC BY-NC-SA 4.0 -
Comment setting
-
Create a new account on Disqus and a new site, then find the shortname in the settings.
-
Modify the following in
config.yamlto add comment functionality (replace<shortname>with the shortname from Disqus settings):1 2 3 4 5 6 7 8 9 10 11 12disqusShortname: <shortname> params: comments: enabled: true provider: disqus disqusjs: shortname: <shortname> apiUrl: apiKey: admin: adminLabel:
-
-
Widget setting
Modify the following inconfig.yamlto display search, table of contents, etc., in the homepage and articles:1 2 3 4 5 6 7 8 9 10 11 12 13params: widgets: homepage: - type: search - type: categories params: limit: 10 - type: tag-cloud params: limit: 10 page: - type: search - type: toc
-
Writing Articles
Hugo requires using Markdown syntax for writing articles. The method here is to create a folder for each article for easy organization.
-
In the
content/postfolder, create a new folder named after the new article (preferably in English, with no spaces between words). -
Add an
index.mdfile in the folder. The file structure in thecontent/postfolder will look like this:1 2 3 4├── myPost │ └── index.md └── myPost2 └── index.md -
Use a text editor like Visual Studio Code to edit
index.md. Below is the basic file content (except for the article property structure, which can be modified):1 2 3 4 5 6 7 8 9 10 11 12 13 14--- title: myPost slug: my-post date: 2024-05-20 description: My first post categories: - Blog tags: - First --- ## Hugo Blog content
Preview Hugo Website
Use the built-in web page live preview feature to understand the current content of the web page.
- Enter the following command in the terminal:
1hugo server -D - If there are no errors on the web page, the terminal will display the following content:
1 2 3 4Serving pages from disk Running in Fast Render Mode. For full rebuilds on change: hugo server --disableFastRender Web Server is available at http://localhost:1313/ (bind address 127.0.0.1) Press Ctrl+C to stop - Connect to
http://localhost:1313/in the browser to preview the current web page.
Push to GitHub
For the subsequent web deployment, it is necessary to push the web pages generated just now to GitHub, with the specific steps as follows:
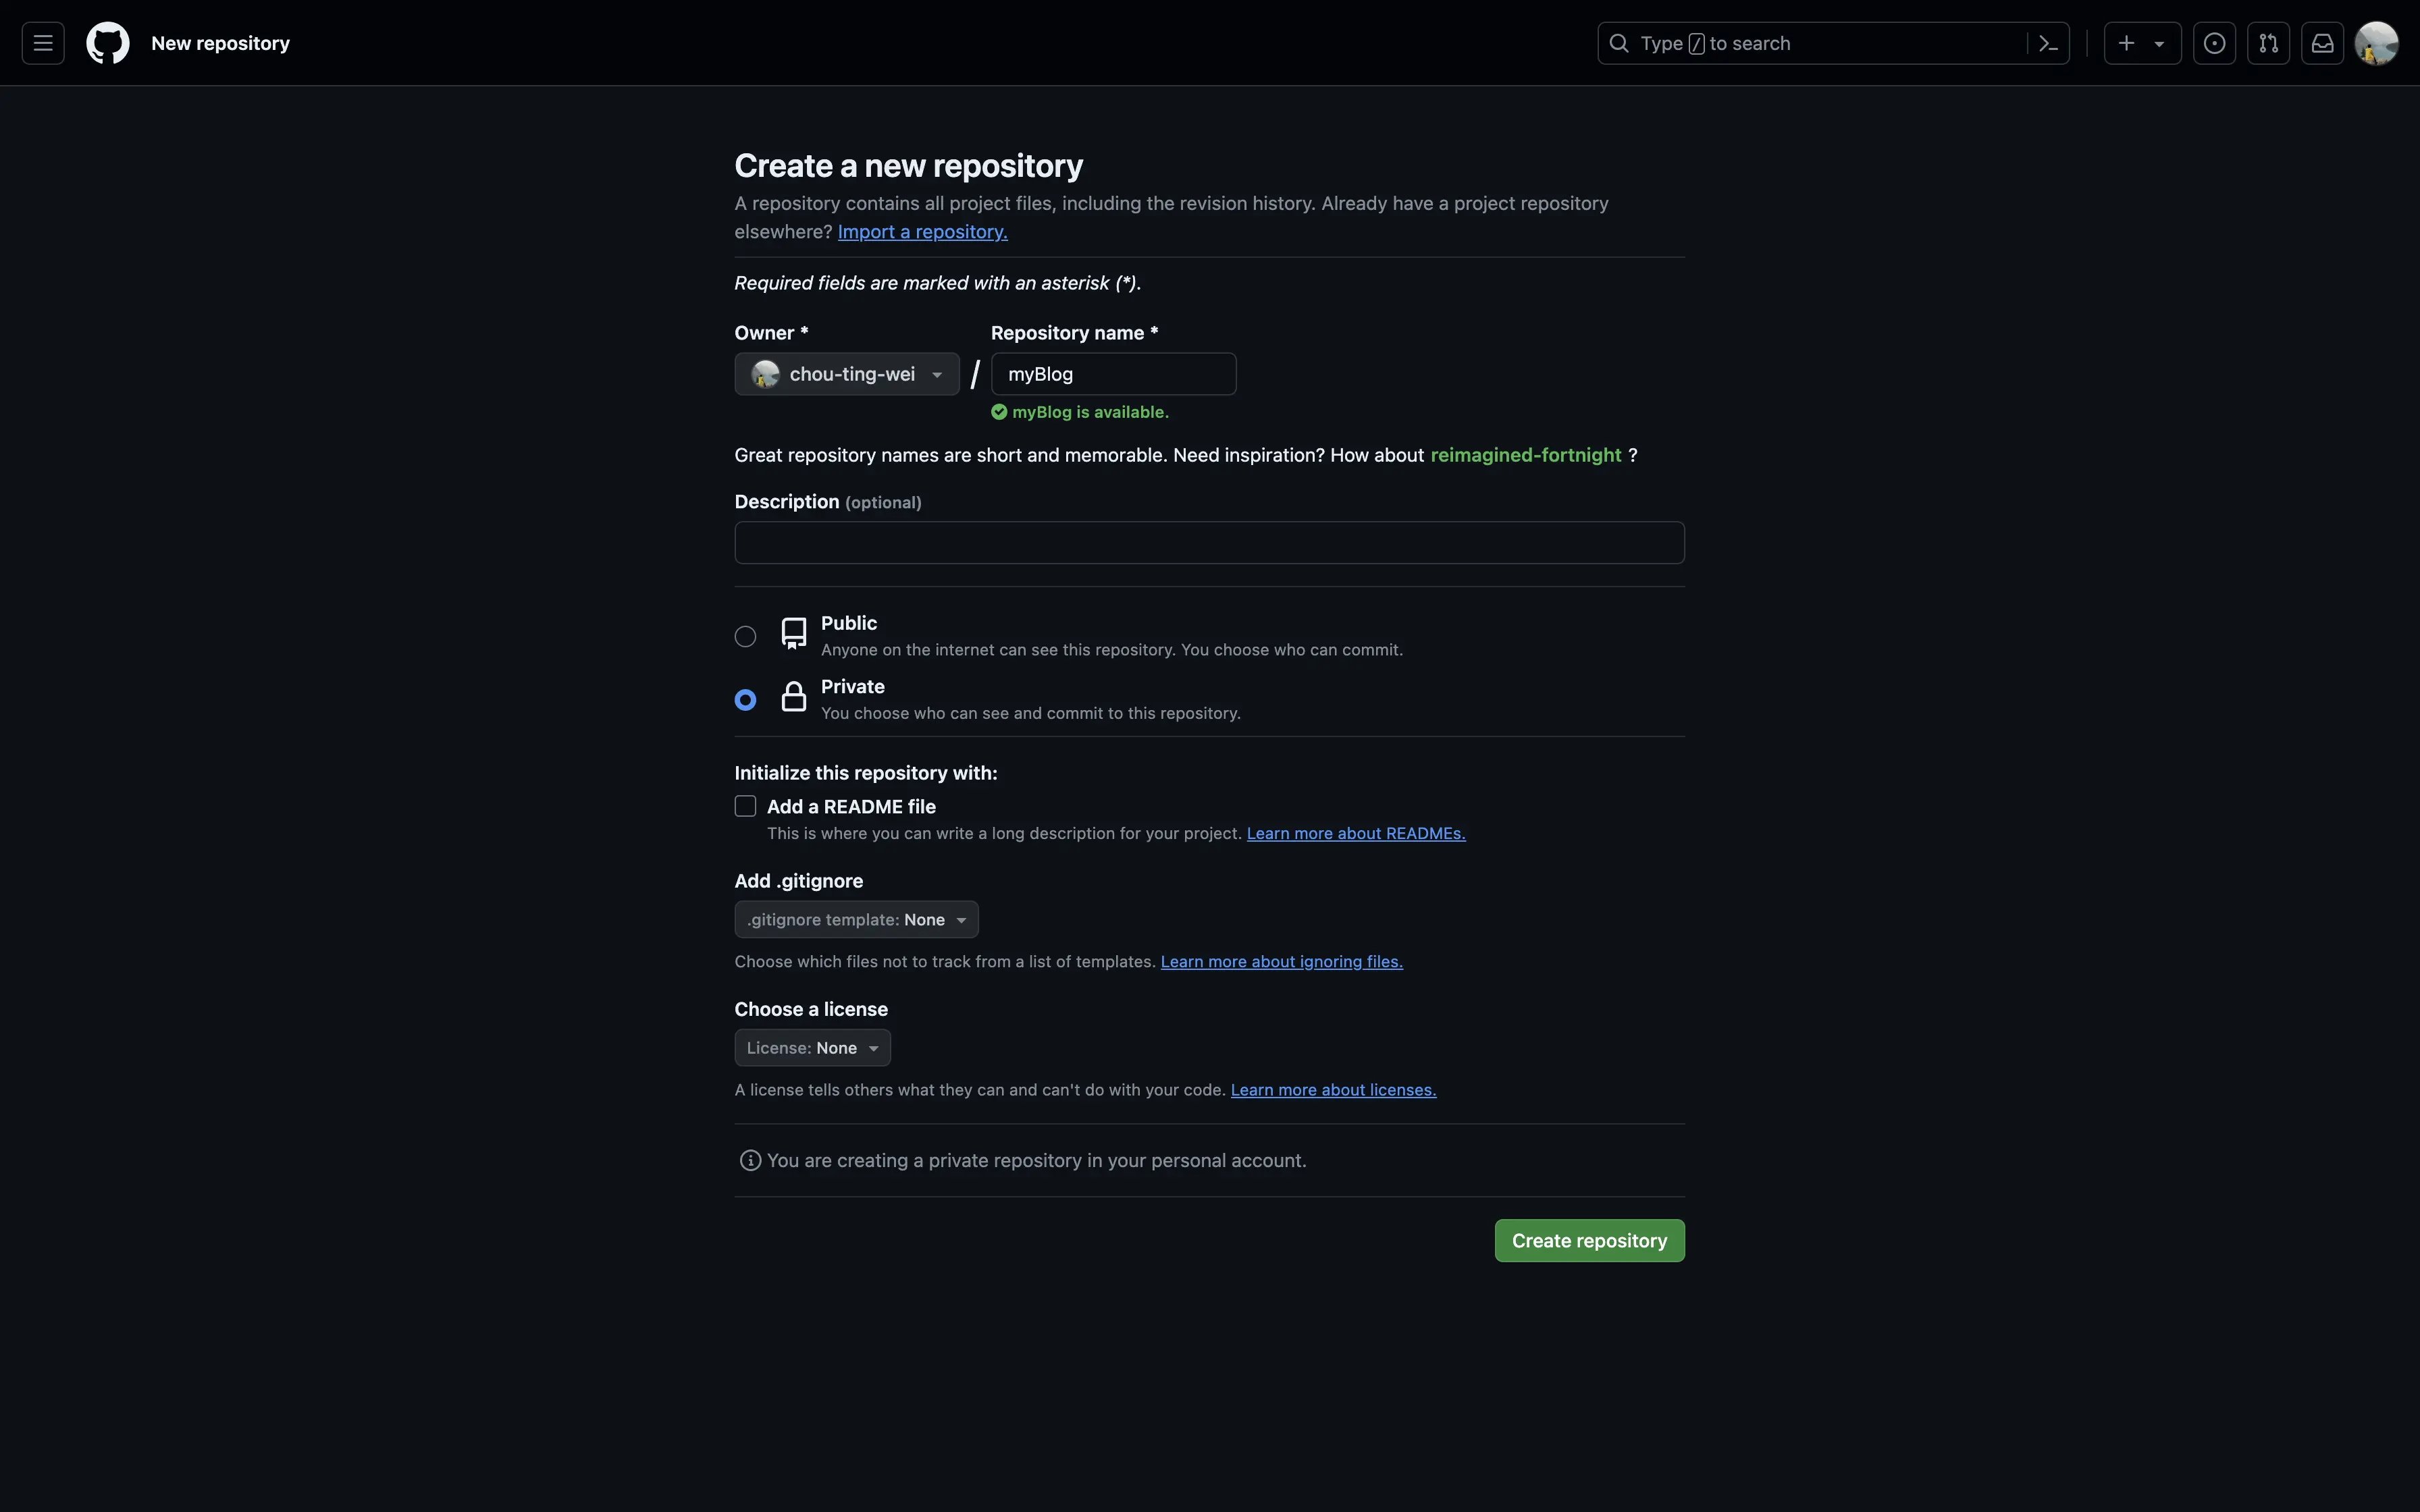
- Create a new repository on GitHub and set the permission to Private, leaving the rest of the settings unchanged.
- Create a
.gitignorefile in the root directory, with the following content:1 2 3 4public resources assets/jsconfig.json .hugo_build.lock - Copy the repository URL
https://github.com/xxx/xxx.gitfrom the page, and execute the following commands in the root directory (replace<repo_link>with the repository URL) to push all files to the GitHub repository:1 2 3 4 5git add . git commit -m "first commit" git branch -M main git remote add origin <repo_link> git push -u origin main
Vercel
Vercel is a web hosting service platform, similar to GitHub Pages but more powerful and faster. Additionally, Vercel can automatically deploy new web pages with new Git pushes and offers 100GB of free traffic per month, which is a great boon for small website setups. Below is a table comparing several common web hosting platforms:
| Feature | Vercel | Netlify | GitHub Pages |
|---|---|---|---|
| Optimized for | Next.js applications | Static sites | Static sites |
| Deploys from | GitHub, GitLab, Bitbucket | GitHub, GitLab, Bitbucket | GitHub only |
| Build Times | Very fast | Fast | Slow |
| Bandwidth Limit | 100GB/month (free plan) | 100GB/month (free plan) | Unlimited |
| Uptime Guarantee | 99.99% | 99.99% | None |
| Analytics | Built-in | Built-in | None |
Deploy Website
- Log in to Vercel’s official website with GitHub.
- Select
Add New >> Project, and choose the Git Repository you just set up from the list on the left. - Set
Framework PresettoHugo, and click to expandEnvironment Variablesto addHUGO_VERSIONwith the version used locally (can be checked with thehugo versioncommand):
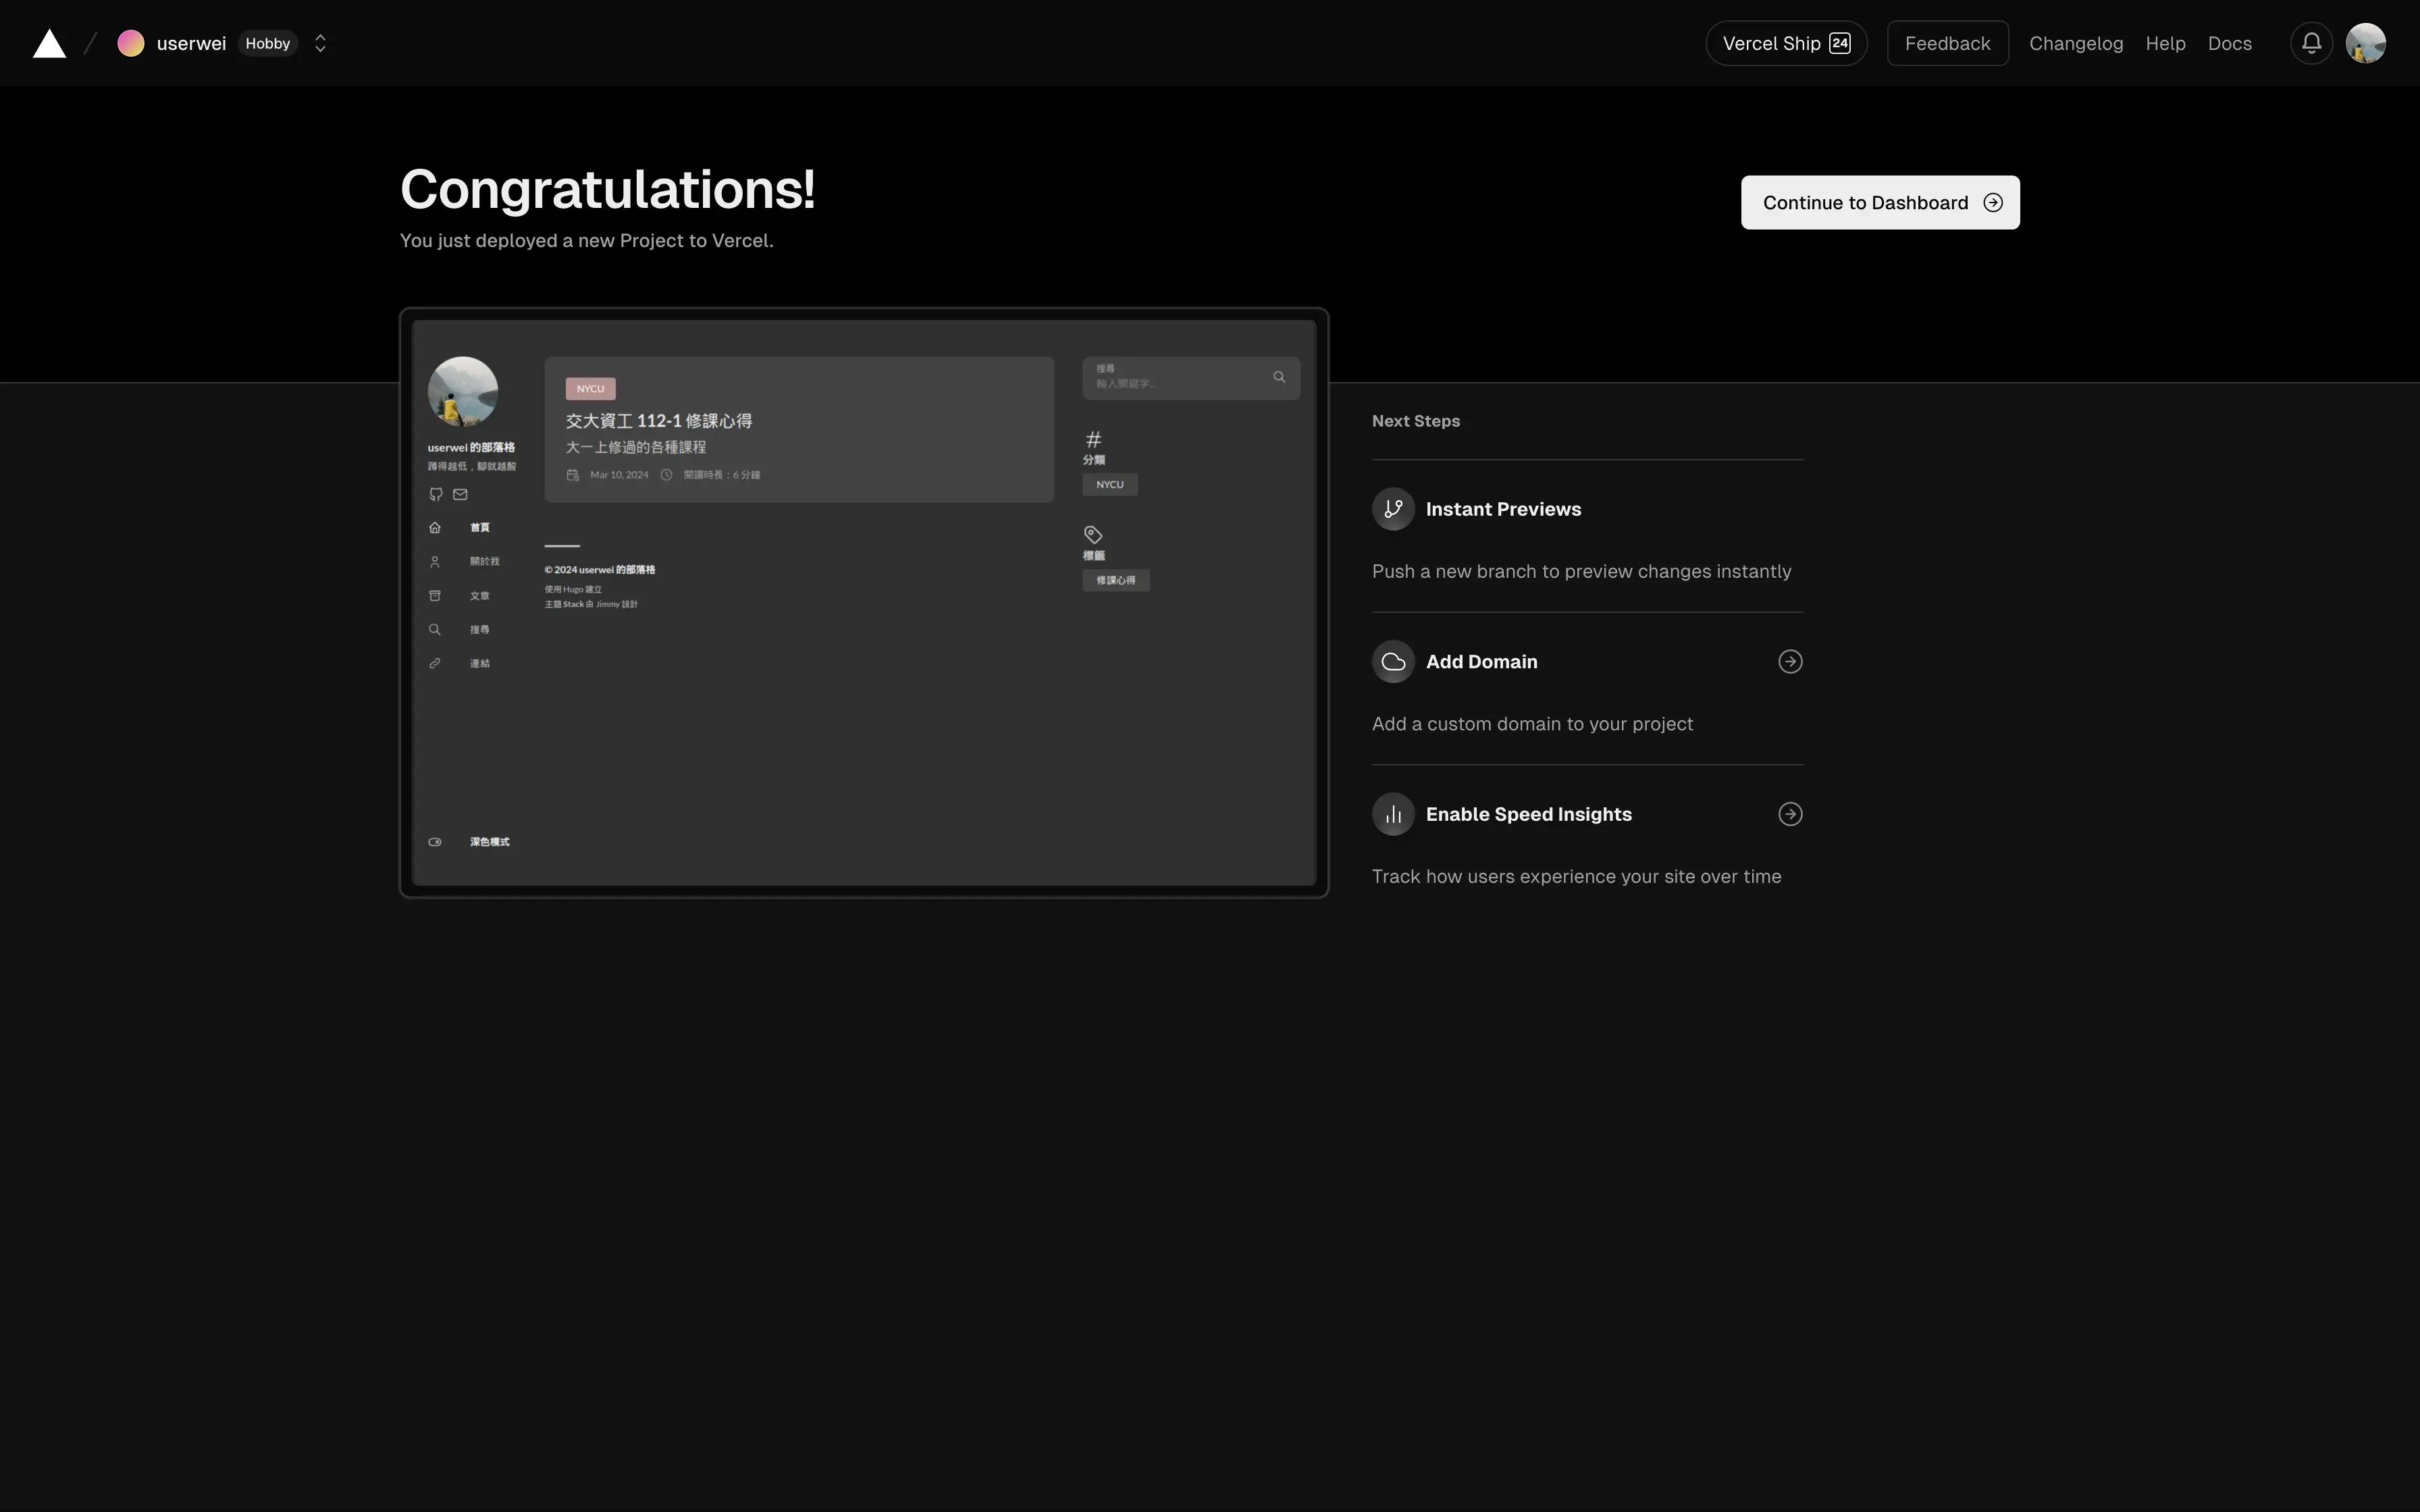
- If you see the following screen, the website deployment is complete.
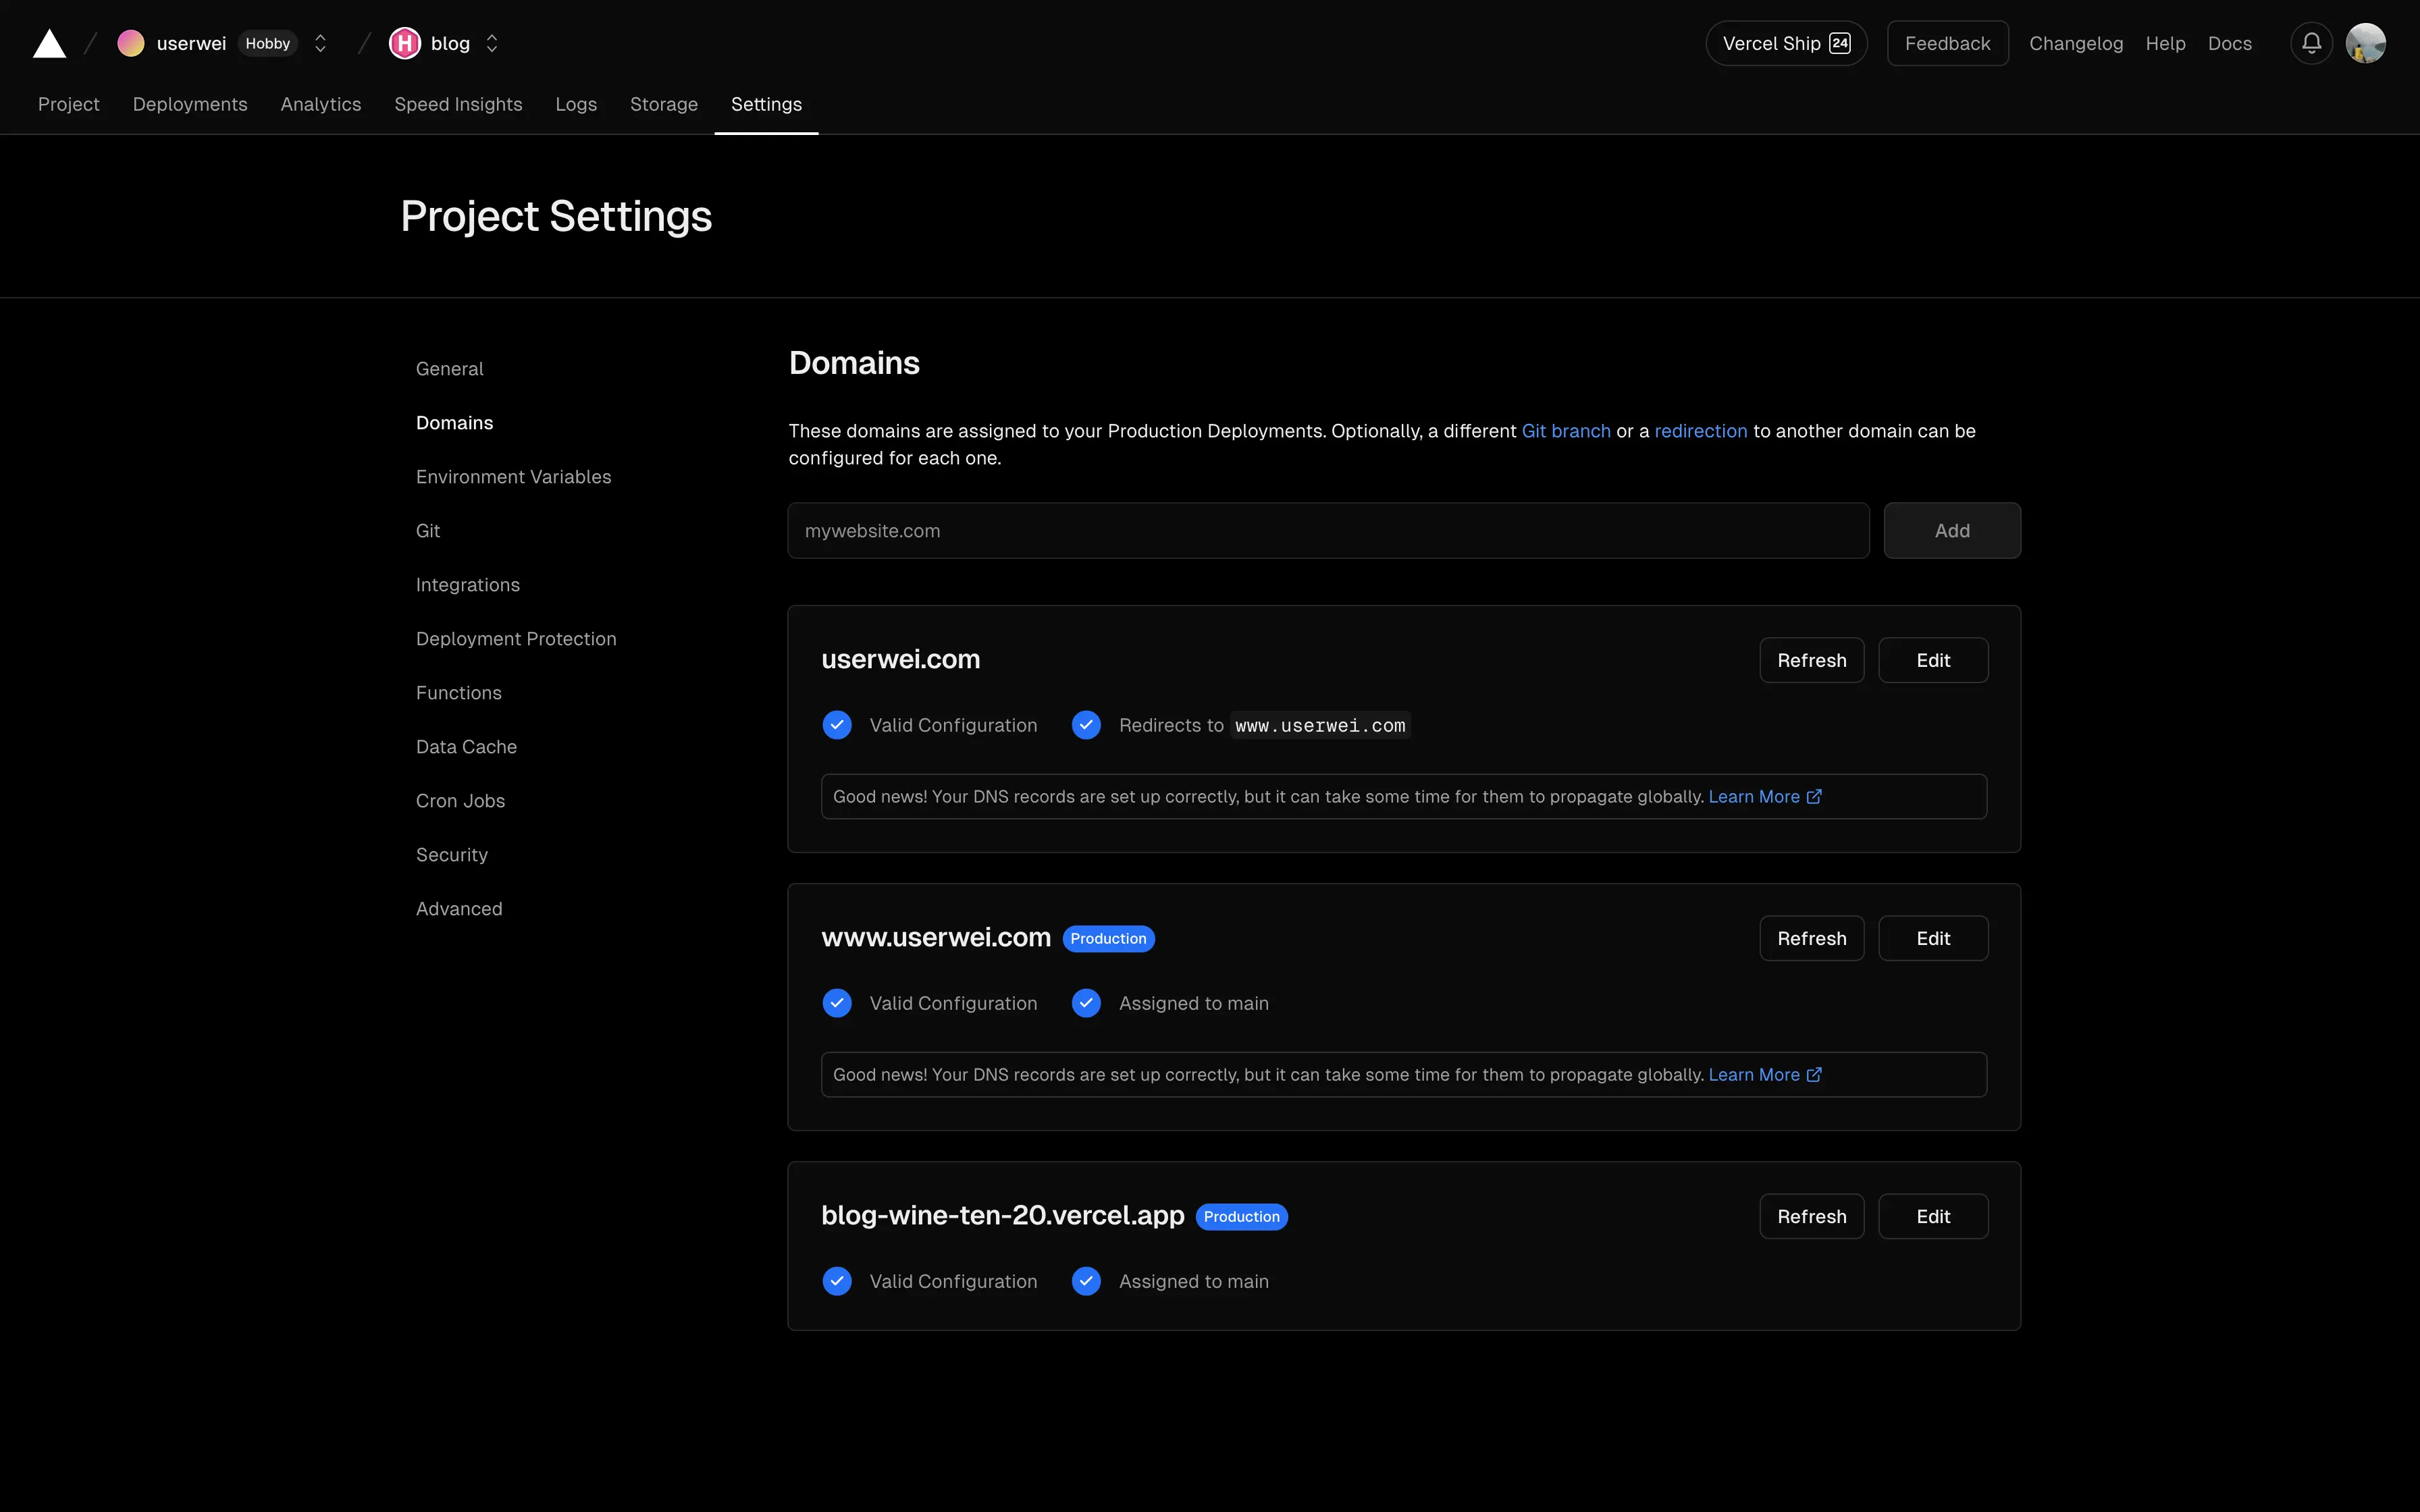
Link Domain
In the backend, you can see that Vercel provides a xxx.vercel.app URL for the newly deployed web page. If you want to change it to another custom URL, you need to obtain and link the domain yourself.
- Obtain a domain from domain registrars like Cloudflare, Namecheap or GoDaddy.
- Change the
baseurlinconfig.yamlto the obtained domainhttps://www.xxx.com:1baseurl: <domain_name> - Go to
Settings >> Domainsin the backend and add the obtained domain, choosing the recommended method of addition. After adding, the following screen will be displayed: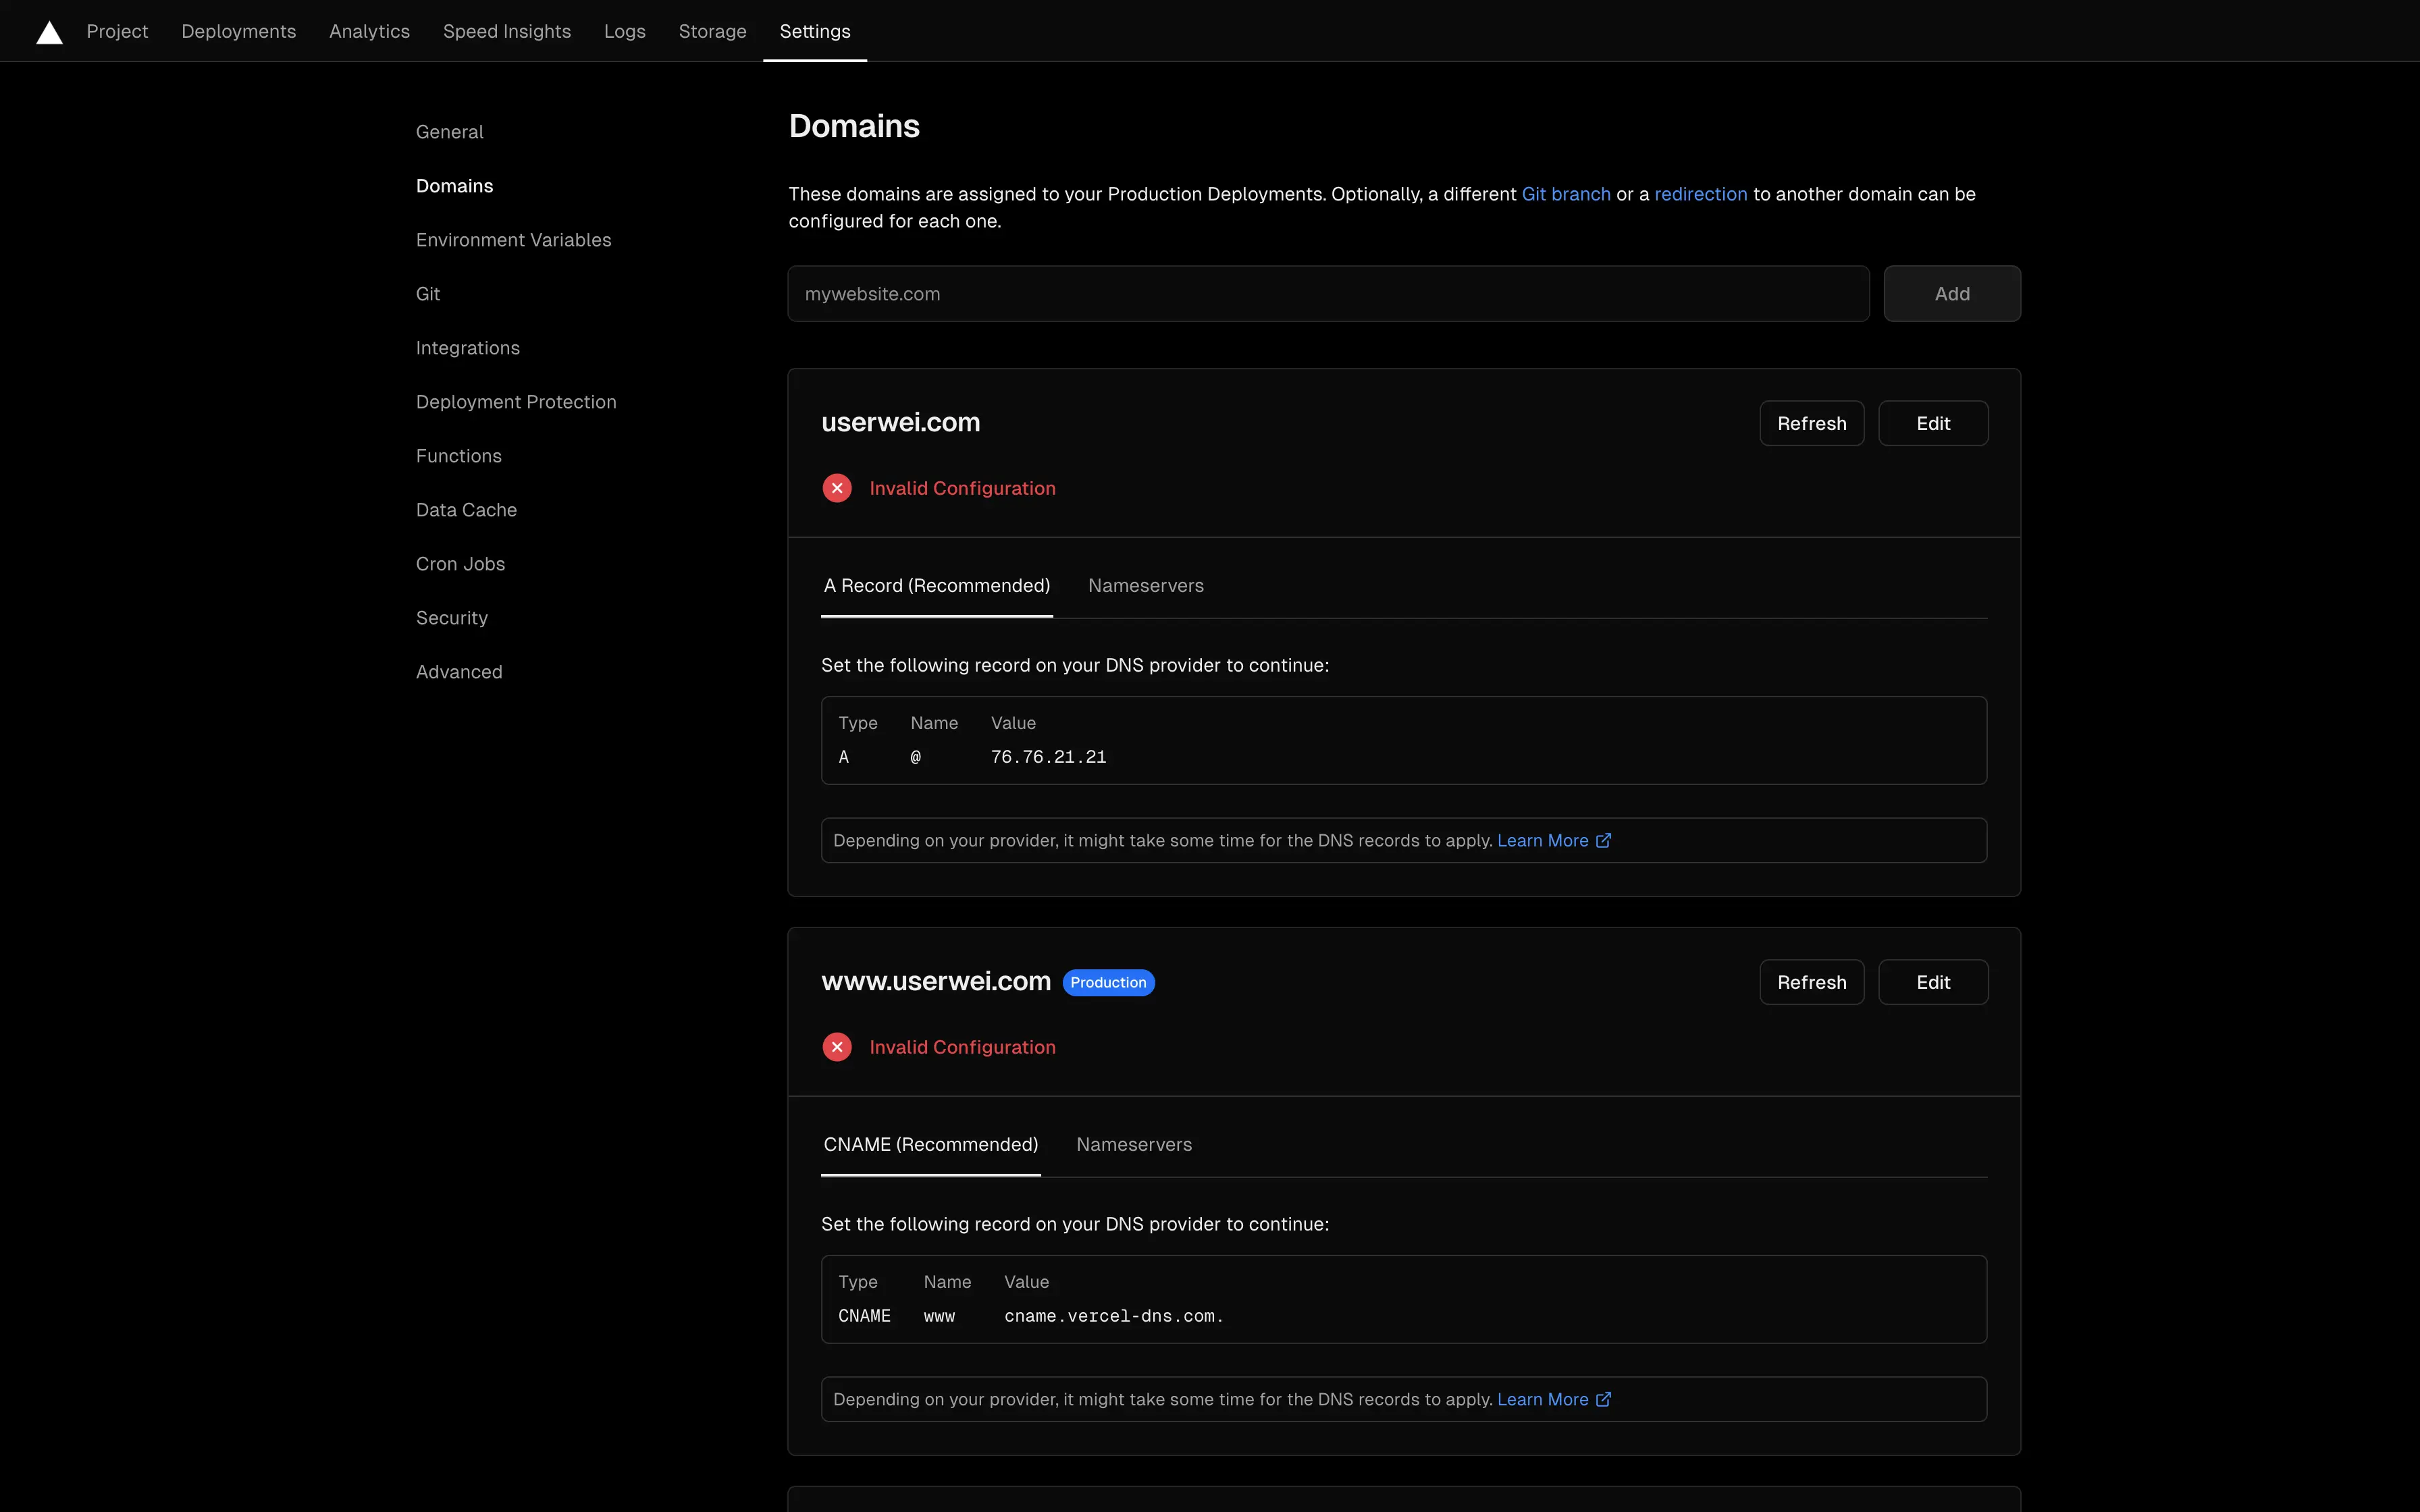
- Follow the instructions to set up DNS with the domain registrar:
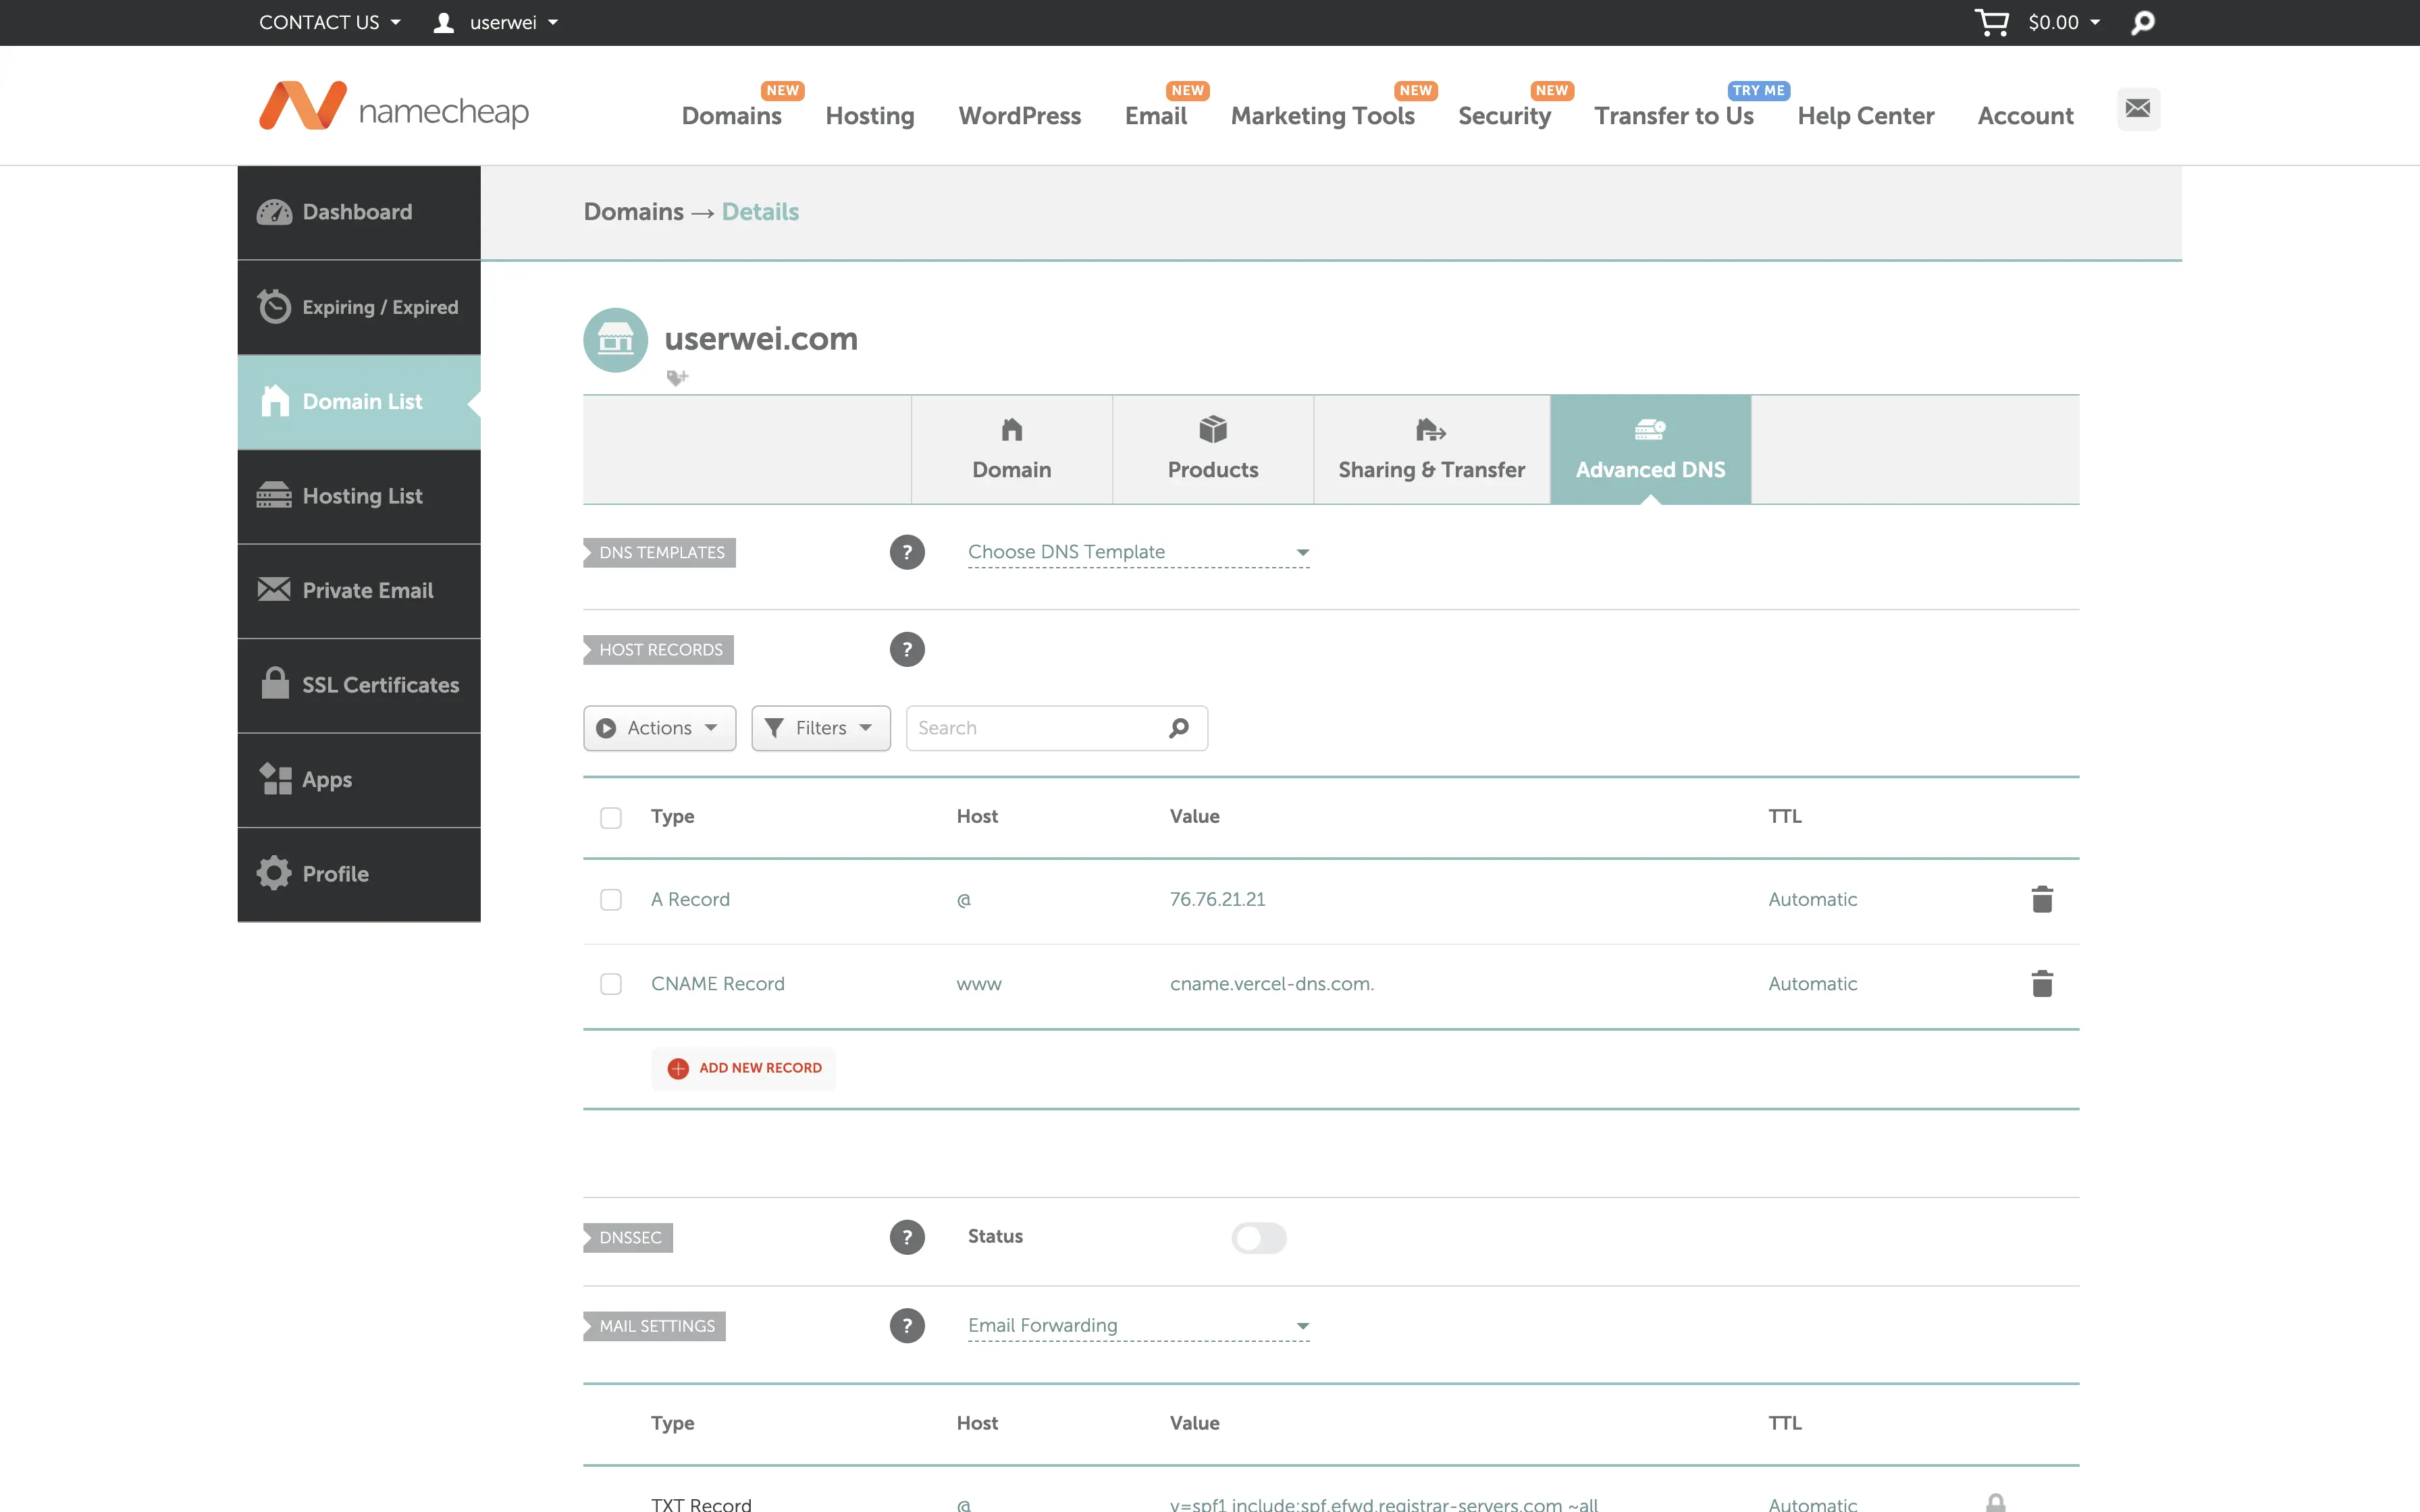
- After refreshing the backend, seeing that the domain settings are successfully configured completes the setup:
Web Analytics Setup
In the Vercel backend’s navigation bar, you can find options for Analytics and Speed Insights, which can be used to understand the current performance of the web page.
- Agree to use these two web analytics in the backend, and you will see several pieces of code that need to be added to your own web page.
- Add a
_defaultfolder in thelayoutsdirectory. - Copy
baseof.htmlfromthemes/hugo-theme-stack/layouts/_defaultto the newly addedlayouts/_defaultfolder, with the following structure:1 2 3└── layouts └── _default └── baseof.html - Add the following code in the
<body>section ofbaseof.html:1 2 3 4 5 6 7 8 9 10 11 12 13 14 15 16<script> window.si = window.si || function () { (window.siq = window.siq || []).push(arguments); }; </script> <script defer src="/_vercel/speed-insights/script.js"></script> <script> window.va = window.va || function () { (window.vaq = window.vaq || []).push(arguments); }; </script> <script defer src="/_vercel/insights/script.js"></script>⚠️Caution: Do not replace
<>in this part. - Push the updated website to GitHub, and refresh the Vercel backend to view web analytics.
Google Search Console
Google Search Console is an SEO tool developed by Google that provides website owners with information on indexing status, search traffic, etc., to optimize the search ranking of web pages.
Add Web Property
- After logging into Google Search Console, choose to add a property and enter the domain you obtained:
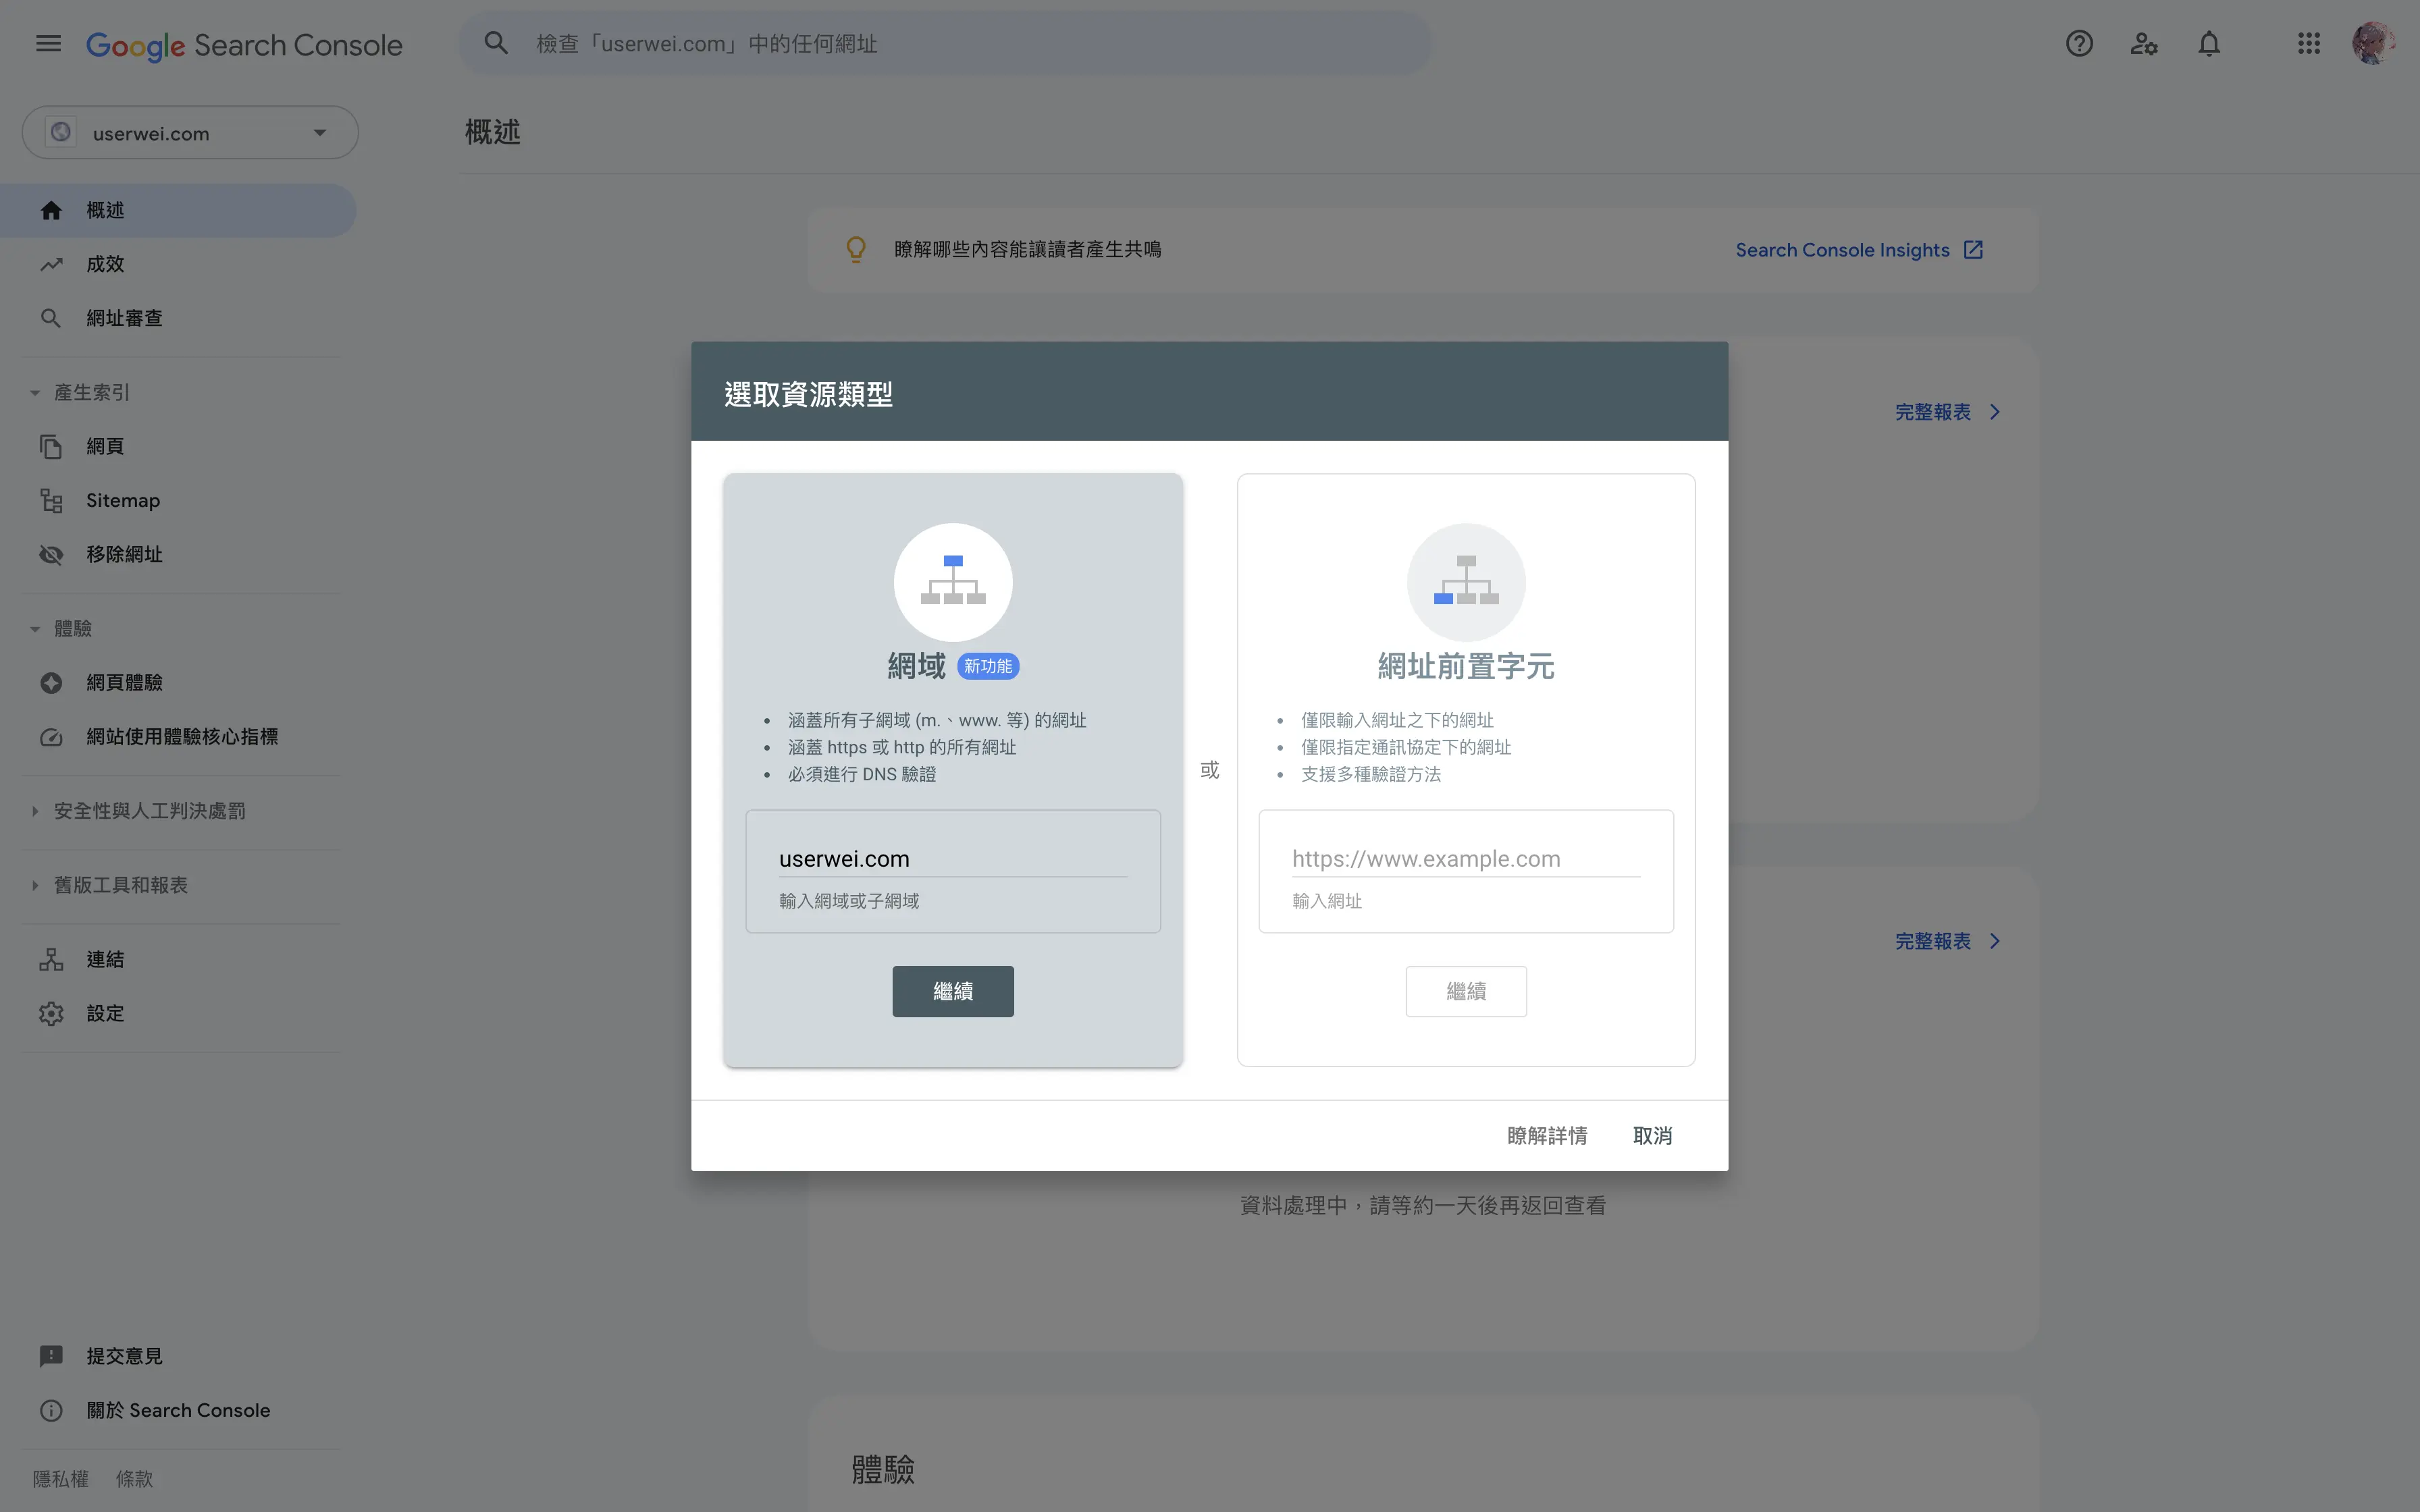
- Add the verification code
google-site-verification=xxxprovided by Google to the DNS of the domain registrar: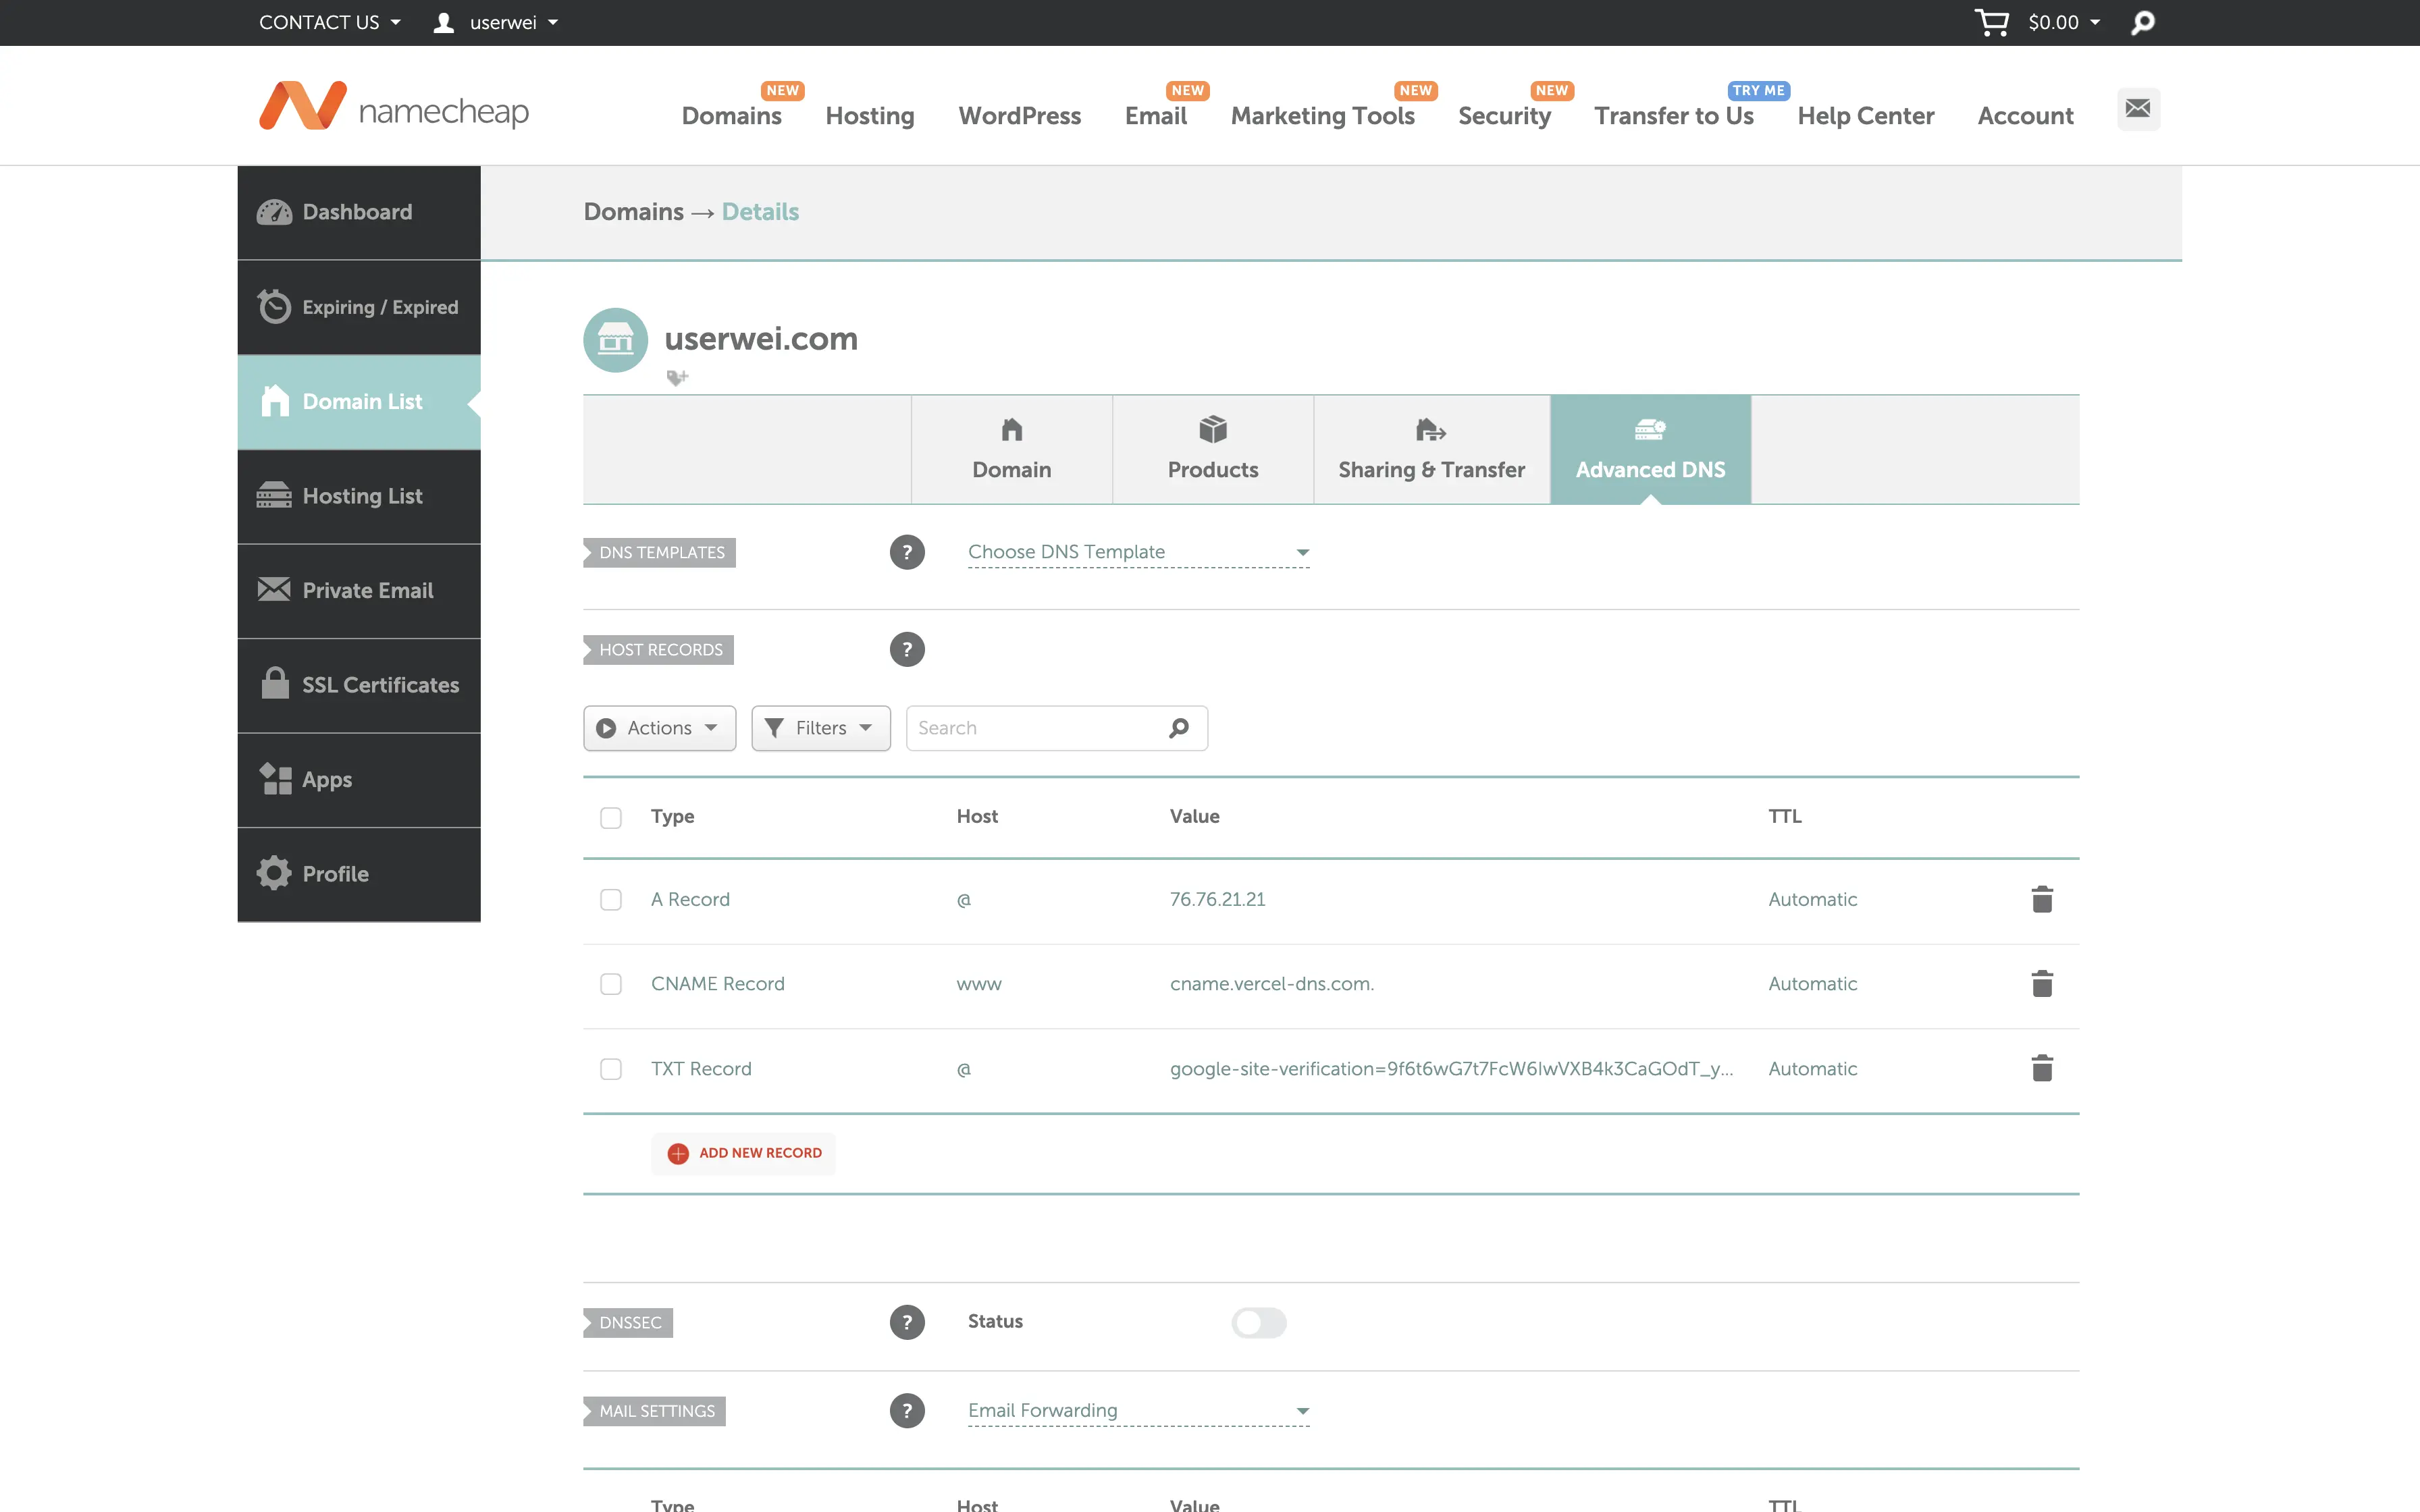
- Wait for the ownership verification to succeed before using.
Sitemap Settings
A Sitemap is a type of web navigation file that records all web page links and structures, allowing search engines to quickly understand the content structure of the website. The most widely used is the XML Sitemap.
- Add the following settings in
config.yamlto automatically generatesitemap.xml:1 2 3 4 5sitemap: changeFreq: "" disable: false filename: sitemap.xml priority: -1 - Push the updated website to GitHub and wait for Vercel to rebuild the web page.
- In the Google Search Console backend sidebar, select
Sitemapand addhttps://www.xxx.com/sitemap.xml. - After submission, if the status shows success, the setup is complete.
Robots.txt Configuration
Robots.txt is a set of instructions provided to robots, primarily used to manage the activities of web crawlers. It can inform search engine bots about which URLs on a website can be accessed.
-
In the
staticfolder, create arobots.txtfile with the following content:1 2 3 4User-agent: * Disallow: Sitemap: https://example.com/sitemap.xml -
The
Disallowsection can be customized according to individual needs. Here are a few examples:1 2 3Disallow: /page/ Disallow: /page/search/ Disallow: /categories/ -
Wait for Google Search Console to automatically crawl the site. You can check the status in
Settings >> robots.txt. If it shows as fetched, the configuration is complete.